Weathering Rolling Stock, a Continous thread

ModelRailroadForums.com is a free Model Railroad Discussion Forum and photo gallery. We cover all scales and sizes of model railroads. Online since 2002, it's one of the oldest and largest model railroad forums on the web. Whether you're a master model railroader or just getting started, you'll find something of interest here.


Status
Not open for further replies.
Weathering these old timers has finally been completed. All the photographs of freight cars of this era, taken contemporarily, show little weathering. My layout is 1900-1940 so I am not wrecking these but trying to make them realistic. Several posts back I have photos of the early part of the process. Last night I took a few hours and added a white wash and some brown wash around the edges.

apply wash 1.JPG


I previously sprayed them with a clear coat. Now i am applying a wash of water and alcohol with some white paint added. Also using some brown acrylic wash with a separate smaller brush. I am also trying to remove any bubble that shows up before they dry, to prevent those sharp edges

old timers completed.JPG


Above I have everything put together and on the track. I believe they are adequately dulled down , in other words I am ok with them. I will consider these "done"

weathered old timers.JPG


There is subtle brown lowlights towards the bottom of the cars and around the doors. Not easy to pick out but I believe they add some realism in my mind. All of these are Roundhouse cars except the Northern Pacific one in the center is Athearn, I believe.

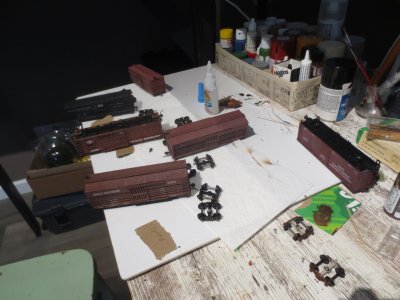
Tom - I want to thank you for the idea of the assembly line method. Next time I do weathering it will be 6 cars at a time again!

Dave LASM
 

Attachments

  • assembly line weathering.JPG
    assembly line weathering.JPG
    419.4 KB · Views: 309
Weathering these old timers has finally been completed. All the photographs of freight cars of this era, taken contemporarily, show little weathering. My layout is 1900-1940 so I am not wrecking these but trying to make them realistic. Several posts back I have photos of the early part of the process. Last night I took a few hours and added a white wash and some brown wash around the edges.

View attachment 187747

I previously sprayed them with a clear coat. Now i am applying a wash of water and alcohol with some white paint added. Also using some brown acrylic wash with a separate smaller brush. I am also trying to remove any bubble that shows up before they dry, to prevent those sharp edges

View attachment 187749

Above I have everything put together and on the track. I believe they are adequately dulled down , in other words I am ok with them. I will consider these "done"

View attachment 187750

There is subtle brown lowlights towards the bottom of the cars and around the doors. Not easy to pick out but I believe they add some realism in my mind. All of these are Roundhouse cars except the Northern Pacific one in the center is Athearn, I believe.

Tom - I want to thank you for the idea of the assembly line method. Next time I do weathering it will be 6 cars at a time again!

Dave LASM
You’re welcome but of course it’s not an original idea from me. But it works fairly well for me and glad it’s being tried by you.

The cars look good. Used but not abused and with era appropriate weathering.
 
Last edited:


Nice to see several pieces of CNW rolling stock still running around in original paint.
There is a lot to see in the video. I knew when the 2 CNW hoppers were the 1st 2 focused cars it was going to be a good one. It was sent to me by a FB “friend” who I have done some weathering commissions on. Funny though it was sent to me to check out the coil cars as I put out a “in search of” message in a weathering group. The white out on the UP emblem on the coil car will be a must include! The tank cars also intrigued me as they seem similar to my weathering efforts but show the use of tagging and some graffiti. The helper engines were also interest.

The foreground track for those modelers and painters of track is a good one to use as inspiration.

One of the better videos for a bit of everything…
 
i know its not rolling stock, but it will soon serve rolling stock.
and its my first try with weathering.

i use the following:

- acrylic colors (waterbased)
- liquid pigments
- dry pigments

i will also add a graffiti to the wall.

sunday_001.jpg

any feedback or tipps and tricks are welcome!
 
i know its not rolling stock, but it will soon serve rolling stock.
and its my first try with weathering.

i use the following:

- acrylic colors (waterbased)
- liquid pigments
- dry pigments

i will also add a graffiti to the wall.

View attachment 189795

any feedback or tipps and tricks are welcome!
Rarely see a yellow building these days, but what is it, some kind of pre-fab, or a brick building, a few more fotos from another angle would help


hi @Smudge617 atm i dont have more pictures, the sidewalls are not yet weathered. The Building is from Walthers, this one
i was trying the "same" color like the one on the picture, but i know its to yellow. but i will try to tone it down with some more weathering and maybe a grey wash.

cheers
jay
Ok, I think I've got that one somewhere too, I think Beige might be closer, or use yellow mixed with white to give it a "lighter" look
 
I think Beige might be closer, or use yellow mixed with white to give it a "lighter" look
i added white, but maybe should have taken even more. will try to clean it and than maybe airbrush a more light version.
as iam writing this i guess i found my error. i mixed yellow with white, but i should have done the opposite xD white with small portion of yellow.

well i guess you never not learning :D
 
i added white, but maybe should have taken even more. will try to clean it and than maybe airbrush a more light version.
as iam writing this i guess i found my error. i mixed yellow with white, but i should have done the opposite xD white with small portion of yellow.

well i guess you never not learning :D
You could just fade it using white, but yellow is a strong colour not sure how many fades you would need, did you use primer on this first ?
 
If you go to the first few pages of this thread (if you haven't already) Tom gives some great advice on how to achieve great results
 
yes i did use primer. normally i always add primer. did learn it that way :D

will check out the first few pages, i think i did already but its never wrong to do it again :D
 
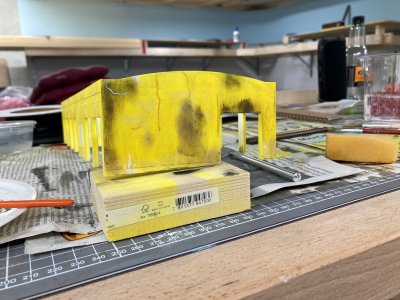
i know its not rolling stock, but it will soon serve rolling stock.
and its my first try with weathering.

i use the following:

- acrylic colors (waterbased)
- liquid pigments
- dry pigments

i will also add a graffiti to the wall.

View attachment 189795

any feedback or tipps and tricks are welcome!
Generally we don’t post pictures of structures in this thread but weathering is weathering. I have no issue with you posting it here!

I use pictures of structures to see the weathering patterns and colors on similar structures. The thing on structures (even more so then freight cars) is the randomness of the patterns. There is NO RIGHT or WRONG WAY to weather a structure EXCEPT in my book for the colors.

#1 You have 4 or more walls on a structure and the fading for each wall probably is very different on each

#2 unless you have a old metal building rust is at a minimum BUT it’s still usually there. Down spouts and gutters are notorious for rust usually where the hangers are. Also areas where things are attached to or coming out of the wall may have some rust and downward streaks. Fasteners rust or if they are supposedly rust proof those spot have a dirt build up from the elements

#3 weathering on brick is more subtle than a metal clad building and the age of either building helps determine weathering

As for the yellow building above. I like the rust streaks on the end wall. That color in to my eye is right.

The black exhaust above the wider end panel door should thin out (fade) as it does towards the roof. I like the pattern though above that door and if it’s exhaust buildup the coloring is right

Dirt or grime generally is not a pure black (unless it’s black mold) on a building. I think you need brown with a touch of black added on the center panel and the far left panels to represent more of a grime build up. If the black is supposed to be exhaust, you need to add exhaust pipes for that to occur. Again though IMO you have the patterns down, you just need a reason for it if it’s exhaust.

None of this is meant as criticism and I hope you take it in the constructive way I want to convey it. You took the plunge by posting a picture of your 1st weathering. Congrats on that. I weathered models for years before I posted pictures.

This thread was started asking for constructive criticism on weathering projects I and others have posted here. Respond back, ask questions but really nothing you have done is wrong.

How high is your self layout in the background from the floor!
 
Last edited:


Status
Not open for further replies.


Affiliate Disclosure: We may receive a commision from some of the links and ads shown on this website (Learn More Here)

Back
Top