

You are using an out of date browser. It may not display this or other websites correctly.
You should upgrade or use an alternative browser.
You should upgrade or use an alternative browser.
Weathering Rolling Stock, a Continous thread
- Thread starter TLOC
- Start date
ModelRailroadForums.com is a free Model Railroad Discussion Forum and photo gallery. We cover all scales and sizes of model railroads. Online since 2002, it's one of the oldest and largest model railroad forums on the web. Whether you're a master model railroader or just getting started, you'll find something of interest here.

Maybe used the same torch they started the fire with
Geez I do have a propane torch and way too many screw drivers! An experiment now for outside though as I disassembled the paint booth exhaust system about an hour ago.
I do need to dig a little deeper online though for dented gondolas. For the current batch on the work table I am using these pictures as my weather along guides. No dents that are real noticeable, so my experimenting maybe for naught
All pictures are credited but the last 4 which were sent to me but also used with permission personally from the photographer.


TomO
Here are a couple:

Alright, that is a little overboard. I am sure they don't take that one very fast.

The sides are a little puffy

I included this one because of your location.
Did not find the pic I was looking for but some more ideas, maybe
I am pretty much done weathering until we return from Texas sometime in April. I promised myself that I need to work on the layout till we leave 3/25. I haven’t run a train more then 40’ in weeks
TomO
I really appreciate you looking for me.

I have not used the Mig washes yet but have a couple. Are they difficult to work with? Any tricks or must have to’s before I venture into those? I use Pan Pastels and I used to use a black ink dilution for panel lines.
Thank you
TomO
TomO
TomO
TomO


 .
.

Affiliate Disclosure: We may receive a commision from some of the links and ads shown on this website (Learn More Here)
- Status
- Not open for further replies.
logandsawman
Northern Pacific history enthusiast
Hi Tom- read on the forum here someone heated up a screwdriver and used that to make the dents.Finished with pulp cars for a while. We have gondolas!
I finished up 2 duplicate numbered CN’s 63’ mill gons from Walthers. This was my great buy that I was so proud of that I didn’t buy the numbers of cars I have. It was very deflating when I figured out was wrong. Anyway, they are lightly weathered and on the layout.
View attachment 142794
As I finished the Testors dull cote the mail delivery arrived with 2 more. A CN with a number I don’t have and a WC gondola, also the Walthers 63’ mill gondola with drop down ends. They are on the turntable after getting a light base coat of Tamiya Hull Red
View attachment 142799View attachment 142800
Funny thing. I cannot find these in the Walthers online catalog including when I look for retired pieces. The box says it’s Walthers RTR series. The all are in need of 36” steel wheels and the Kadee #148 whisker coupler I use.
Tomorrow for that exchange.
A FB friend asked if I would do the dents and dings these cars normally have. The prototype pictures I am working from do not have the big bulges and dents I see so commonly done in You Tube videos. I did start experimenting though with a soldering iopron on one side of an old Athearn BB. Tomorrow I will use the heat gun on low and try that as a comparison
TomO
Maybe used the same torch they started the fire with
TLOC
Well-Known Member
Thanks Dave. I tried to use my heat gun on low a few months ago and never got the hang of isolated melting. I have been experimenting with the heat gun again and the soldering iron the last couple days. Still not enough control for either one of the methods for me at this timeHi Tom- read on the forum here someone heated up a screwdriver and used that to make the dents.
Maybe used the same torch they started the fire with
Geez I do have a propane torch and way too many screw drivers! An experiment now for outside though as I disassembled the paint booth exhaust system about an hour ago.
I do need to dig a little deeper online though for dented gondolas. For the current batch on the work table I am using these pictures as my weather along guides. No dents that are real noticeable, so my experimenting maybe for naught
All pictures are credited but the last 4 which were sent to me but also used with permission personally from the photographer.
TomO
logandsawman
Northern Pacific history enthusiast
The most dented ones I have seen were in mow service. I'll try to get a picThanks Dave. I tried to use my heat gun on low a few months ago and never got the hang of isolated melting. I have been experimenting with the heat gun again and the soldering iron the last couple days. Still not enough control for either one of the methods for me at this time
Geez I do have a propane torch and way too many screw drivers! An experiment now for outside though as I disassembled the paint booth exhaust system about an hour ago.
I do need to dig a little deeper online though for dented gondolas. For the current batch on the work table I am using these pictures as my weather along guides. No dents that are real noticeable, so my experimenting maybe for naught
All pictures are credited but the last 4 which were sent to me but also used with permission personally from the photographer.
View attachment 142835View attachment 142836View attachment 142837View attachment 142838View attachment 142839View attachment 142840View attachment 142841View attachment 142842View attachment 142843View attachment 142844
TomO
Here are a couple:
Alright, that is a little overboard. I am sure they don't take that one very fast.
The sides are a little puffy
I included this one because of your location.
Did not find the pic I was looking for but some more ideas, maybe
Last edited:
TLOC
Well-Known Member
Thank you Dave. Even the pictures you posted the bulges and dents aren’t real obvious like the 1st MOW gon.The most dented ones I have seen were in mow service. I'll try to get a pic
Here are a couple:
View attachment 142845
Alright, that is a little overboard. I am sure they don't take that one very fast.
View attachment 142846
The sides are a little puffy
View attachment 142847
I included this one because of your location.
Did not find the pic I was looking for but some more ideas, maybe
I am pretty much done weathering until we return from Texas sometime in April. I promised myself that I need to work on the layout till we leave 3/25. I haven’t run a train more then 40’ in weeks
TomO
I really appreciate you looking for me.
logandsawman
Northern Pacific history enthusiast
Agree about the lack of dents. They universally seem to puff out a little between the reinforcing steel, however.
Greg@mnrr
Section Hand
The danger in creating dents is the final effects look like a soldering iron was used to do the denting.
One method that works well for many modelers is to use a high watt soldering gun and a piece of thin steel plate or even a section of bent aluminum can and hold the steel against the side or near the top of the gon and press the heated soldering gun against the steel plate. As the plastic of the gon begins to melt you and shape the damage in many different ways.
I found that bending the metal in a "U" shape work fine for me. Different sizes of the pieces of metal works good for a variety of damaged areas.
Like weathering, you don't need a lot of damage to get the message across that the gondola has seen better days.
Have fun with your project.
Greg
One method that works well for many modelers is to use a high watt soldering gun and a piece of thin steel plate or even a section of bent aluminum can and hold the steel against the side or near the top of the gon and press the heated soldering gun against the steel plate. As the plastic of the gon begins to melt you and shape the damage in many different ways.
I found that bending the metal in a "U" shape work fine for me. Different sizes of the pieces of metal works good for a variety of damaged areas.
Like weathering, you don't need a lot of damage to get the message across that the gondola has seen better days.
Have fun with your project.
Greg
Last edited:
TLOC
Well-Known Member
While waiting for ballast dry, (makes watching paint dry very exciting in comparison) I took out the heat gun. On high I heated up a large flat blade screw driver. On the experimental sacrifice of an old Athearn BB bay cube, I got this

 Not too bad but as you can see the sill in the bottom picture is distorted. That was from trying the heat gun on the inside of the car and then pushing the flat head screw driver on it. That is a fail even after switching heads on the heat gun and running the heat on low, 545f degrees. 950f degrees on the screw driver head alone does work without distorting other parts of the car.
I really am reluctant to break out the propane torch but I do think it’s worth the try. The heat gun just doesn’t heat the screw driver up enough to allow for some work time. The propane powered flame may!
Greg, thanks for another idea. I just finished drinking from a rare aluminum can in this household. Diet Cream Soda. Anyway, I will pull it from the recycling bin and cut it up after cleaning.
Finally, last night I was spray painting some track. The new toy, the Vortex Mixer, is fantastic. I didn’t realize how little I was shaking and mixing paint. This is day 5 of using it and I am thrilled so far.

TomO
I really am reluctant to break out the propane torch but I do think it’s worth the try. The heat gun just doesn’t heat the screw driver up enough to allow for some work time. The propane powered flame may!
Greg, thanks for another idea. I just finished drinking from a rare aluminum can in this household. Diet Cream Soda. Anyway, I will pull it from the recycling bin and cut it up after cleaning.
Finally, last night I was spray painting some track. The new toy, the Vortex Mixer, is fantastic. I didn’t realize how little I was shaking and mixing paint. This is day 5 of using it and I am thrilled so far.
TomO
TLOC
Well-Known Member
That looks great
TLOC
Well-Known Member
Lee, no issue come aboard. 1st off I am Scale blind and second weathering in any scale is still weathering. I will try to learn something. Love the flat cars and that Trailer Service load is awesome. Brings back memories of my youth in Chicago’s southwest side. NW had a trailer yard that had trailers that looked like what you are showing. Late 60’s to 76 is my remembrances.Tom. Great idea for a Thread hope you don’t mind some of my O Scale Weathering. I learned how to weather many years ago from the Millitary Modelers I still build Millitary stuff but not as much. I’ve done several Lionel PS4 Piggyback Flatcars and have quite a few left to do here are some that I’ve done a couple years ago. I use Mig. Washes and other different pigment powders. View attachment 143058View attachment 143059View attachment 143060View attachment 143061View attachment 143062View attachment 143063View attachment 143064View attachment 143065View attachment 143066View attachment 143067
I have not used the Mig washes yet but have a couple. Are they difficult to work with? Any tricks or must have to’s before I venture into those? I use Pan Pastels and I used to use a black ink dilution for panel lines.
Thank you
TomO
gunslinger
Member
i am not really into 3-rail but those look great, realism is a plus in any scale
TLOC
Well-Known Member
That is well written. Realism is a plus in any scale.i am not really into 3-rail but those look great, realism is a plus in any scale
TomO
TLOC
Well-Known Member
The biggest thing so far weathered is practicing on an old Athearn BB 86’ boxcar from the early 70’. That was a big canvas to work on, I can only imagine about O scale.I understand I like both HO and O. The thing about a bigger scale is when weathering or building you have to put more effort in it to make it look very convincing. You can hide more mistakes and less effort in the smaller scales. That’s what I’ve found out anyway. Thanks for the complement.
TomO
TLOC
Well-Known Member
Lee, those are well done.
Love the trailers as they do bring back the memories. But, I am very impressed by the less is more weathering done on the flat car decks. Too often I find myself having to go back and strip down the weathering on the decks I have done. You have done enough to say, these are well used but not abused cars. Even with pictures to go from I still have the heavy hand, but getting better.
Thanks for sharing
TomO
Love the trailers as they do bring back the memories. But, I am very impressed by the less is more weathering done on the flat car decks. Too often I find myself having to go back and strip down the weathering on the decks I have done. You have done enough to say, these are well used but not abused cars. Even with pictures to go from I still have the heavy hand, but getting better.
Thanks for sharing
TomO
TLOC
Well-Known Member
Making you think, great!Thanks Tom for the nice complement it’s a real confidence builder for me. I’ve always worried about doing it to much or to little I always start out light and build up to a stopping point then I put it on the layout and see how it blends in seems to work so far. I’ve been in the pulling Intermodal containers now for over 25 years I see lots of spline cars that have a Piggyback trailer on them and there not heavily weathered. I want to do a Sea Container some day now since you started this thread yesterday I started looking more closely at the containers I pull.
TomO
TLOC
Well-Known Member
I have received few pulp cars minus trucks, wheels and couplers from a Northeastern Wisconsin club. Turns out the 3 pulp cars I did for the FB friend went over great at his club. They gave me a list of the cars with reporting marks On Tuesday. I went online and found 5 of the numbers. They have approved the pictures as they would like those cars to appear. Free reign on the balance of the cars. This will be fun!
I had pulled my next batch of cars to weather off the layout.

There is a Bulford transfer caboose, 3 BLMA before Atlas purchased them, one Atlas, a couple Accurail, 4 Scaletrains.com cars, 2 Intermountain that I really dislike, they roll terribly and it takes some work to fix IMO.
This will wait till we return
TomO
I had pulled my next batch of cars to weather off the layout.
There is a Bulford transfer caboose, 3 BLMA before Atlas purchased them, one Atlas, a couple Accurail, 4 Scaletrains.com cars, 2 Intermountain that I really dislike, they roll terribly and it takes some work to fix IMO.
This will wait till we return
TomO
Greg@mnrr
Section Hand
Looking forward to the weathering you are planning and performing on the transfer caboose. I think I have two maybe three of them one in C&NW and the others MILW.
Nice honor to weather the pulpwood cars from the Northeastern Wisconsin Model Railroad club. Be sure to show use your results on these cars as well.
Have fun!!!
Greg
Nice honor to weather the pulpwood cars from the Northeastern Wisconsin Model Railroad club. Be sure to show use your results on these cars as well.
Have fun!!!
Greg
TLOC
Well-Known Member
Good finish. I would laugh about the 10 years between the start and finish but I know I have at least 2 projects that old.
I like the use of the pencils graphite in the tie down pocket. Makes it seem like the tie down chains have rubbed the paint from the pocket.
A thought! Maybe a touch of weathering on the blocking for the tires. They look too new IMO but Cat did spend money for transportation items, they may be new lumber. The deck is well done
TomO
I like the use of the pencils graphite in the tie down pocket. Makes it seem like the tie down chains have rubbed the paint from the pocket.
A thought! Maybe a touch of weathering on the blocking for the tires. They look too new IMO but Cat did spend money for transportation items, they may be new lumber. The deck is well done
TomO
CambriaArea51
Well-Known Member
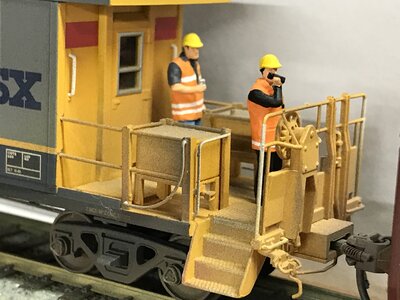
I have a couple of them, added a couple of workers, one was holding a shovel that I cut out to make it look like he's holding a coffee. The other talking on the radioThere is a Bulford transfer caboose,
.- Status
- Not open for further replies.
Affiliate Disclosure: We may receive a commision from some of the links and ads shown on this website (Learn More Here)