The College Kid Layout Building Saga - End?

ModelRailroadForums.com is a free Model Railroad Discussion Forum and photo gallery. We cover all scales and sizes of model railroads. Online since 2002, it's one of the oldest and largest model railroad forums on the web. Whether you're a master model railroader or just getting started, you'll find something of interest here.


That's going to get old really fast. What are your next plans? Will scenery fit in storage? Even with this small of a layout, there's plenty of room for some cool structures that will be fun to add and for us to see.

Look for some old desks along the side of the road for free wood to put that on.
I will be trying to do some scenery in the close future. The scenery that I will do will be very structural so both of the boards can be placed on top of each other. I would like to have at least a little bit of height on the two boards but I am going to see what I can do.
 
Update:
20230428_090103.jpg
20230428_090120.jpg
20230428_090117.jpg

The first step into the scenery. I have been frequently going to Dollar Tree and checking out what kinds of things I can use for some DIY scenery. I found a block tower that had some great wood and a few crappy wood kits that I think could work great with creating some buildings or detail. I have started to assemble a small station that I can put on my spur. It might not look professional but this is not a professional layout. Doing things on the cheap is going to help me learn more about the hobby.


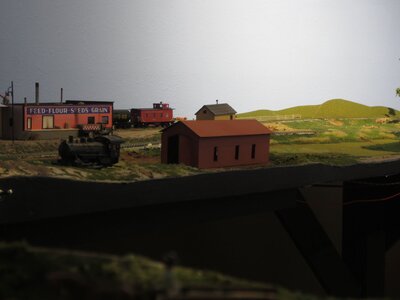
You can make some pretty neat stuff using cereal boxes. That is what I used in creating this engine house, also several other buldings over the years:

engine houes.JPG

Over time I purchased roofing material also some fake stone for the walls, plastic windows, etc; however in the meantime my wife the engine house as shown in the picture.

This was painted with a coat of automotive primer.

The process for making this is on my "Daves Layout V. 4.0 " thread under " layout design and construction"

Dave LASM

 
You can make some pretty neat stuff using cereal boxes. That is what I used in creating this engine house, also several other buldings over the years:

View attachment 167378

Over time I purchased roofing material also some fake stone for the walls, plastic windows, etc; however in the meantime my wife the engine house as shown in the picture.

This was painted with a coat of automotive primer.

The process for making this is on my "Daves Layout V. 4.0 " thread under " layout design and construction"

Dave LASM

I put Daves Layout V. 4.0 in the search and it does not come up.
 
You can make some pretty neat stuff using cereal boxes. That is what I used in creating this engine house, also several other buldings over the years:

View attachment 167378

Over time I purchased roofing material also some fake stone for the walls, plastic windows, etc; however in the meantime my wife the engine house as shown in the picture.

This was painted with a coat of automotive primer.

The process for making this is on my "Daves Layout V. 4.0 " thread under " layout design and construction"

Dave LASM
I thoroughly enjoyed looking at all the photos in your thread with a little reading here and there. Turned out awesome.
 
Update:
20230502_084838 (1).jpg
20230502_085014 (1).jpg
20230502_084930 (1).jpg
20230502_085003 (1).jpg


Long time no see! This weekend was pretty busy so the layout had to go under the bed and no construction was able to happen. I ended up running to Dollar Tree and impulse-buying a bunch of cars for the layout. I know they are out of scale and yadda yadda, but I don't care they were a dollar apiece. I painted some of the leftover posterboard that I had laying around and made it into some roads that go to the station that I had built. If you look at the last post about the station I hadn't done too much to it other than building the platform. As you can see I have painted it, added some cover to the platform, and painted all of that. The white rectangle is a person for scale since I do not have HO scale figures yet. Overall I think for my first scratch-built building it is good enough for my purposes. I will be lining the roads and parking lot soon. Also, the Brillo pads are temporary just to see what they look like. Im not sure if I am sold on them yet. I still have that grass mat in my back pocket if I want to use that instead. It sure probably will be more cost-effective but I really don't like that grass mat after it left a bad taste in my mouth.


Update:
View attachment 167681View attachment 167682View attachment 167683View attachment 167684

Long time no see! This weekend was pretty busy so the layout had to go under the bed and no construction was able to happen. I ended up running to Dollar Tree and impulse-buying a bunch of cars for the layout. I know they are out of scale and yadda yadda, but I don't care they were a dollar apiece. I painted some of the leftover posterboard that I had laying around and made it into some roads that go to the station that I had built. If you look at the last post about the station I hadn't done too much to it other than building the platform. As you can see I have painted it, added some cover to the platform, and painted all of that. The white rectangle is a person for scale since I do not have HO scale figures yet. Overall I think for my first scratch-built building it is good enough for my purposes. I will be lining the roads and parking lot soon. Also, the Brillo pads are temporary just to see what they look like. Im not sure if I am sold on them yet. I still have that grass mat in my back pocket if I want to use that instead. It sure probably will be more cost-effective but I really don't like that grass mat after it left a bad taste in my mouth.
Nice job, well done.
 
I love what you're doing with all of these dollar store objects. Brillo pad grass! Where there's a will, there's a way.
The Brillo pad grass is something I have been thinking of for a while. It is quite convincing surprisingly! I just purchased a bunch of other random stuff from Dollar Tree so stay tuned for a wild update in the future with a funky/unexpected building material...
 
Last edited:
Update:
20230502_225820.jpg

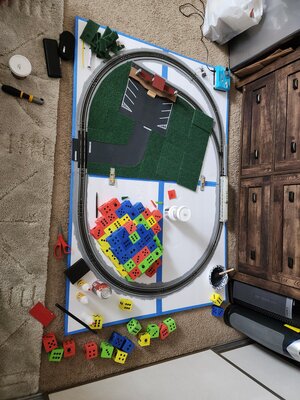
Big Rock Candy Mountain! This is the update that I have teased a bit. Over the last few days, I have been accumulating these foam die packs from Dollar Tree. They are super sturdy and can easily be shaved down to create some scenery. Once they are carved down they will be one of the staples of the layout. I'll probably use some plaster or something to fill in the gaps once I have it carved but I am thinking this is going to be a great cheap way to build a large hill. Also, spot the Brillo pads being temporarily put in place. Also, you can see that I finished up the lining for the parking lot and the road. I used a white paint pen to create the lines after I attempted to do it with paint brushes. That didn't work out so well so I had to repaint the entire road and start over with the paint pen. I am going to grab more of the packs of dice and Brillo pads tomorrow to continue to be able to work on the scenery.
 
Update:
View attachment 167704
Big Rock Candy Mountain! This is the update that I have teased a bit. Over the last few days, I have been accumulating these foam die packs from Dollar Tree. They are super sturdy and can easily be shaved down to create some scenery. Once they are carved down they will be one of the staples of the layout. I'll probably use some plaster or something to fill in the gaps once I have it carved but I am thinking this is going to be a great cheap way to build a large hill. Also, spot the Brillo pads being temporarily put in place. Also, you can see that I finished up the lining for the parking lot and the road. I used a white paint pen to create the lines after I attempted to do it with paint brushes. That didn't work out so well so I had to repaint the entire road and start over with the paint pen. I am going to grab more of the packs of dice and Brillo pads tomorrow to continue to be able to work on the scenery.
Have to admit, your "outside the box" thinking of using unusual items to create scenery, road's etc. is really very creative, your doing an amazing job.
Makes me wonder what you would be able to do if you could build a much larger layout.
 
Update:
20230503_172124.jpg

Here is the layout as it stands currently. I have glued in most of the Brillo pads other than the row at the top. Looks like I am going to need much more. I think it looks pretty good. I worked around the latch at the southern end of the layout to make sure that was open so there are no issues there. I have been working on gluing the big die mountain down. On the inside of the mountain I put one of the large sponges I was working with before I found the die but that seems to not be working out the way I want it to. It isn't gluing down the die as much so I will have to see if letting it have extra time to dry is something that it needs or if I need to do something else. I am going to put a couple more hills on that half so when I stack the two layers it can be sturdy so I am going to work on that. I need to go out and get more Brillo pads and maybe some more die. The people at Dollar Tree think I am nuts... Also, newly aquired NH #121 rolls well on the layout.
 

Attachments

  • 20230503_172124.jpg
    20230503_172124.jpg
    946.4 KB · Views: 224


Update:
20230505_143758.jpg
20230505_143806.jpg
20230505_143810.jpg


Light update today. I have been trying to get some carving on the mountain. I have been using my small hand saw and seraded kitchen knife😅. I feel like it has been going well. I have glued all of the die down but they don't seem to want to stick too well. I used some Loctite after the first round of gluing didn't go so well but they still aren't sticking that well. If you guys have any ideas regarding how to tack down the die best I would love to hear it.


Affiliate Disclosure: We may receive a commision from some of the links and ads shown on this website (Learn More Here)

Back
Top