
You are using an out of date browser. It may not display this or other websites correctly.
You should upgrade or use an alternative browser.
You should upgrade or use an alternative browser.
Show us your weathered boxcars and covered hoppers
- Thread starter Dallas Modern HO Scale
- Start date
ModelRailroadForums.com is a free Model Railroad Discussion Forum and photo gallery. We cover all scales and sizes of model railroads. Online since 2002, it's one of the oldest and largest model railroad forums on the web. Whether you're a master model railroader or just getting started, you'll find something of interest here.
That is so cool. That's got to be one of the coolest aspects of modelling modern stuff.
That is so realistic looking. Love the roof and interior; actually, love it all. Great work!

I think it looks fine as-is,
most of the time those types cars are basically clean from being rain washed a lot, they're just worn, faded from sitting in cleaner settings. Other types of cars subjected to heavy industrial stuff collect grease/oil, pollution etc. If you do add, I say make it very thin just to highlight seams, rivots etc, it's easy to over do it, myself and many others tend to go to far.
Great job.


Looks great. Thanks for sharing the way you did it.

Affiliate Disclosure: We may receive a commision from some of the links and ads shown on this website (Learn More Here)


Laidoffsick
3 Railer
Patched Atlas car, renumbered and lettered.


That is so cool. That's got to be one of the coolest aspects of modelling modern stuff.
Patched Atlas car, renumbered and lettered.


That is so realistic looking. Love the roof and interior; actually, love it all. Great work!
ChevelleSSguy
Member
I agree. That looks fantastic.
Laidoffsick
3 Railer
It's just technique I guess. Most of it is acrylic and/or oil artist paints. There is a bit of powder at the end just to tone it down a bit, and dirty up the seams and sills. The rocks are just Woodland Scenics molds. I recently ripped off the 3 rail track and replaced it with some Atlas 2 rail track. Looks much better since I only use it to display 2 rail cars 


nordique72
New Member
Time to dust off this thread again!!
I finally got around to installing the Plano roofwalks on my Intermountain PS4750 hopper PTLX 14944. I custom made the PTLX and "Crawford Grain" decals in Adobe Illustrator- I used Microscale ACI tags, COTS label and some white data for the hopper bays and slope sheets. The car also got 36" metal wheels, Kadee 58s, cut levers and air hoses. The car is lightly weathered to represent a car after about 3 years of service.
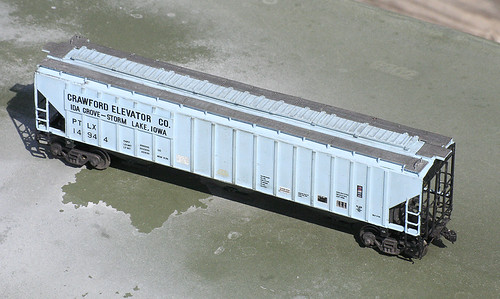
Thanks for looking!
I finally got around to installing the Plano roofwalks on my Intermountain PS4750 hopper PTLX 14944. I custom made the PTLX and "Crawford Grain" decals in Adobe Illustrator- I used Microscale ACI tags, COTS label and some white data for the hopper bays and slope sheets. The car also got 36" metal wheels, Kadee 58s, cut levers and air hoses. The car is lightly weathered to represent a car after about 3 years of service.
Thanks for looking!
A couple shots of an ex-Milwaukee Road 18 rib covered hopper for my home road. It's an HO Intermountain kit. Not quite finished but well on its way.
View attachment 25620
View attachment 25621
View attachment 25620
View attachment 25621
ChevelleSSguy
Member
Any tips on how you did the rust streaks and how you patched out the Milwaukee Road letters?
The patches are clear decal film trimmed to a "rolled on" shape then brush painted to give an uneven coverage prior to applying. The rust is burnt sienna and burnt umber artist's oils. The darker was dabbed on first with a toothpick, once it had partially dried the lighter was dabbed on over top and dragged down with a brush moist with turpenoid.  I still want to add a dark grimy wash, but will let what is on it dry for a bit.
I still want to add a dark grimy wash, but will let what is on it dry for a bit.
Last edited by a moderator:
flh80
Member
The patches are clear decal film trimmed to a "rolled on" shape then brush painted to give an uneven coverage prior to applying. The rust is burnt sienna and burnt umber artist's oils. The darker was dabbed on first with a toothpick, once it had partially dried the lighter was dabbed on over top and dragged down with a brush moist with turpenoid.
I think it looks fine as-is,
most of the time those types cars are basically clean from being rain washed a lot, they're just worn, faded from sitting in cleaner settings. Other types of cars subjected to heavy industrial stuff collect grease/oil, pollution etc. If you do add, I say make it very thin just to highlight seams, rivots etc, it's easy to over do it, myself and many others tend to go to far.
Great job.
Last edited by a moderator:
You're pretty much bang on with your comment on highlighting seams and the ribs. I'll try to resist the temptation to add too much, but the car just looks too fresh on its lower half. I'll have to play around on some extra parts to get a feel for how strong to go. This car will be in the ranks of the more battle weary grain cars on my fleet, along side some shopped and painted second-hand cars and some recent deliveries.
I'm using these two photos as inspiration for the weathering.
I'm using these two photos as inspiration for the weathering.
Last edited by a moderator:
ho/ttothemoss
Member
Last edited by a moderator:
The patches are clear decal film trimmed to a "rolled on" shape then brush painted to give an uneven coverage prior to applying. The rust is burnt sienna and burnt umber artist's oils. The darker was dabbed on first with a toothpick, once it had partially dried the lighter was dabbed on over top and dragged down with a brush moist with turpenoid.
Looks great. Thanks for sharing the way you did it.

Affiliate Disclosure: We may receive a commision from some of the links and ads shown on this website (Learn More Here)