
You are using an out of date browser. It may not display this or other websites correctly.
You should upgrade or use an alternative browser.
You should upgrade or use an alternative browser.
Plaster cloth texture
- Thread starter aslan
- Start date
ModelRailroadForums.com is a free Model Railroad Discussion Forum and photo gallery. We cover all scales and sizes of model railroads. Online since 2002, it's one of the oldest and largest model railroad forums on the web. Whether you're a master model railroader or just getting started, you'll find something of interest here.



Affiliate Disclosure: We may receive a commision from some of the links and ads shown on this website (Learn More Here)
steveparkinson
Member
Stan,
If they are very small holes (pin sized) you can usually just smooth the plaster material out as you lay it down. I do this to prevent those tiny holes, if dry already you can either go over with another layer of plaster cloth or just cover proceed with your next material you plan to cover with. I had some very small holes here and there and just covered with sculptamold and it was fine. I put a few more pieces to cover bigger holes or a bunch of small holes in one area.
Steve
If they are very small holes (pin sized) you can usually just smooth the plaster material out as you lay it down. I do this to prevent those tiny holes, if dry already you can either go over with another layer of plaster cloth or just cover proceed with your next material you plan to cover with. I had some very small holes here and there and just covered with sculptamold and it was fine. I put a few more pieces to cover bigger holes or a bunch of small holes in one area.
Steve
wombat457
I'm the one
aslan,
One thing you should know about 'Plaster Cloth', you need to at least double lay it to get an even half decent finish and get rid of those 'holes' you have. As such, you are going to use at least twice as much of the stuff to cover what it is you want to cover. Secondly, there is very very little plaster in the cloth so strength is an issue as well.
I don't know what you are trying to cover but I would suggest that you use get rid of the Plaster Cloth and use straight out Plaster Of Paris (PoP) in the powdered form. To start with, it is WAY cheaper and a 25 lb bag goes a long long way!
Also, stay away from them Model specific stuff as it is much much more expensive and isn't any better than PoP. Infact, Pop in many cases is better than the model specific stuff. The beauty of PoP is that you can buy it powdered with a variety of cure times, from 15 minutes up to 90 minutes and most typical times in between. This gives you flexibility. I use the 20 minute cure time PoP for my layout and it works extremely well, dries hard, strong and is very light. It is also only around $11.00 a bag from Lowes. How much of the commercial, hobby specific stuff can you buy for $11.00?
http://www.lowes.com/pd_299302-272-...form&pl=1¤tURL=?Ntt=pro+form&facetInfo=
Seeing as you have already laid the cloth, I would most definitely go over it with PoP and then continue to use PoP on the rest of your layout instead of the cloth.
Should add here that I also used plaster cloth when I first started in this hobby, so I am speaking from experience with both products. It didn't take long for me to realise that using the cloth was a mistake, and a huge waste of money.
One thing you should know about 'Plaster Cloth', you need to at least double lay it to get an even half decent finish and get rid of those 'holes' you have. As such, you are going to use at least twice as much of the stuff to cover what it is you want to cover. Secondly, there is very very little plaster in the cloth so strength is an issue as well.
I don't know what you are trying to cover but I would suggest that you use get rid of the Plaster Cloth and use straight out Plaster Of Paris (PoP) in the powdered form. To start with, it is WAY cheaper and a 25 lb bag goes a long long way!
Also, stay away from them Model specific stuff as it is much much more expensive and isn't any better than PoP. Infact, Pop in many cases is better than the model specific stuff. The beauty of PoP is that you can buy it powdered with a variety of cure times, from 15 minutes up to 90 minutes and most typical times in between. This gives you flexibility. I use the 20 minute cure time PoP for my layout and it works extremely well, dries hard, strong and is very light. It is also only around $11.00 a bag from Lowes. How much of the commercial, hobby specific stuff can you buy for $11.00?
http://www.lowes.com/pd_299302-272-...form&pl=1¤tURL=?Ntt=pro+form&facetInfo=
Seeing as you have already laid the cloth, I would most definitely go over it with PoP and then continue to use PoP on the rest of your layout instead of the cloth.
Should add here that I also used plaster cloth when I first started in this hobby, so I am speaking from experience with both products. It didn't take long for me to realise that using the cloth was a mistake, and a huge waste of money.
Last edited by a moderator:
Lynnb
Well-Known Member
When I use the plaster cloth I keep a 4 inch cheapo paint brush on hand and after I overlap about 3 6x6 inch pieces I dip my brush into water bowl and brush the plaster cloth and that takes care of most any pin holes. Sometimes for strength I will brush on a layer of tuf cote or pop for added strength.
flyboy2610
Loveably weird
Not to be a but-in-ski or anything, but the link Wombat posted is for joint compound. Joint compound and plaster of Paris are NOT the same thing. Plaster of Paris is used for surfaces that need to dry nice and hard. Did you ever break a bone as a kid? Your cast was plaster of Paris. (Nowadays fiberglass is more commonly used for that.)
[video=youtube;rWOs-_VrjQw]https://www.youtube.com/watch?v=rWOs-_VrjQw[/video]
Plaster of Paris will dry hard, and is hard to scratch. Joint compound dries softer and will scratch more easily.
[video=youtube;rWOs-_VrjQw]https://www.youtube.com/watch?v=rWOs-_VrjQw[/video]
Plaster of Paris will dry hard, and is hard to scratch. Joint compound dries softer and will scratch more easily.
wombat457
I'm the one
Whoops, screwed up on the name side of things, my error. Either way though, what was posted is what I use and it has worked very well for me.
As for it drying soft and scratches easy ... I don't know if it just this particular brand or not but I would defy anyone to scratch any part of my layout where I have used this product. When I say that, I mean through normal day to day use and not using a crow bar to do it
In so far as the softness of it goes, well, in order for me to cut it I need to use a Boning Saw. I can 'scrape it away' using a decent hobby knife but that takes for ever. There is one area of my layout, the town area that is flat and has been built up with layers of the plaster/joint compound or whatever it's correct name is, that I kneel on to get to the very back corner of my layout. I don't have to kneel on it to reach the corner, it just makes it easier. Try doing that with plaster cloth, or some other over priced products, and still have your layout in tact.
Personally, unless you intend to run around on your layout, what I use is plenty hard enough and strong enough for a layout.
As for it drying soft and scratches easy ... I don't know if it just this particular brand or not but I would defy anyone to scratch any part of my layout where I have used this product. When I say that, I mean through normal day to day use and not using a crow bar to do it
In so far as the softness of it goes, well, in order for me to cut it I need to use a Boning Saw. I can 'scrape it away' using a decent hobby knife but that takes for ever. There is one area of my layout, the town area that is flat and has been built up with layers of the plaster/joint compound or whatever it's correct name is, that I kneel on to get to the very back corner of my layout. I don't have to kneel on it to reach the corner, it just makes it easier. Try doing that with plaster cloth, or some other over priced products, and still have your layout in tact.
Personally, unless you intend to run around on your layout, what I use is plenty hard enough and strong enough for a layout.

Davidfd85
Member
Well I will throw in my little bit too. When I have made mountains and hills with the PC I use a wet brush to smooth it and it will fill in most of the little holes between the threads, then I let it set up for about an hour or so depending on how big the area is. I use the dry mix joint compound because I find that the pre mix tends to crack when it dries. I mix up a small batch in a plastic cup a little bit thicker than wall paint would be. Then paint a coat over the fresh PC area. It will cover all the thread patterns that show through and fills the small holes also. Hope this gives you another option to use.
Thanks
David
Thanks
David
trailrider
Well-Known Member
Over what did you lay the plaster cloth? In other words, what was the main structure underneath it? Over the last 60 years or so, I've built three layouts. For mountains and tunnels, I used a framework of small pieces of wood or plywood (contoured to the shape of the terrain I was making. Over that I laid screenwire (fine mesh). On some of the layouts, I did, indeed use straight Plast of Paris, which worked fine. On my current layout, I did overlay the screenwire with plaster cloth (2 layers with the plaster smeared to cover the pinholes). This was followed by Plaster of Paris, which was dry mixed with powdered tempera paints in earth tones. Although I don't walk or kneel on the scenery, it is amply strong enough to lean on! When completely dry (three or four days to cure completely...I live in a dry climate...the plaster should NOT feel damp or cold to the touch!), I paint it with acrylic paint, sprinkling on whatever ground cover I'm modelling while the paint is wet. I mainly used the plaster cloth when I was in a bit of a hurry, to get as much coverage as possible. Another reason is that laid over the screenwire, it gave a bit more strength to the wire. Nowadays, most metal screenwire is aluminum, whereas years ago, it was steel, which was stiffer. Not saying there aren't other ways of doing this. But this is how I have done it.
sphinx
One track mind
Here's my method
I used the plaster cloth over crumpled news print on a small layout in the early nineties. It was fairly easy to work with. Like it has been said before, it takes more than one layer to get any strength. To cover the holes, I mixed some pearlite (butchered that spelling) ceiling texture with earth colored latex paint. It worked okay but looked like the surface of Mars up close.
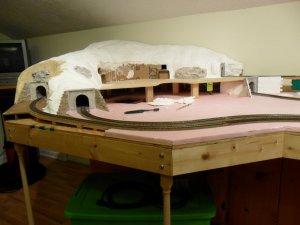
On my current layout I did not use plaster cloth due to the cost. I started out with plaster soaked paper towels with a little vinegar in the plaster mix to retard the set time over a cardboard strips frame. Then someone told me about trying used dryer sheets instead of the paper towels. That worked much better, stronger, and dried with a smother texture. Best of all, about a years worth of dryer sheets should complete the mine scene!
Aslan, your mountains look good, and will look even better when you get some color on them. Flat plaster just does not do our work justice.
Here are pics of the cardboard frame and the plastered sections.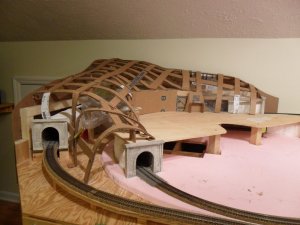
I used the plaster cloth over crumpled news print on a small layout in the early nineties. It was fairly easy to work with. Like it has been said before, it takes more than one layer to get any strength. To cover the holes, I mixed some pearlite (butchered that spelling) ceiling texture with earth colored latex paint. It worked okay but looked like the surface of Mars up close.
On my current layout I did not use plaster cloth due to the cost. I started out with plaster soaked paper towels with a little vinegar in the plaster mix to retard the set time over a cardboard strips frame. Then someone told me about trying used dryer sheets instead of the paper towels. That worked much better, stronger, and dried with a smother texture. Best of all, about a years worth of dryer sheets should complete the mine scene!
Aslan, your mountains look good, and will look even better when you get some color on them. Flat plaster just does not do our work justice.
Here are pics of the cardboard frame and the plastered sections.
Last edited by a moderator:
wombat457
I'm the one
aslan,
You really need to go over that with a layer of PoP or Joint Compound or whatever. I would still recommend what I use due to it's cost, strength, availability, fast curing time and ease of use.
What you have is typical and the norm for plaster cloth, unless you do multiple layers, and is what makes it a waste of money.
Your choice though
You really need to go over that with a layer of PoP or Joint Compound or whatever. I would still recommend what I use due to it's cost, strength, availability, fast curing time and ease of use.
What you have is typical and the norm for plaster cloth, unless you do multiple layers, and is what makes it a waste of money.
Your choice though
Last edited by a moderator:
Lynnb
Well-Known Member
Actually I've tried it both ways , plaster cloth with no plaster coat and just plaster cloth and both with a earth tone painted surface. No plaster on the cloth will work if you plaster attach your rocks but if you try to attach wet rock molds things don't turn out so well as theres too much movement and no bite for the wet rock mold plaster. If I plaster on a rock casting onto plaster cloth it works ok as long as I wet the plaster cloth surface first but because I generally use ws poly fiber over ground goop and start building up in layers from there it adds rigidness to the surface which helps down the road when I want to plant trees. So saying all this I would recommend a thin brushed on layer of pop or a durabond what ever is cheapest.
Affiliate Disclosure: We may receive a commision from some of the links and ads shown on this website (Learn More Here)