
Paint as a decal?

ModelRailroadForums.com is a free Model Railroad Discussion Forum and photo gallery. We cover all scales and sizes of model railroads. Online since 2002, it's one of the oldest and largest model railroad forums on the web. Whether you're a master model railroader or just getting started, you'll find something of interest here.


MikeOwnby

Active Member
This is a weird thing I just thought of because of an issue with a locomotive I painted, and a brainstorm I had on maybe fixing something I did there.

Has anyone ever just painted a color onto white decal paper and then cut that into a decal to use that would perfectly match the paint already on a loco? I got some paint too close to the edge on an N-scale GP40, and there's just no way I can paint orange over black and still have it look like the orange I originally painted over my white primer.

I was thinking of shooting some paint onto that white decal paper, then cutting it into thin strips and applying those along that edge to "back off" the black and restore the small orange line that should go around the top of the short hood rather than the black coming all the way to the edge. I'm thinking surely I'm not the first person to ever have that idea; the question is whether it's a valid idea or just a waste of materials.

You can see below what I'm talking about. My paint job as opposed to what it should look like. I know the decals would leave a tiny bit of a "hump" around the edge, but with enough decal solvent and some very light brushing around the edges it might blend in well enough to finally disappear altogether once the clear coats are added at the end.

Thoughts?
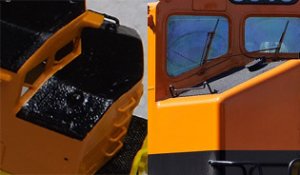
hood.jpg
 
It used to work with the old decal inks. With the new inks manufacturers have to use today, when you cut through the ink, it flakes off at the edges. Trying to get a clean cut to stay straight is almost impossible any more. Too bad, as I did what you are describing many times. What happens is that you spray on your orange, cut out a thin stripe, and the flaking along the edge ends up showing the white underneath.

Not saying it won't work, but you'll probably have to make a number of tries at it before you can maintain a straight clean edge. You'll get lucky eventually, just spray enough film to make a lot of extra pieces.

Mark.
 
It used to work with the old decal inks. With the new inks manufacturers have to use today, when you cut through the ink, it flakes off at the edges. Trying to get a clean cut to stay straight is almost impossible any more. Too bad, as I did what you are describing many times. What happens is that you spray on your orange, cut out a thin stripe, and the flaking along the edge ends up showing the white underneath.

Not saying it won't work, but you'll probably have to make a number of tries at it before you can maintain a straight clean edge. You'll get lucky eventually, just spray enough film to make a lot of extra pieces.

Mark.

Thanks for the info. I wondered about the flaking, especially with this solvent-based paint I'm having to use on this one. It seems to be a lot less malleable and much touchier than the acrylics I prefer to use. Between the touchy paint and the touchy decal film, I can't imagine I'll have much luck, and that's not even taking into account that the decals will have to bend over that edge and again I'm back to the paint probably cracking. May be something to take a shot at some time with acrylics but I think I'll just leave this one as is. Other than just not being quite prototypical the paint job came out well, so I might as well not mess with it. It would be nice if it were perfectly accurate, but I've already seen that the cab isn't quite prototypical in and of itself, so there's no point trying to count rivets on this one.


It really comes down to whether you can live with it or not. I've had things like that where I try to convince myself that it's ok or it's close enough, but every time I look at it, that's all I see. Ultimately, it will get redone so I can be happy with it.

If it were me, I'd first try masking off the hood in the proper location and spray a light coat of white along the black edge. That would give you a good base for your orange. Then spray your orange feathering down onto the side. A final flat or satin finish and a light weathering would blend it in quite well.

Mark.
 
It really comes down to whether you can live with it or not. I've had things like that where I try to convince myself that it's ok or it's close enough, but every time I look at it, that's all I see. Ultimately, it will get redone so I can be happy with it.

If it were me, I'd first try masking off the hood in the proper location and spray a light coat of white along the black edge. That would give you a good base for your orange. Then spray your orange feathering down onto the side. A final flat or satin finish and a light weathering would blend it in quite well.

Mark.

Masking was the whole problem to begin with and why I was brainstorming. I've got grab irons right where the paint line would be, and there's just no way to mask it off. It could have been masked from the outside to begin with, but trying to mask it from the inside just won't work. Like I said, the cab isn't quite perfect to the original anyway. I'm going to have decals that are a little bit off of the original because of that, etc. So rather than mess up a good paint job over another small detail that isn't quite right, I can live with it like it is. If I don't tell people it's wrong, 99% of them won't realize it anyway, and it's going to look awfully pretty regardless ;)

I have to admit this is one of those times I wish I was working in HO instead of N. I could repaint the bigger one no problem, but what I'm dealing with here is a 1/32" strip that has maybe 1/100" between it and the grab-irons. There's just no way to get in there and do it unless I shoot the whole nose again, and at that point I'm going to be losing details with all the layers of paint.
 
Last edited by a moderator:
Mike,

What about masking off everything around the "black" then prime the entire black area. You could then spray the orange where needed and mask off from the outside, up to the grab irons etc, and redo the black. Means basically starting again but would give you the clean lines, especially if you follow Marks advise of feathering the orange to blend in.
 
It sounds like a pretty small narrow strip you need to cover. I wonder if you could use Woodland Scenics white dry transfer stripes to get a base white color down and then hand paint your orange over it.
 
Mike,

What about masking off everything around the "black" then prime the entire black area. You could then spray the orange where needed and mask off from the outside, up to the grab irons etc, and redo the black. Means basically starting again but would give you the clean lines, especially if you follow Marks advise of feathering the orange to blend in.

As I was saying up above, I've already got three layers of paint on there, and adding three more to do all that would make the paint too thick. It would start to look more like I'd poured melted plastic over the hood rather than painted it.

It sounds like a pretty small narrow strip you need to cover. I wonder if you could use Woodland Scenics white dry transfer stripes to get a base white color down and then hand paint your orange over it.

No way to hand paint with Tru Color paints. They're pre-thinned for spraying and while they can do spot touch-ups if applied several times they definitely can't be used to just brush paint something.
 
Mike, sorry must have over looked the part about three layers :(

Nah, no worries, I've been kinda all over the place with this. I think the only viable option is to create a decal, and I may still do it. Just trying to figure out if it's worth $12 in decal paper for that one little detail. The only decal paper I have right now is clear, and I'd have to shoot two coats on it which again starts to get a bit thick and noticeable. We'll see. I keep hopping over, on and around the fence on this one, and haven't completely decided whether it's worth the effort to fix or not. If it were for somebody else, I'd definitely have to fix it some way, even if it meant stripping the whole thing and starting over. But for myself, and since this thing is not going to be 100% prototypical in any case...yeah, tough choice.


If you looking for black decals why not try Microscale trim film decals. It also comes in different colors so it can be used for patch paint jobs. Shouldn't be any chipping when cutting it.
 
I reread the OP, I see that now. They have an SP orange and a DR&GW orange colors, don't know if one of those will work.
 
Last edited by a moderator:
Well, maybe you can make the color itself a dry transfer rather than a decal.

http://www.pulsarprofx.com/decalpro/Vertical/1_MENU/1a_Home/Hobby/Hobby.html

That's an interesting system. Something to think about down the road. But besides the equipment cost to get that up and running, it's pretty unlikely I'd be able to exactly match that orange. That's the real problem. Nobody else out there ever decided that shade of pumpkin orange was a great color for a locomotive (which it is...that's a nice looking paint job imo), so anything else just doesn't match. Tru Color specifically makes a G&W Orange just for their paint jobs & it's different from their other shades of orange.

It really is just down to painting some white decal film or nothing. I may very well decide to at least give it a shot, but honestly at this point I'm thinking it really doesn't look bad as it is.
 
I agree - give it a shot. You'll know right away when you apply it if it's going to work or not. Nothing ventured, nothing gained ....

Mark.


Affiliate Disclosure: We may receive a commision from some of the links and ads shown on this website (Learn More Here)

Back
Top
