OMG! How do I put on connectors without stabbing myself?

ModelRailroadForums.com is a free Model Railroad Discussion Forum and photo gallery. We cover all scales and sizes of model railroads. Online since 2002, it's one of the oldest and largest model railroad forums on the web. Whether you're a master model railroader or just getting started, you'll find something of interest here.


Warpiper

Member
I can not for the life of me can not connect my new code 83 flex track using code 83 connectors. I've filed the sides down to 45 deg as the connector package says to do and Ive tried using pliers to put them on. The only thing I've accomplished is to stab myself multiple times, thin out the track, and crush some connectors with the pliers. Is there an easier way to do this? :confused:
 
You need an $8 set of about six needle files. Often you can get a pack of them inside a clear plastic sleeve in the dollar stores, but the hardware and tool specialty stores sell them as well.
Then, once you have trimmed your rail end to the length you need, you take one of the thin needle files and 'dress' the end of the foot of the rail...both flanges, tops and bottoms. The idea is to remove any burrs from the cutting process. You can also gently jam one of those files into the two open ends of the joiners, themselves, to spread them a wee bit, just at their two openings. From there, it should be much smoother sailing.

Note: this all presupposes you are using the correct joiners. They aren't all the same.
 
You are attempting just about the hardest and most dangerous part of Model RRing. lol
I cannot begin to count the number of times that I stabbed myself over the years.
After doing what Crandell suggests - use an Awl or an Ice pick to spread the joiner a little to get it started.
Does not take much and you will quickly determine how much is needed.
Carry on, Sir!


If you're doing this on your layout bench or workbench, clamp a piece of hardwood or a piece of right angle steel to the edge of the bench. Start the joiner onto the rail end as mentioned above, then holding the rail, place the end of the joiner against the block and push it onto the rail end.
 
I guess this is another advantage with Kato sectional track.

Sent from my SAMSUNG-SGH-I337 using Tapatalk
 
Besides all of the above mentions items above, what I did in addition was to have a small block of wood to push the joiner onto the rail. My track was either hand laid or was flex track and most everything had to be cut to length. On top of that, all of my track is code 70. Many times I was unable to get code 70 rail joiners and ended up using N scale rail joiners. The block or wood is soft enough to not bend the joiner if you go slowly after preping the rail.
 
One more comment. You're probably already doing it this way, but, for the real newbies ....

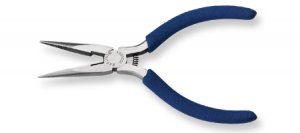
You need to be using small (4" to 5") needle nose pliers:

Needle nose pliers.jpg

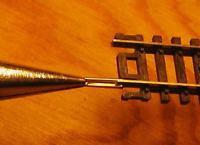
The rail joiner needs to be in line with the jaws:

install.JPG

Also, unless the track section has a gap for the joiner (as in the above photo), you need to remove a couple of ties to make room for the joiner. After the joiner is installed, use a file or hobby (read Xacto) knife to remove the "spikes" and "fish plate" so that the tie will slide in under the rail joiner.


You need an $8 set of about six needle files. Often you can get a pack of them inside a clear plastic sleeve in the dollar stores, but the hardware and tool specialty stores sell them as well.
Then, once you have trimmed your rail end to the length you need, you take one of the thin needle files and 'dress' the end of the foot of the rail...both flanges, tops and bottoms. The idea is to remove any burrs from the cutting process. You can also gently jam one of those files into the two open ends of the joiners, themselves, to spread them a wee bit, just at their two openings. From there, it should be much smoother sailing.

Note: this all presupposes you are using the correct joiners. They aren't all the same.

Hi Crandell,

Thanks again. :) I used to have a file set like that at one time. Time to go get another set. The track I'm using is Atlas code 83 3' flex track and the joiners are Micro Engineering Rail Joiners code 83.

My mind must be slipping. As I was blooding myself up I remembered a running joke when I was in the army signal corps. "How do you tell the copper wire from the steel wire in WD 1 field wire?" "Jam the stripped end into your palm and the color coded ones are the steel". Well, it was funny back then. :o
 
You are attempting just about the hardest and most dangerous part of Model RRing. lol
I cannot begin to count the number of times that I stabbed myself over the years.
After doing what Crandell suggests - use an Awl or an Ice pick to spread the joiner a little to get it started.
Does not take much and you will quickly determine how much is needed.
Carry on, Sir!

Hi Sherrel,

Thanks. I'll give it a try. Used to have an ice pike around somewhere.
 
If you're doing this on your layout bench or workbench, clamp a piece of hardwood or a piece of right angle steel to the edge of the bench. Start the joiner onto the rail end as mentioned above, then holding the rail, place the end of the joiner against the block and push it onto the rail end.

Thanks again tootnkumin,

I tried that last night but it was into the plywood. Didn't widen the opening but made some nice holes in the bench!!
 
Besides all of the above mentions items above, what I did in addition was to have a small block of wood to push the joiner onto the rail. My track was either hand laid or was flex track and most everything had to be cut to length. On top of that, all of my track is code 70. Many times I was unable to get code 70 rail joiners and ended up using N scale rail joiners. The block or wood is soft enough to not bend the joiner if you go slowly after preping the rail.

Hi Chet,

Thanks. I'm gettin the idea that prepping the track is key.
 
One more comment. You're probably already doing it this way, but, for the real newbies ....

You need to be using small (4" to 5") needle nose pliers:

View attachment 60545

The rail joiner needs to be in line with the jaws:

View attachment 60551

Also, unless the track section has a gap for the joiner (as in the above photo), you need to remove a couple of ties to make room for the joiner. After the joiner is installed, use a file or hobby (read Xacto) knife to remove the "spikes" and "fish plate" so that the tie will slide in under the rail joiner.

Hi Kevin,

Thanks. I tried using the needle nose pliers I have but I think they were too big and I could not get a good grip on it. I do have some old jewelry pliers around somewhere. I'll have to spend some time in the garage to find them. Haven't unpacked every yet.


Do yourself a favor and get some Atlas joiners. I tried the micro engineering joiners and they seem to be too narrow for the bottom web of the Atlas flex. I got tired of bleeding and destroying track and joiners. I don't mind doing extra work,but doing surgery on every track joint to put on a joiner was unacceptable. Just my 2c


Affiliate Disclosure: We may receive a commision from some of the links and ads shown on this website (Learn More Here)

Back
Top