
You are using an out of date browser. It may not display this or other websites correctly.
You should upgrade or use an alternative browser.
You should upgrade or use an alternative browser.
New Layout for LASM
- Thread starter logandsawman
- Start date
ModelRailroadForums.com is a free Model Railroad Discussion Forum and photo gallery. We cover all scales and sizes of model railroads. Online since 2002, it's one of the oldest and largest model railroad forums on the web. Whether you're a master model railroader or just getting started, you'll find something of interest here.

Smart move going to the doctor, yet another example of why I admire you so much!
I hope you are feeling better and let us know what the doctors are saying.


Masonite is a trade name for hardboard. Widely used for interior doors. 4.8 mm Masonite will take a dry curve of 450 mm. (1/4" and 18") Wet, you can get it down to half that. Formica would be pretty expensive.

Affiliate Disclosure: We may receive a commision from some of the links and ads shown on this website (Learn More Here)
Bruette
Well-Known Member
Louis, Thanks for voicing your concern. I am going to see the Doctor today as it has been nothing but pain for the last 4 days. No bruise visible any more, but it hurts day and night.
You are correct about the not rushing back to work. I have been going to the office but I don't think that has been smart, either. I need to give it some time to heal.
Funny you should log on as I was just thinking about you yesterday!
Smart move going to the doctor, yet another example of why I admire you so much!
I hope you are feeling better and let us know what the doctors are saying.
Hawkesburytrain
Well-Known Member
Hi David,
Been a while, hope your wrist is doing better cause I need you to finish your background so I can plan mine.
That's a lot of background you need to do, I can't wait to see the final look
Later
Been a while, hope your wrist is doing better cause I need you to finish your background so I can plan mine.
That's a lot of background you need to do, I can't wait to see the final look
Later
logandsawman
Northern Pacific history enthusiast
Hi guys, thanks for your concern, actually turned out to be a burst blood vessle in my hand which caused mucho pain for several days. Pretty much out of the woods now and actually made some progress on my backdrop framework last night!!
I have been off the computer for a few days while healing up and have a lot of catching up to do.
I have been off the computer for a few days while healing up and have a lot of catching up to do.
logandsawman
Northern Pacific history enthusiast
Here is some progress on my backdrop. I have the whole framework glued together, I glued 2 x 2 and 1 x 6 framework on back of the hardboard so I ended up with a 16' section and a 17'6" section.
In addition, I am adding the 1 x 4 strips across the top, painted white, which some 1000 lumen LED lights are being attached to. They are being wired together (parallel) and will be operated with one switch in the control center.
Here I have the trim boards on and one of the lights wired in, also wires running to the second light.
The lights are situated to highlight key areas of the layout. There will be a total of 4 lights. There is also general room lighting which will not be obstructed by the backdrop.
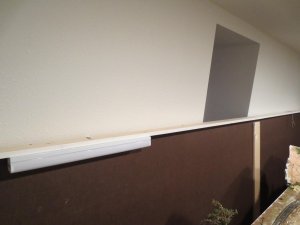
The top of the backdrop is at 6' so the wires and top of the board will not be visible to anyone shorter than 6'4".
The vertical 1x6 in the center of the hardboard sheets was used to clamp (temporary) the pieces together while glueing, and will be removed.
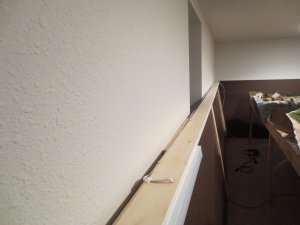
In addition, I am adding the 1 x 4 strips across the top, painted white, which some 1000 lumen LED lights are being attached to. They are being wired together (parallel) and will be operated with one switch in the control center.
Here I have the trim boards on and one of the lights wired in, also wires running to the second light.
The lights are situated to highlight key areas of the layout. There will be a total of 4 lights. There is also general room lighting which will not be obstructed by the backdrop.
The top of the backdrop is at 6' so the wires and top of the board will not be visible to anyone shorter than 6'4".
The vertical 1x6 in the center of the hardboard sheets was used to clamp (temporary) the pieces together while glueing, and will be removed.
Hawkesburytrain
Well-Known Member
Hi David,
Very well thought out with the lights.
Questions:
- When you say glued, is it ONLY glued or did you also use nails?
- I need to curve my background with a radius of about 20", would you be able to use the same material you're using for your background? and if not, what would you use?
- What exactly are you using and can you guide me to a picture of the material (maybe being from Canada, we have a different name for the board)
- What's the thickness of that board?
Thanks for your help
Very well thought out with the lights.
Questions:
- When you say glued, is it ONLY glued or did you also use nails?
- I need to curve my background with a radius of about 20", would you be able to use the same material you're using for your background? and if not, what would you use?
- What exactly are you using and can you guide me to a picture of the material (maybe being from Canada, we have a different name for the board)
- What's the thickness of that board?
Thanks for your help
logandsawman
Northern Pacific history enthusiast
Good questions, Lloyd; I can go home and check with materials if that radii would work. I only used glue across the top, used screws to hold everything tight than removed the screws on top and did some light sanding to be sure marks would not show through.
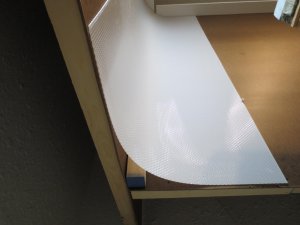
On my corners I am curving a plastic material to 8" radius so there is not a sharp right angle. The material is 2' x 4' and normally used in suspended ceilings where a flourescent light is placed behind them. I can get a photo this weekend when I am installing them. Menards does have a heavy cardboard in rolls 63" x 100' not sure if that would work for anything.
On the bottom, where it isn't showing I used screws and glue and will leave those screws in. I used the 1 1/4" sheet rock screws spaced about 12' apart..
The board I am using is 1/8" hardboard. That is what they call it here and I don't know any other name for it. It also comes 1/4" but that would be pretty heavy.
On my corners I am curving a plastic material to 8" radius so there is not a sharp right angle. The material is 2' x 4' and normally used in suspended ceilings where a flourescent light is placed behind them. I can get a photo this weekend when I am installing them. Menards does have a heavy cardboard in rolls 63" x 100' not sure if that would work for anything.
On the bottom, where it isn't showing I used screws and glue and will leave those screws in. I used the 1 1/4" sheet rock screws spaced about 12' apart..
The board I am using is 1/8" hardboard. That is what they call it here and I don't know any other name for it. It also comes 1/4" but that would be pretty heavy.
logandsawman
Northern Pacific history enthusiast
The hardboard will not curve to a 20" radius, maybe 40". However, the laminate material they use for countertops, sometimes called formica, will bend down that much and is plenty strong to support a backdrop. It can be custom ordered to your dimensions and attached easily to adjacent wood using contact cement.
Masonite--could be the same stuff.
Masonite--could be the same stuff.
Hawkesburytrain
Well-Known Member
Thanks Jim
Thanks again David
I figured that such a small radius wouldn't work.
I'll need to spend sometime at the wood depot store to figure out what would be best.
I need to cover 190', that would be the entire layout.
Thanks again David
I figured that such a small radius wouldn't work.
I'll need to spend sometime at the wood depot store to figure out what would be best.
I need to cover 190', that would be the entire layout.
Masonite/Hardboard, referred to by both names here. There is an oil tempered variety may curve more successfully, don't know where the "oil" part comes into it 'cause it's paintable.
The hardboard will not curve to a 20" radius, maybe 40". However, the laminate material they use for countertops, sometimes called formica, will bend down that much and is plenty strong to support a backdrop. It can be custom ordered to your dimensions and attached easily to adjacent wood using contact cement.
Masonite--could be the same stuff.
Masonite is a trade name for hardboard. Widely used for interior doors. 4.8 mm Masonite will take a dry curve of 450 mm. (1/4" and 18") Wet, you can get it down to half that. Formica would be pretty expensive.
logandsawman
Northern Pacific history enthusiast
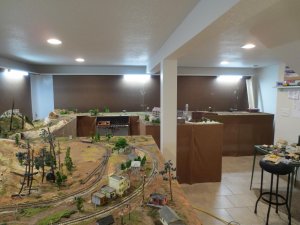
I was able to install all the lights and get the framework up to its final location, here are the pics:
Here is a shot of the finished lights mounted just above the backdrop framework. The top of the frame is 6'.
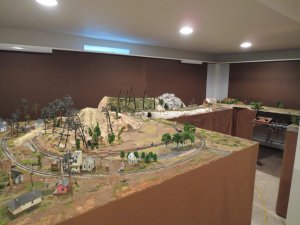
In this shot the lights are turned on. The back of the layout will be well illuminated. 8" of new landscaping will be added to theback here.
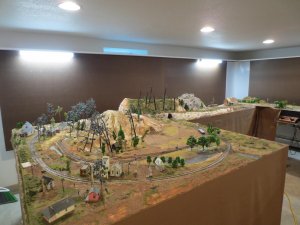
Here is the lighting on the other side of tha layout. A 2" expansion along the very back wall will be added, for a gravel road and some vegetation:
Here is how I did the corner. I used plastic panels made for lighting in suspended ceilings. It will be epoxied into place.
Here is a shot of the finished lights mounted just above the backdrop framework. The top of the frame is 6'.
In this shot the lights are turned on. The back of the layout will be well illuminated. 8" of new landscaping will be added to theback here.
Here is the lighting on the other side of tha layout. A 2" expansion along the very back wall will be added, for a gravel road and some vegetation:
Here is how I did the corner. I used plastic panels made for lighting in suspended ceilings. It will be epoxied into place.
Hawkesburytrain
Well-Known Member
Very nice David, looks great
Hope you had help attaching those long panels
Can't wait to see the backdrops
Thanks for sharing
Hope you had help attaching those long panels
Can't wait to see the backdrops
Thanks for sharing
logandsawman
Northern Pacific history enthusiast
Thanks, Jim; Lloyd; I just read in a recent MRR one of the featured railroaders took the same approach to clean appearance on the backdrop framework and skirting area. Of course, there is no right or wrong when it comes to personal preferences.
I think I most often see where there are controls and diagrams both above and below the tracks. I think these look cool but are maybe most appropriate to people that like to feature this part of the layout.
I think I most often see where there are controls and diagrams both above and below the tracks. I think these look cool but are maybe most appropriate to people that like to feature this part of the layout.

logandsawman
Northern Pacific history enthusiast
Thanks, Chet, I just reviewed my plans with the President of the Corporation (wife) and she is on board with it, will be ordering today. Later will post photos of the purchased materials.
logandsawman
Northern Pacific history enthusiast
Here are pics of the backdrops I ordered, a total of 34 lineal feet, from left to right first some blue sky with a few whispy clouds, then gently rolling landscape up to a bigger hill. I have an opportunity to mask the transition from clouds to terrain with some landscaping I will be adding to the layout:

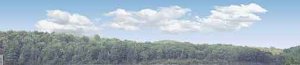
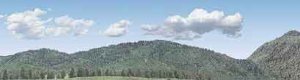
The vendor is Backdrop Warehouse and they have better images than the ones I copied. They have a huge selection if you are planning a large continuous scene.
The vendor is Backdrop Warehouse and they have better images than the ones I copied. They have a huge selection if you are planning a large continuous scene.

Affiliate Disclosure: We may receive a commision from some of the links and ads shown on this website (Learn More Here)