
Need some help for a Roco/Atlas HO diesel- truck removal

ModelRailroadForums.com is a free Model Railroad Discussion Forum and photo gallery. We cover all scales and sizes of model railroads. Online since 2002, it's one of the oldest and largest model railroad forums on the web. Whether you're a master model railroader or just getting started, you'll find something of interest here.


GGNInNScale

Granite Gorge and Northern Again
Back in the day when I ran HO, I had a bunch of these Roco/Atlas diesels. I need to service the gears in a GP40 unit, but cannot get the truck off the frame. I can remove the bottom plate and the two driven axles- no issue. But I cannot remember how to get the truck assembly off the frame. The two splines that extend over a horizontal bar are probably brittle (age), so I don't want to pull too hard. I cannot recall if there was a kingpin to bump over. The Atlas archives do not go back to the Roco days. I searched online, but nothing useful- mostly the newer Atlas models and some Athearn models.
Any help is appreciated. Thanks in advance.
 
Back in the day when I ran HO, I had a bunch of these Roco/Atlas diesels. I need to service the gears in a GP40 unit, but cannot get the truck off the frame. I can remove the bottom plate and the two driven axles- no issue. But I cannot remember how to get the truck assembly off the frame. The two splines that extend over a horizontal bar are probably brittle (age), so I don't want to pull too hard. I cannot recall if there was a kingpin to bump over. The Atlas archives do not go back to the Roco days. I searched online, but nothing useful- mostly the newer Atlas models and some Athearn models.
Any help is appreciated. Thanks in advance.
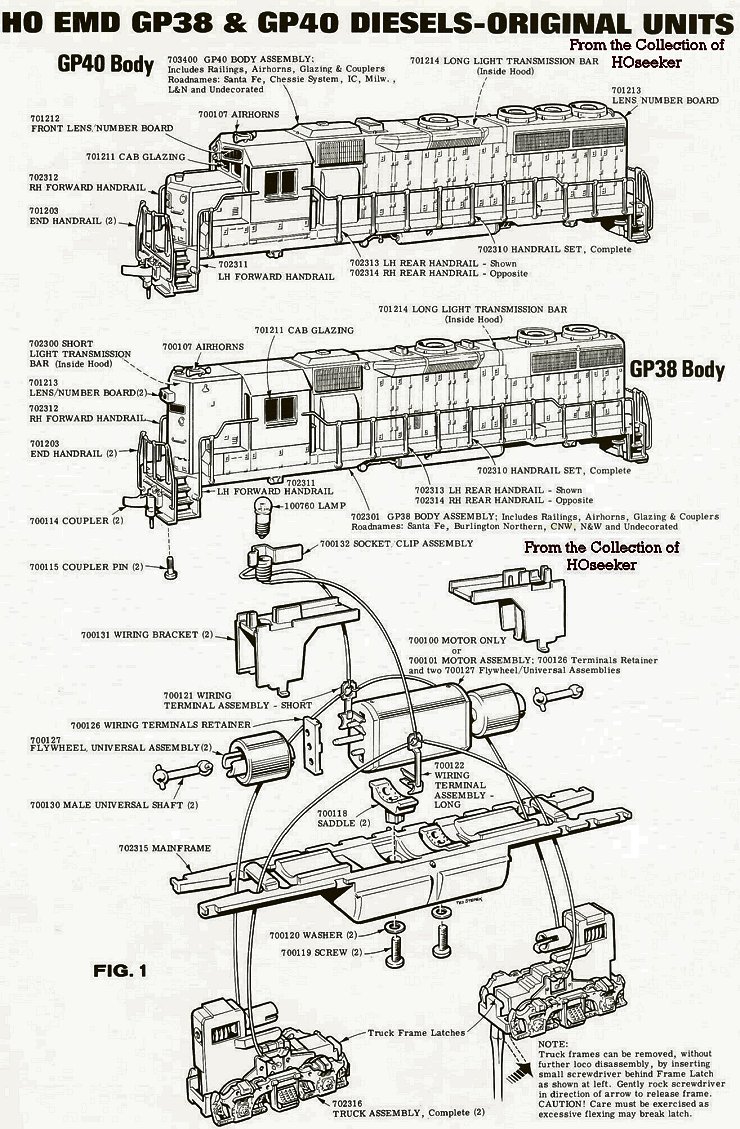
As I recall it is just a dimple on the truck and a bump in the truck that keep them on. I cannot see either in the diagram.
assemblyexplosionatlasgp38highhoodpg1.jpg


Edit - actually I found it in the explosion diagram for the SD24.
sd24 truck.jpg
 
Last edited:
Hi Thanks a bunch. I looked at the main diagram also, but that did not give enough info as you noted. I don't want to break anything as this type of plastic is basically non-repairable, although using a brace and some epoxy might work until oil rots the epoxy. I will try to pull things a bit harder, maybe with a wedge to spread the splines to clear the kingpin. Access is really limited.
 
Last edited:


Looking at a zoomed-in view of the GP-40 diagram posted above.

It says:
Truck frames can be removed, without further loco disassembly, by inserting small screwdriver behind frame latch as shown above. Gently rock screwdriver in direction of arrow to release frame.
CAUTION! Care must be exercised as excessive flexing may break latch.


truck diagram.jpg


Looking at the pic (I don't have any old Roco-built engines), these seem to have a different "gear tower design" than do just about all locos made in more recent times (thinking of the Proto 2000 line).

In every engine I own (about 33 of them), there is a U-shaped "clip" that covers the worm and secures the truck to the frame.

Not on these.
Wondering if "the latch" mentioned above permits the ENTIRE truck assembly to be removed, or perhaps just a part of it ...?
 
I have maybe a dozen of the Roco ones made in Austria and about three doz of the Kato ones made in Japan the Roco are older I think made in the late 80's the Kato in the 90's any way here's the truck for the GP40

https://hoseeker.org/assemblyexplosionAtlas/Assembly Explosion Atlas GP-38 Truck Assembly.jpg
Yeah! On that one there is a "dimple" in the 7000149 clamp part. That is why initially I could not figure out if the dimple was on the frame or the truck. Seems it was both depending on time.

I looked at the main diagram also, but that did not give enough info. I don't want to break anything as this type of plastic is basically non-repairable, although using a brace and some epoxy might work until oil rots the epoxy. I will try to pull things a bit harder, maybe with a wedge to spread the splines to clear the kingpin.
I do recall repairing a truck in exactly that manner. I used epoxy (or 6000) to attach a waste sprue from some modeling kit. I think the one I did is still intact, but the slippery plastic they use in the truck does not like to take glue.
 
Last edited:
That latch on the bottom of the truck is to help take the truck apart

Look at the diagram take the two wiring brackets off and then you can gently pry between the truck and the cross member of the frame
It doesn't take much pressure not much holding it the truck will come straight out between the split part of the frame nothing should break doing that

then you will be able to take the truck apart I've never broken a part on one of these I just went and looked I have four of the GP40's made by Roco one of them I took the frame and used it on a different body
 
Looking at a zoomed-in view of the GP-40 diagram posted above.

It says:
Truck frames can be removed, without further loco disassembly, by inserting small screwdriver behind frame latch as shown above. Gently rock screwdriver in direction of arrow to release frame.
CAUTION! Care must be exercised as excessive flexing may break latch.


View attachment 204747


Looking at the pic (I don't have any old Roco-built engines), these seem to have a different "gear tower design" than do just about all locos made in more recent times (thinking of the Proto 2000 line).

In every engine I own (about 33 of them), there is a U-shaped "clip" that covers the worm and secures the truck to the frame.

Not on these.
Wondering if "the latch" mentioned above permits the ENTIRE truck assembly to be removed, or perhaps just a part of it ...?
Hi The latch only removes the bottom axle retaining clip with the oil hole. Then the two axles can be removed, The idler gears are retained between the two side plates. I tried to pop the two side plates apart but they do not move far enough in the main frame to remove the gears and access the main gear.


Mine don't have the pcb or the posts either the ones with those that might have been something in between at some point

can you take a pict of yours

and you have to remove the truck before it will come apart don't take the bottom cover off until the truck is out

then you can see there are three points that have a built in clip and that 700149 clip holding the sides together

IMG_0424[1].JPG
IMG_0425[1].JPG
 
Hi Thanks for your time. My unit is the same as yours. You hit the issue: removing the truck. I have tried a number of ways to get the truck out of the frame- small screwdriver wedging between the top of the truck and the bottom of the metal frame and pulling, a thin spatula to get into the pivot pin, just pulling and wiggling, to no avail so far. I also tried to squeeze the truck and metal frame horizontal bar with a pair of needle nose to push the truck past the pivot- did not work either. I have taken off the gray lamp/wire holder to work on the truck. You can see where I changed the old incandescent bulb to directional LEDs (both ends)- works really well. I had a trick back to do this, but after 40+ years, it is long out of memory🤪

gp2.jpg

gp1.jpg
 
I just took hold of the truck with my hand on the truck frames and wiggled side to side and pulled at same time It popped right off
 
Well, I finally decided to give it a "W-t-H", if it breaks so be it... I wedged a flat screwdriver between the end of the truck and the metal of the frame and kept the pressure on until it yielded. It resisted pretty hard.
Of course the pickup clip was fused onto the two gear tower pieces, so a bit of dremel work to release the case halves. As Rosanne Rosanadana said "It's always something..."
 
If the prongs break off, you can use a soldering iron to melt the prongs back in place (plastic fusion weld). The prongs may also be reinforced with scrap plastic which smells the same when melted as when the prongs are melted.
I have had to replace the truck prongs on a few occasions. As I recall, I used epoxy and an old sprue for one of them, and E6000 glue and half round styrene piece for the other.


Affiliate Disclosure: We may receive a commision from some of the links and ads shown on this website (Learn More Here)

Back
Top
