You are using an out of date browser. It may not display this or other websites correctly. You should upgrade or use an alternative browser.
My Northern Pacific Butte Montana Layout.
Thread starterNP2626
Start date
ModelRailroadForums.com is a free Model Railroad Discussion Forum and photo gallery. We cover all scales and sizes of model railroads. Online since 2002, it's one of the oldest and largest model railroad forums on the web. Whether you're a master model railroader or just getting started, you'll find something of interest here.
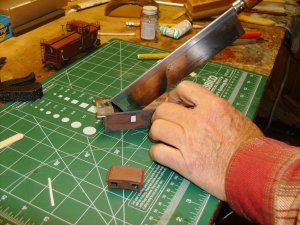
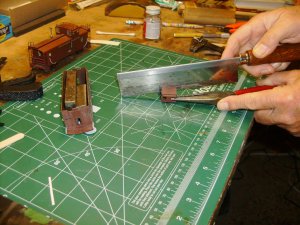
I could not find the dimensions describing where the cupola is located on the body of the caboose. So, I made up a scale to scale the N.P. drawings in the Mainstreeter. From this I determined how far back from the long end, the cupola was located. That dimension is 17 feet in round figures. In reality it is probably 17 feet X inches. So, I made a mark on the roof 17 feet back from the long end of the body. I laid my Cupola on top, making sure it looked square and scribed a line with my #11 X-acto knife and cut that part out of the roof. In the 2nd photo, I show how I cut out the roof section with a razer saw. The part removed is moved to the back end of the cupola opening and glued in place to fill the hole. I actually end for ended the piece, so that the roof walk supports aligned better.
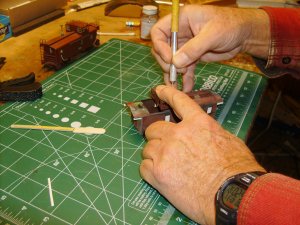
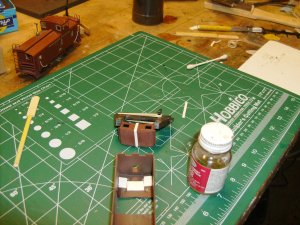
In photo #1 above, because I need to widen the cupola I am cutting the cupola in half along the center line of the car. The cupola was difficult to hold, so I used my nerdle nees pliers to hold it. The body of the caboose is to the left in this photo and I have glued plastic tabs to the underside of the roof, to support the roof piece cut off previously from the front portion of the body which will be moved back to the back part. The weights inside the body are holding the tabs in position.
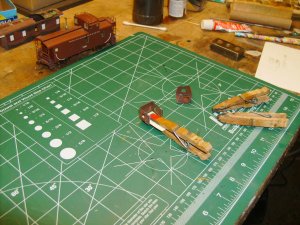
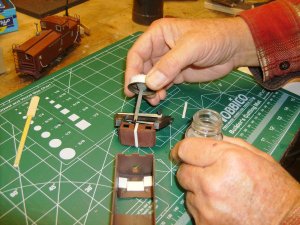
In photo #2, I'm showing the new plastic underside of the cupola roof that will align the two halves of the cupola and hold them apart the distance needed to make the cupola as wide as the body of the caboose. I bent the part to fairly closely match the camber of the roof of the cupola and am using one of my Clothes Pin clamps to secure the part to the underside of the cupola's roof.
This would be a good place to describe my Clothes Pin Clamps. They are made from spring type clothes pins and I have found these to be the handiest clamps I have and I made them back when I was heavily involved in Radio Control Model Airplanes. The wood portion of the clamp is disassembled form the spring. The spring is reversed from it's normal position and the wood portions flipped over and reinserted into the springs. The wood pieces are pushed into the spring so the arms fit into the notch where the round spring barrels where located. These clamps have a fairly long reach into a part to apply clamping pressure. I have about twenty five or so of these part. Some have tapered ends; or, small pads of 1/16th plywood glued to the clamping pads. These really are very handy devices and if you don't have any, maybe you should make a couple and discover how handy they are. They are certainly not my invention, I think I was shown how to make them in Radio Control Modeler Magazine. The photos describe how to make them better than I can describe verbally.
In the first photo, I am showing the pieces glued to the inside of the roof used to support moving the piece cut from just forward of the of the cupola, that was moved to the back of the cupola. It aslo shows that the widening pieces for the cupola have been installed and clamped in position.
The second shows my using Testor's Liquid cement to glue the parts to the cupola. You can see that the brush bristles have been thinned down to about 1/4th of the amount of bristles that where originally in the brush glue applicator. This allows for smaller amounts of cement to be strategically placed where needed.
That caboose is really coming along. Like that you have good photos to work with. NP cabooses were a bit different compared to other railroads and it's nice that you are capturing the look. Waiting for more updates.
Updating away! Thanks for the kind words! I was starting to wonder if anyone was still watching, good to see someone is. Yes, N.P. cabooses where a bit different. Many where built here in Minnesota at the Brainerd shops, the 1000 to 1100 cabooses where.
Oh Yeah ... watching away. I love seeing articles of modeling projects such as this. I may not comment every time, but you can bet your last dollar that I am watching.
Love the clamps .. I have to make myself some of those.
Thanks for watching Sherrel, feed back is always good. Yes indeed, those little clamps are some of the most used items in my shop, even though they're range of useful clamping distance is only about 1/2 inch.
I'm having a difficult time finding the color "Mineral Red" as that is the Floquil color I used to paint my previous Northern Pacific steel caboose. Anyone have an suggestions?
I'm taking a break from building the caboose and am using a spread sheet to catalog all my rolling stock. I think I have around 150 freight cars, the majority are box cars as was the case with what I can remember of the Northern Pacific and mostly 40 footers. If I come across any duplicate road numbers, instead of changing one of the numbers, as I have attempted to do, I think I will just sell those cars off. I don't know where/when I picked up my enjoyment of statistics, as I am not a arithmetic/math/algebra type person by any stretch of the imagination! However, I do like them as they can tell me many things about my railroad.
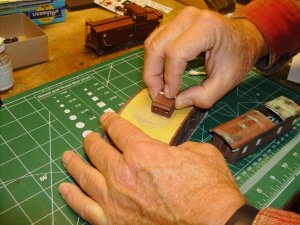
I'm back at it, again. It just so happens that the camber of the roof of the body of the caboose fairly closely matches the camber of the top of one of my rubber sanding blocks. Because I added width to the cupola, I needed to match the base of the cupola to the roof of the caboose, again and this is how I did that. It doesn't need to absolutely match, that is what the Squadron Signals putty takes care off.
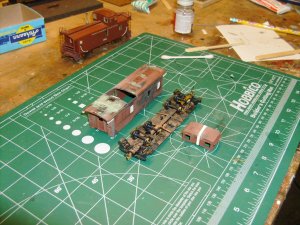
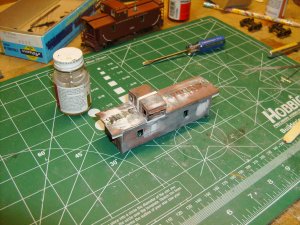
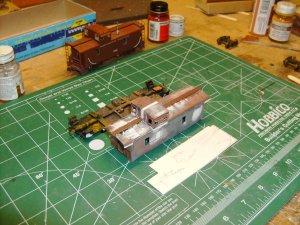
Here are the sub-assemblies; the body, the chassis and the cupola. Final sanding and filling is still quite a ways off. I will eventually sand the body and cupola with 600 grit paper. I'm somewhat stymied at this point, as I don't remember how I cut the new windows in. Anyone have any suggestions?
I ended up using a #11 X-acto knife to cut the new windows in. made a few passes on each side and then drilled a 1/8th inch hole in the center and broke out the centers of the windows. Low tech, I know; but, it worked. My totals of the rolling stock on my layout are complete: I have 141 freight cars and of those, 55 are box cars, 40 and 50 footers, I have 9 Overton Passenger cars, I have 12 cabooses, 6 MOW cars, 12 steam locomotives and 9 diesels. Six of my steamers are in some state of needing repair; or, are being converted to DCC/Sound. All of my diesels are in good working order. Generally the diesels pull very well, the steamers maybe not quite as well.
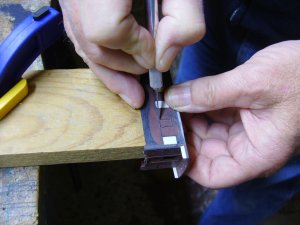
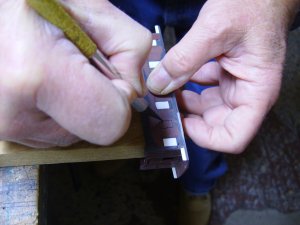
In photo one, I'm showing off the process of cutting off the tip of your thumb. No, kinda looks like it; but, I'm really only making pass cuts on the bottom of the back caboose window, on the right side. Three or four cuts, trying to stop before I go to far, then you move on to one of the other of the four sides of the window as seen in photo #2. I only needed to cut two new windows, then like I said above I drilled a 1/8th inch dimeter hole in the center of the window and that allowed me to use a needle nose pliers to break out the plastic in the window. Then I used a small file to clean up the edges of the new window.
I think what you've forgotten of the window cutting out process, is to make cuts from the corners into that center hole (X) so the plastic breaks out easier.
The plastic broke out very easily Toot; however, I will keep that in mind for next time.
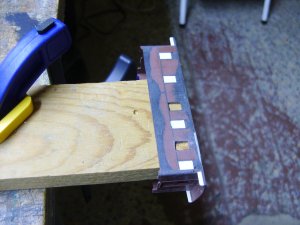
Here is the finished product after completing the cutting out process. The window is in rough condition at this point and needs to be have the edges filed straight and smooth.
In this photo, the cupola has been glued onto the body of the caboose and the sides and joints where the cupola joined the body have been filled and sanded smooth with 220 grit sandpaper and my little flat file. The new windows in the body have had there edges smoothed and straightened.
At this point I will admit to everyone that this kit bash has not turned out as well as I would have liked. The cupola is maybe about 1/16th of an inch too far forward and the cupola is slanted forward just a bit! Being too far forward is only noticeable from the left side of the caboose and the fact it is slanted is only noticeable from directly from the side. I could possibly fix this by breaking out the cupola and re-attaching. However, I've decided I'm just going to live with it. When I built the 1000-1049 series caboose 10-15 years ago, I wouldn't have made these mistakes as my abilities where at their peak. Today, at 66 and going on 67, things that used to be important, are less so at this age. At least I am still able to see my mistakes! I also think I'm able to be less critical of myself at this older age.
If you where looking for perfection in this kit bash, sorry to disappoint!
While I haven't commented yet, this has been an educational and interesting kitbash/modification. To paraphrase something I recently heard in our presidential election, if you go for perfection, you never get anything done!
Keep posting your progress.
Willie
Again, here is a photo of the three sub assemblies for the project, only now the cupola and body have been joined; so, we're actually down to two sub assemblies. I have now glued the roof walks onto the roof of the body. I guess I had inadvertently sanded off a few of the roof walk's support blocks and needed to replace them with plastic strips cut with my NWSL "The Chopper". Also, the old roof walks from the Athearn kit needed to be modified: I cut off the end platform as it will be moved to the other side and the platforms near the cupola are not used. The forward roof walk needs to be shortened as the cupola has been moved forward and the rear one needs to be lengthened by gluing what was removed from the forward one, onto the rear. I cut the length of the roof walks so that they hung over the end of the roof 1/8th of an inch.
The white plastic in front of the body in the photo above, is a drill template I made for the tall cupola caboose I built previously. It is for drilling the holes in the caboose and making its' grab. It is flipped over and drilled from the other side, to make the holes on the other side of the caboose. Although not visible, all the holes for the various grab rails have been drilled into the caboose in this photo. So, the next step in the process will be the making of the grab rails!
I was just looking at photos of cabooses at the NPRHA website and realized I need to cut in the small bathroom window at the forward end of the left side. I will use Toot's suggestion of cutting an "X" where I want to remove the plastic where the window will go.
During the past week, I found out that American Model Builders Laser Kit have introduced a new Northern Pacific Caboose, the 1700 series. These are the wood N.P. cabooses that have the side of the cupola exactly the same width as the body. I had to order one and it came today! Other than the fact I would really like to build this caboose, NOW, I have put it on the shelf and will finish this steel caboose project first. If you need one of these cabooses, I've found the best price to be at the Northern Pacific Railway Historical Association's website company store at $46.00. AMB's Laser kit of this caboose is selling for $52.95, from Laser kit.