
You are using an out of date browser. It may not display this or other websites correctly.
You should upgrade or use an alternative browser.
You should upgrade or use an alternative browser.
My adventures in Ho Scale.
- Thread starter migalyto
- Start date
ModelRailroadForums.com is a free Model Railroad Discussion Forum and photo gallery. We cover all scales and sizes of model railroads. Online since 2002, it's one of the oldest and largest model railroad forums on the web. Whether you're a master model railroader or just getting started, you'll find something of interest here.

Concerning the quite vertical areas, what do you plan ? Is it possible to do some handcarving or is there any plaster cloth in the way underneath.
You have to be careful when coloring though. Plaster and sculptamold take washes at a different rate. You have to apply a solid base layer before you start your washing, or it will be noticeable.
I can go through that when I start the coloring process.
I can't say much because I never used plaster cloth nor sculptamold.
Covering everything with a 1/2 inch (or thicker) layer of slow setting plaster that could be carved, is a way to create eye catching formations and hide all unrealistic
"ripples". The thicker the layer is, the deeper the carved formations can be. Also good for outstanding rocks outcroppings.
Watching the second photo it would be possible to first, spread glue above and below the rocks on the slope, then pour different sizes of screened sand and let it flow between the rocks all the way down the lower slope. Pour enough sand so it will look natural. The finest size last.
Putting some stones at the foot of the cliff, they would be partially covered and would act as a dam so the sand wouldn't flow too far.
Then just use the known method to glue everything ( wet water or alcohol then 50/50 mix water and glue).

Thanks for that!

would really take it to the next level.
Keep the suggestions coming!
the sand will spread out.
I attach some photos of different cases that could help to visualize.
The drawback is that when the glue has set and everything is dry, you'll need an airbrush to color sand and stones, then a drybrush to make individual stones and sand grains stand out.
I suppose it is the first coloring step.
You could have just painted the rocks then let sand and rocks flow down the slopes. When glued and dry use an airbrush to color sand and stones.
Anyway, it looks good.
I plan on using 5 or more colors on these rocks.

I used this plaid nutmeg brown since it was flat. I used the entire 8oz bottle mixed 4:1 with water in a glass Mason jar.

Then it will get a heavier black wash to bring out the cracks, and cause some shadowing.
Final will be a very thin black wash to tie it all together.
That's the plan, we shall see!

Affiliate Disclosure: We may receive a commision from some of the links and ads shown on this website (Learn More Here)

trailrider
Well-Known Member
Will your MOW people check the rocks periodically to see they can't come down on the tracks? Maybe they should hire some of the people who check Mt. Rushmore periodically. All kidding aside, that looks GREAT!
migalyto
Well-Known Member
I was working on this area doing some blending and kept thinking it needed a little more depth.
Here's what I started with.

I added a couple more castings to it to give it more depth.


Im fairly happy with this section and think that will be all the castings for this particular mountain. I believe I have achieved the look I was going for and didn't want to do too much, less is more from what I hear.
This is how this scene is shaping up.

Thanks for looking.
Here's what I started with.
I added a couple more castings to it to give it more depth.
Im fairly happy with this section and think that will be all the castings for this particular mountain. I believe I have achieved the look I was going for and didn't want to do too much, less is more from what I hear.
This is how this scene is shaping up.
Thanks for looking.
These are great looking rocks and also nicely blended together.I was working on this area doing some blending and kept thinking it needed a little more depth.
Here's what I started with.
View attachment 225092
I added a couple more castings to it to give it more depth.
View attachment 225093
View attachment 225094
Im fairly happy with this section and think that will be all the castings for this particular mountain. I believe I have achieved the look I was going for and didn't want to do too much, less is more from what I hear.
This is how this scene is shaping up.
View attachment 225095
Thanks for looking.
Concerning the quite vertical areas, what do you plan ? Is it possible to do some handcarving or is there any plaster cloth in the way underneath.
migalyto
Well-Known Member
Yes, there will be some hand carving involved in those areas. and probably some scrap castings.Concerning the quite vertical areas, what do you plan ? Is it possible to do some handcarving or is there any plaster cloth in the way underneath.
You have to be careful when coloring though. Plaster and sculptamold take washes at a different rate. You have to apply a solid base layer before you start your washing, or it will be noticeable.
I can go through that when I start the coloring process.
I understand, very interesting challenge.Yes, there will be some hand carving involved in those areas. and probably some scrap castings.
You have to be careful when coloring though. Plaster and sculptamold take washes at a different rate. You have to apply a solid base layer before you start your washing, or it will be noticeable.
I can go through that when I start the coloring process.
migalyto
Well-Known Member
So, much of what I have done over the last couple of weeks really havent been photo worthy. I have been doing some final touch-up on the blending of the rock castings and getting everything in this elevator section in a final layer of sculptamold..
I'm finishing up this end section and wasn't really liking the look of everything going from the top of the mountain straight down. I wanted to change it up so the two rock faces didn't come together just flat and form a 90 degree angle. I decided to put a taper from the bottom half or so way up and start the rock faces from there. hope that makes sense. It will when I add them, now its a little hard to visualize.
Here's what I started with:

With some cardboard strips I made a slight taper. Not a lot, only around 1.5", and covered it with tape so I could see what it will look like.

Then added a layer of plaster cloth.
Final result.


I can now get the final shape with the sculptamold . I may taper a little more.
I'm finishing up this end section and wasn't really liking the look of everything going from the top of the mountain straight down. I wanted to change it up so the two rock faces didn't come together just flat and form a 90 degree angle. I decided to put a taper from the bottom half or so way up and start the rock faces from there. hope that makes sense. It will when I add them, now its a little hard to visualize.
Here's what I started with:
With some cardboard strips I made a slight taper. Not a lot, only around 1.5", and covered it with tape so I could see what it will look like.
Then added a layer of plaster cloth.
Final result.
I can now get the final shape with the sculptamold . I may taper a little more.
Hi ! These vertical cliffs look very promising and should be quite impressive when done.So, much of what I have done over the last couple of weeks really havent been photo worthy. I have been doing some final touch-up on the blending of the rock castings and getting everything in this elevator section in a final layer of sculptamold..
I'm finishing up this end section and wasn't really liking the look of everything going from the top of the mountain straight down. I wanted to change it up so the two rock faces didn't come together just flat and form a 90 degree angle. I decided to put a taper from the bottom half or so way up and start the rock faces from there. hope that makes sense. It will when I add them, now its a little hard to visualize.
Here's what I started with:
View attachment 233733
With some cardboard strips I made a slight taper. Not a lot, only around 1.5", and covered it with tape so I could see what it will look like.
View attachment 233730
Then added a layer of plaster cloth.
Final result.
View attachment 233731
View attachment 233732
I can now get the final shape with the sculptamold . I may taper a little more.
I can't say much because I never used plaster cloth nor sculptamold.
Covering everything with a 1/2 inch (or thicker) layer of slow setting plaster that could be carved, is a way to create eye catching formations and hide all unrealistic
"ripples". The thicker the layer is, the deeper the carved formations can be. Also good for outstanding rocks outcroppings.
migalyto
Well-Known Member
Over the last few days I was figuring out how to do this area.
In the above post I decided to put a slight sloe to this mountain than have it just be a straight cliff wall as most of the others are and I didn't like the box shape it would create at the corner.
I added a slight slope from the middle to the bottom and added some rock work.
Here it is all blended and in its final layer of sculptamold.
I really like how this is shaping up. Almost time to get some ground color on this area and pull it all together.


In the above post I decided to put a slight sloe to this mountain than have it just be a straight cliff wall as most of the others are and I didn't like the box shape it would create at the corner.
I added a slight slope from the middle to the bottom and added some rock work.
Here it is all blended and in its final layer of sculptamold.
I really like how this is shaping up. Almost time to get some ground color on this area and pull it all together.
Last edited:
I like it, it's taking shape. If I may, I have a suggestion :Over the last few days I was figuring out how to do this area.
In the above post I decided to put a slight sloe to this mountain than have it just be a straight cliff wall as most of the others are and I didn't like the box shape it would create at the corner.
I added a slight slope from the middle to the bottom and added some rock work.
Here it is all blended and in its final layer of sculptamold.
I really like how this is shaping up. Almost time to get some ground color on this area and pull it all together.
View attachment 234195View attachment 234196View attachment 234197
Watching the second photo it would be possible to first, spread glue above and below the rocks on the slope, then pour different sizes of screened sand and let it flow between the rocks all the way down the lower slope. Pour enough sand so it will look natural. The finest size last.
Putting some stones at the foot of the cliff, they would be partially covered and would act as a dam so the sand wouldn't flow too far.
Then just use the known method to glue everything ( wet water or alcohol then 50/50 mix water and glue).
Kusojiji
RANK AMATEURS OF THE MODEL RAILROAD FORM MEMBER
You going to paint an ACME tunnel at the end of that run so that the coyote can smash into it? hahaOver the last few days I was figuring out how to do this area.
In the above post I decided to put a slight sloe to this mountain than have it just be a straight cliff wall as most of the others are and I didn't like the box shape it would create at the corner.
I added a slight slope from the middle to the bottom and added some rock work.
Here it is all blended and in its final layer of sculptamold.
I really like how this is shaping up. Almost time to get some ground color on this area and pull it all together.
View attachment 234195View attachment 234196View attachment 234197
migalyto
Well-Known Member
Now that you mention it, I will never be able to un-see that image any time look down those tracks!You going to paint an ACME tunnel at the end of that run so that the coyote can smash into it? haha
Thanks for that!
migalyto
Well-Known Member
Thanks, took me several days of to get it to this point.I like it, it's taking shape.
I had actually thought of doing something similar to the slope. I didn't think of starting at the top and letting it fall naturally, but I think that. If I may, I have a suggestion :
Watching the second photo it would be possible to first, spread glue above and below the rocks on the slope, then pour different sizes of screened sand and let it flow between the rocks all the way down the lower slope. Pour enough sand so it will look natural. The finest size last.
Putting some stones at the foot of the cliff, they would be partially covered and would act as a dam so the sand wouldn't flow too far.
Then just use the known method to glue everything ( wet water or alcohol then 50/50 mix water and glue).
would really take it to the next level.
Keep the suggestions coming!
When letting sand "flow", the natural "angle of repose" (specialists words, not mine) is about 30/33°. It helps to know ahead roughly how farThanks, took me several days of to get it to this point.
I had actually thought of doing something similar to the slope. I didn't think of starting at the top and letting it fall naturally, but I think that
would really take it to the next level.
Keep the suggestions coming!
the sand will spread out.
I attach some photos of different cases that could help to visualize.
The drawback is that when the glue has set and everything is dry, you'll need an airbrush to color sand and stones, then a drybrush to make individual stones and sand grains stand out.
Attachments
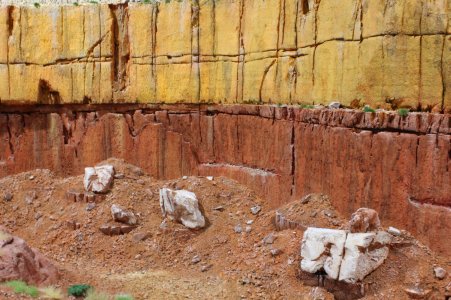
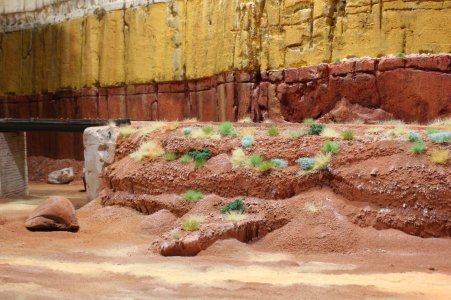
That looks pretty good, I especially like photos 2 and 3. I can already see the debris and rocks that have fallen down the slopes.No turning back now!
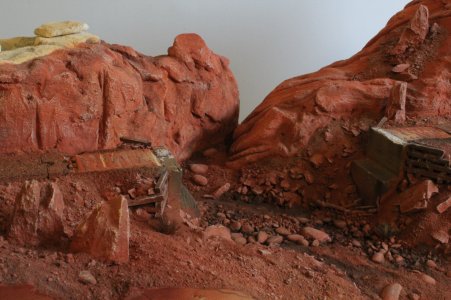
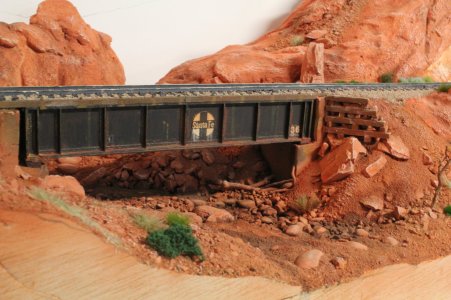
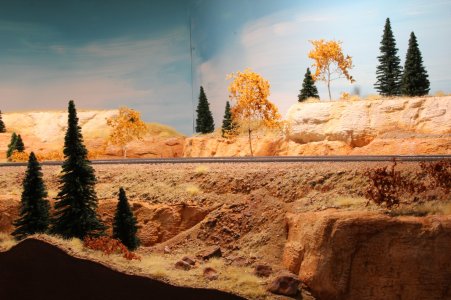
Started getting a base layer everything start pulling it all together.
View attachment 235180
View attachment 235181
View attachment 235182
I suppose it is the first coloring step.
You could have just painted the rocks then let sand and rocks flow down the slopes. When glued and dry use an airbrush to color sand and stones.
Anyway, it looks good.
migalyto
Well-Known Member
This is just a base coat to pull it all together.I suppose it is the first coloring step.
I plan on using 5 or more colors on these rocks.
That looks pretty good, I especially like photos 2 and 3. I can already see the debris and rocks that have fallen down the slopes.
I suppose it is the first coloring step.
You could have just painted the rocks then let sand and rocks flow down the slopes. When glued and dry use an airbrush to color sand and stones.
Anyway, it looks good.
Colorado Midland Modeler
Proudly modeling the CM, MT & SL in HO Scale
Wow! That's just a base coat?! That looks great! If that's not even the finished product, I really look forward to seeing it when it's done.
migalyto
Well-Known Member
Did you water down the paint?
I used this plaid nutmeg brown since it was flat. I used the entire 8oz bottle mixed 4:1 with water in a glass Mason jar.
Yes, colors planned are another brown (earth I think is the color) Raw sienna, Burnt Sienna, probably a gray, I bought Slate and Country to experiment on scrap castings.. These will be thinned much more. Like 8:1 since they are washes and not a base color.Do you plan to in any further coats?
Then it will get a heavier black wash to bring out the cracks, and cause some shadowing.
Final will be a very thin black wash to tie it all together.
That's the plan, we shall see!
Affiliate Disclosure: We may receive a commision from some of the links and ads shown on this website (Learn More Here)