Logan Valley

ModelRailroadForums.com is a free Model Railroad Discussion Forum and photo gallery. We cover all scales and sizes of model railroads. Online since 2002, it's one of the oldest and largest model railroad forums on the web. Whether you're a master model railroader or just getting started, you'll find something of interest here.


Thanks very much for the complement. It took a long time from the original Planning to where it is now.

In the late 70's I had a fairly good size N scale layout, with over 10 scale miles of main line track, plus branch line tracks. Unfortunately back then the quality and performance of N scale locomotives, with some exceptions was extremely poor. I also couldn't find the locomotives I was interested in or the road names. The N scale layout was torn out and plans for the Logan Valley were started. This was in the early 80's. I had a good friend who was interested in HO scale, and in the same era, the transition period. We both were interested in the Northern Pacific and I also had a lot of interest in the Milwaukee Road because when I was a kid, I had relatives working for both railroads, and got to spend countless hours riding in the cabs of steam, diesel and electric locomotives starting when I was about 10. I was hooked.

My friend and I spent a lot of time planning. We were both interested in modeling the area when we live, southwestern Montana, which has a lot of railroad history. Both the Northern Pacific and the Milwaukee Road would be hard to model due to the vast expanse each railroad covered so we decided to freelance. We used USGS amps to figure out where out railroads could actually be and worked from there.

The Logan Valley connected to the NP at Logan, MT and runs south to Gallatin Gateway, where I just happen to live. There it connects to the Milwaukee Road, and my Friends Gallatin Canyon & Western. From Gallatin Gateway, the GC&W runs south to West Yellowstone, MT, where it connects to the Union Pacific. The Logan Valley is a branch/short line that would carry freight from the NP and hand it over to the GC&W to travel south to the UP. In our fictional world, the FCC wouldn't allow the NP to build this route, and being that the GC&W was partially owned by the NP, the Logan Valley would make this route possible. So much for the history.

The Logan Valley construction was started in the mid 80's. At the time I managed to hook up with many suppliers and had dealerships with amny, including Walthers. The lack of hobby shops in our area made this a necessity to continue. My friend had a huge area to wotk with for his railroad. We had a lot of track down for his layout until he unfortunately passed away suddenly. The room for the LV started as a 13x17 foot room. Track was laid but I had the opportunity to expand when a wall was removed and added a 9x13 foot area. Then came destruction and reconstruction.

The additional room is what I have now. I started hand laying code 70 rail. One thing that I really didn't care for in N scale was the over size rail. That is why I chose code 70. I ahd also done a lot of custom painting in O scale for a local collector of brass, so many locomotives and a lot of freight equipment was custom painted for the GC&W and LV. I still have some GC&W equipment, but in my freelance world, the LV bought out the GC&W and just hasn't had time to repaint it. After my friends death, and with the recession that hit in the late 80's, I ended up giving up my dealerships due to not moving enough merchandise. I ahd also been selling to other modelers around the state and due to the recession and a number of job losses, sales went down the drain.

Because of having a solid plan on what I was building, I had quite a lot of what was needed to continue until the mid 90's. Any major construction came to a halt. There was about a 10 year period when the LV was in limbo because the closest hobby shop that stocked what I needed was hundreds of miles away. Finally e-retailers came on line and I was finally able to continue construction.

I also have other hobbies, such as classic car restoration which takes up a lot of my time, plus I am an avid bowler and we do attend various tournaments around to country, so although construction continues, it is at a rather slow pace.
 
As mentioned before, I too got back into MR in N scale in the early 80s. Running qualities were very poor for most of the locomotives and it was hard to detail the models. I got back into HO and never looked back. I had very similar taste in prototype railroads except add in the UP. These were the railroads that ran around me and I saw them on a daily basis. Our childhoods really influence our interests.
One thing to remember I think, is that the 80s and 90s were very active with Model Railroading. Mall shows and swap meet abounded. At least around here. I was also at an age and financial position that I could really indulge myself in the hobby. Racing motorcycles, cars, getting married, and starting a family never stopped my love for the hobby. It wasn't until I had much of my collection stolen and my layout trashed that I left it for another hobby. Not completely but certainly just still a strong interest. My daughter and her boyfriend are showing serious interest as they both grew up with model trains so maybe I'll get to start again.

Steve
 
An amazing story of your history, mont! So tell me...Is your Logan Valley in HO scale or N scale? This part has me puzzled and I don't understand some of the acronyms you've been using...Like what do LV, NP, and GC&W stand for? I know MT stands for Montana. And sorry to hear about your friend's death. Do you also build the trains yourself? Or do you get them from a hobby shop or dealer? Seeing your project and progress has given me inspiration to start my own similar project. Any tips on how to do this? I already know the scale I will be using for this project.


The Logan Valley is an HO scale railroad. I has started in N scale but with the crude locomotives available in the 70's, I changed to HO scale and never looked back. Acronyms, LV - Logan Valley. NP Northern Pacific. GC&W - Gallatin Canyon & Western.

So far as tips. As I said, I grew up with the railroads. I guess the first items would be to choose the era you want to model and the area you want to model. I had a bit of an advantage modeling the area where I live, but did use a bit of modelers license with some of the industries on the layout. Some are actual, along with the town the railroad serves. Some industries were added, but they are industries what either were in the area, or COULD have been.

The next thing would to have a plan. We probably went a little overboard with ours, but even though the plan is over 30 years old, it worked well. I had a very good knowledge of the railroads in the area which was a help, along with the local economy and local industries. This can all be researched if needed if your are modeling any particular area. Al of the trains were locomotives and rolling stock available at the time, which was in the early 80's. All of the Logan Valley locomotives and rolling stock was custom painted and detailed. I had time on my hands and construction was moving slowly as I was almost always waiting for modeling supplies. I sure learned a lot about using an air brush and detailing.

I had a dealership with a number of suppliers for a few years, but ended up letting them go as I couldn't order in the volume they wanted after my friend passed away in the late 80's. Being that I did have a plan and stuck to it, I had a lot of what I needed to keep the layout going until the mid 90's. At that time I was about dead in the water because I had absolutely no decent hobby shops in my area. Billing, MT had one, 150 miles away, but it seemed that he never had what I needed in stock. Finally, in recent years e-retailers have come on line and I have been able to move forward again. It was a bit frustrating. We did a lot of traveling, and when ever we were going be be i a city with a good hobby shop, we would always make it a point to stop by and stock up.

I think if I could have gotten what I needed when I wanted it, I could probably have gotten to th epoint where I am now in probably 12 to 15 years instead of 30 years. Way too much time was lost not being able to find model railroad supplies. I guess I am just a bit persistant because of my feelings for the hobby.
 
The Logan Valley is an HO scale railroad. I has started in N scale but with the crude locomotives available in the 70's, I changed to HO scale and never looked back. Acronyms, LV - Logan Valley. NP Northern Pacific. GC&W - Gallatin Canyon & Western.

So far as tips. As I said, I grew up with the railroads. I guess the first items would be to choose the era you want to model and the area you want to model. I had a bit of an advantage modeling the area where I live, but did use a bit of modelers license with some of the industries on the layout. Some are actual, along with the town the railroad serves. Some industries were added, but they are industries what either were in the area, or COULD have been.

The next thing would to have a plan. We probably went a little overboard with ours, but even though the plan is over 30 years old, it worked well. I had a very good knowledge of the railroads in the area which was a help, along with the local economy and local industries. This can all be researched if needed if your are modeling any particular area. Al of the trains were locomotives and rolling stock available at the time, which was in the early 80's. All of the Logan Valley locomotives and rolling stock was custom painted and detailed. I had time on my hands and construction was moving slowly as I was almost always waiting for modeling supplies. I sure learned a lot about using an air brush and detailing.

I had a dealership with a number of suppliers for a few years, but ended up letting them go as I couldn't order in the volume they wanted after my friend passed away in the late 80's. Being that I did have a plan and stuck to it, I had a lot of what I needed to keep the layout going until the mid 90's. At that time I was about dead in the water because I had absolutely no decent hobby shops in my area. Billing, MT had one, 150 miles away, but it seemed that he never had what I needed in stock. Finally, in recent years e-retailers have come on line and I have been able to move forward again. It was a bit frustrating. We did a lot of traveling, and when ever we were going be be i a city with a good hobby shop, we would always make it a point to stop by and stock up.

I think if I could have gotten what I needed when I wanted it, I could probably have gotten to th epoint where I am now in probably 12 to 15 years instead of 30 years. Way too much time was lost not being able to find model railroad supplies. I guess I am just a bit persistant because of my feelings for the hobby.

Whew! It's been a VERY long day for me. I am tired, but I wanted to make it a point to give you a thorough reply before it became to late at night. So here goes...

1: Era and area are pretty easy for me to name. The era I am hoping to model is between the year 2005 and 2010. These years are some of the easiest years I've had in spite of having to move in 2005. The area I'd like to model is in the mountains of Northwestern Virginia, close to the town of Charlottesville. I've selected this location because I feel as though I belong there, even though I don't currently live in Charlottesville, let alone Virginia. Bearing this in mind, I feel it would be nice to have a mountainous landscape setup.

2: Having a plan is where it starts to get a little tricky. I have thought of a history for the 'town' I want to start building, however, it is a fictional town and I haven't had a chance to write it down as of yet. After I finish this post I will. I am almost certain Charlottesville has at least a little railroad access/transportation. However, as the 'town' I plan to build is fictional, it won't entirely reflect the town of Charlottesville, rather, it will be a fictional town located in the same general area as the town of Charlottesville.

3: Next, I suppose I'd have to find out if it's even possible for me to build something on a scale similar to Logan Valley in TT scale. You managed to build Logan Valley in HO scale, so it shouldn't be to hard for me to accomplish...At least I hope not so hard. And then, I'll have to figure out if I can make it run entirely (Or almost entirely) on batteries...What do you think, mont?
 
I guess you could make it run of batteries. It depends on how. You could power the track with batteries, or the locomotives. Anything is possible it you try hard enough.
 
Well, as it is, the Power City Train locomotive I have now already runs on battery power. But what I meant to say in my previous post was...If I have additional lighting (Like having lit street lamps or buildings) how could I make them be lit using battery power? I can use batteries only to an extent...For now. Any handy tips?
 
I'm sure you can. I have buildings with detailed and lit interiors. I use a DC transformer, and drop the voltage to around 9 volts to keep them from running at a full 12 volts. This will usually gove longer life to the bulbs. I don
t see why you can't.
 
Well, I wrote a little back-story for my fictional town last night. I also did a considerable amount of research on landscaping. What I'd like to know now is...

1: What kind of landscaping did you use for Logan Valley? How long did the landscaping take? Was it hard, intermediate, or easy to do?
2: What materials did you use to make the buildings? Where/how did you get said materials? How hard was it to construct said buildings?
3: Power Trains tracks are made of plastic? How good will this look with gravel placed in/around it? Will placing dirt/gravel affect the performance of my trains? Is it easy to place dirt/gravel?
 
1) - Scenery is hardshell, Hydrocal over wire screen - for me, very easy because I have done so much of it
2) - Materials. Buildings - Some are kits, built as they should be, some are kitbashed and soem are scratchbuilt from wood, styrene or cardstock.
3) - Can't help you with the last as my tracks are code 70 nickel silver. I have no experience at all with plastic track.


How good will this look with gravel placed in/around it? Will placing dirt/gravel affect the performance of my trains? Is it easy to place dirt/gravel?

I use natural dirt that I run through a screen or colander for much of my landscaping. It should be applied so as not to touch the rails, as the minerals in the soil could conduct electricity. It can be brushed away from the rails with a brush. I use a small spoon or bottle to apply the sand. I spread it out with my fingers or a brush.

An eye dropper with Woodland Scenics scenic cement works good to adhere the material to the layout. Some guys use glue mixed with water and a drop of dawn detergent as a wetting agent. The glue will also keep the particles from getting into your moving parts. I go over it with a vacuum cleaner to get the loose stuff off the layout. It is easy to add more sand and get it the way you want it with several applications.

Different size material can be achieved with different screen sizes. Different colors, also, depending on where you collect your sand/gravel. Some of the larger rocks can be used as boulder piles.

I am not familiar with your type of train, it would be nice if you could post a photograph!!!

Hope this helps--lasm
 
I use natural dirt that I run through a screen or colander for much of my landscaping. It should be applied so as not to touch the rails, as the minerals in the soil could conduct electricity. It can be brushed away from the rails with a brush. I use a small spoon or bottle to apply the sand. I spread it out with my fingers or a brush.

An eye dropper with Woodland Scenics scenic cement works good to adhere the material to the layout. Some guys use glue mixed with water and a drop of dawn detergent as a wetting agent. The glue will also keep the particles from getting into your moving parts. I go over it with a vacuum cleaner to get the loose stuff off the layout. It is easy to add more sand and get it the way you want it with several applications.

Different size material can be achieved with different screen sizes. Different colors, also, depending on where you collect your sand/gravel. Some of the larger rocks can be used as boulder piles.

I am not familiar with your type of train, it would be nice if you could post a photograph!!!

Hope this helps--lasm

Hi there! Lucky for me, my tracks are plastic and have no electrical current running through them as my train is battery operated. I did post a few pictures of my train in the Showin' Off thread. I've seen some of the Woodland Scenics and they are all awesome. And most of them are fairly inexpensive to boot!

@ Mont: I have no idea what Hydrocal or kitbashing is...Explain those to me please? Thanks in advance!
 
A few more pictures

Finally all of the structures of the town have been completed except for the signs for the businesses. My printer ran out of ink.

attachment.php


attachment.php


attachment.php


attachment.php


attachment.php


A bit more detail was needed for the back of some of the buildings as they are facing the front edge of the layout. A bit more work is needed for the Sinclair station, but it is moving forward. I still have to find some ballast so the yard can be finished, and then the streets and be put down and detailed.
 
Hi Montanan. We have conversed in another place, and having just (re)joined this board, find you here also. In the first post you say this is not a big layout! But to me it is huge! Big or not-so-big, it is superb work by you and your team. :)

Alan Curtis
http://www.andersley.co.uk
 
Hi Montanan! I just rejoined this forum after quite a layoff and found you. As you know I follow your great layout in another place and am still in awe of what would be my perfect layout!

In the first post you say it is not a big layout, but to me it is huge! A credit to you and your team. Super work. :)

Alan
www.andersley.co.uk
 
The reason I don't consider it a large layout is due to the length of the main line. The run is probably only somewhere in the area of about 65 feet long, not counting the hidden staging area which has three tracks for storing inbound and outbound trains. It also allows for continuous running, but I very seldom do that. In my travels, I have seen model railroads in a similar space with a mainline run four or more times the length of the Logan Valley.

As you can see, the track only passes through the layout one time instead of looping through the layout numerous times. This allows me to have more room for towns and industries to switch. For me, personally, I prefer not to have track pass through the same scene numerous times. Once is enough for me. This also allows more room for scenery.

Another reason I don't consider it a large layout is because years ago, when I was in N scale I had close to 16 scale miles of main lime track. It was set up for continuous running and would take about a half an hour to complete a circuit of the railroad. It sure hurt to tear out the N scale, but as I have mentioned in the past, N scale locomotives, in the late 70's and early 80's were what I would call crude in comparison to what is on today market.

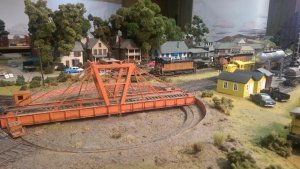
I learned a lot over the years visiting other layouts. When I was stationed at Mare Island for instructor duty when I was in the Navy in the late 60's, I had the opportunity to operate on John Allens G & D railroad. Here's a link to his railroad - http://gdlines.com/ . He was quite an inspiration to me. Another modeler right here in Montana also was a big influence to me was the late Pete Ellis out of Conrad, MT. He had what I would call a large layout. It filled a quanset hut, and eventually he added a building onto the the quanset to enlarge his Treasure State Railroad. I spent many hours operating on it. He was also inspired by John Allen. His layout is planned to be moved and set up in a new railroad museum in Great Falls, MT. This turntable was given to me by Pete when he started his addition and had to tear out a town to make room for the expansion. It was scratch built from brass and powered by a motor from an old player piano. The detail of this turntable will give you an idea of how detailed his layout was.

IMAG0137.jpg

The link below is about his layout going to a railroad museum in Great Falls, MT.

http://www.ble-t.org/pr/news/headline.asp?id=12318

My layout doesn't come close to either of these layouts, but what I have learned form these and others over the years has been a great help to me to come up with an operational scheme for the Logan Valley. I would love to achieve the detail that I have seen in some layouts, but all I can do is give it my best shot.

Great to have you back on board Alan. Waiting to see some posts of your layout.
 
Logan Valley Rocks!

Finally all of the structures of the town have been completed except for the signs for the businesses. My printer ran out of ink.

attachment.php


attachment.php


attachment.php


attachment.php


attachment.php


A bit more detail was needed for the back of some of the buildings as they are facing the front edge of the layout. A bit more work is needed for the Sinclair station, but it is moving forward. I still have to find some ballast so the yard can be finished, and then the streets and be put down and detailed.

Hi again, Mont! I saw the video links you posted and I am very impressed with Logan Valley! It's even bigger than I thought. And I know I don't have a big or even medium-sized railroad layout. Needless to say, I have a lot of work to do if I am to have a railroad layout as nice as yours. Keep up the good work! And if you have any tips or pointers for me to build a realistic layout, feel free to add me or even send me a message...Cheers and hats off to you!
 
Finally some more work has been done

Now that summer is gone, I have been able to get some more work done on the layout. The yard area has finally been ballasted. This can be a pain in the a** because of having to wait for glue to dry. Once the ballast is down, the rest of the day of working on this part of the layout is over.

The hill behind the roundhouse has finally had ground cover put down. Some of my sage brush trees will be covering these hills. I will probably take some pictures of the trees being built when the time comes.

attachment.php


attachment.php


attachment.php


Here are some pics of the rest of the yard area. Additional ground cover needs to be put in some areas, but the plywood is slowly disappearing.

attachment.php


attachment.php


attachment.php


attachment.php


This is the down grade area leading to Logan. I have posted a few pictures of this area. I found some pine trees on Amazon that aren't too bad and tried to tie the backdrop into the hardshell scenery. I was thinking of making my own, but I would like to save time and the trees aren't too bad.

attachment.php


attachment.php


Finally to the scrap yard area. I managed to find a few more casting of "junk" and in time will move forward on this. I'll have to make up some more hydrocal and level the area at the right and to the front edge of the layout. Where the dump truck is, there will be a small building for an office and scale house, and a scale will be put at the entrance to the yard. More details will be added to make the place look a bit scruffy. I have a number of brass detail parts I have no more use for and they will be added to the junk piles.

attachment.php


attachment.php


Chet--You really pulled off the transition from the layout to the backdrop, especially visible in the first five photos!! looks great!! lasm


Affiliate Disclosure: We may receive a commision from some of the links and ads shown on this website (Learn More Here)

Back
Top