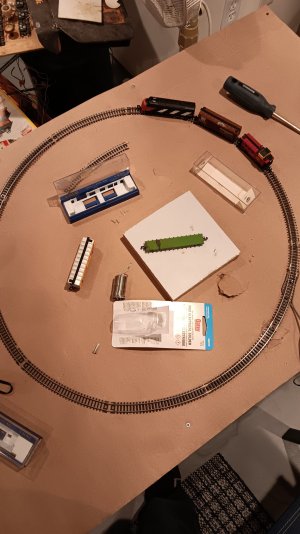
It runs!

ModelRailroadForums.com is a free Model Railroad Discussion Forum and photo gallery. We cover all scales and sizes of model railroads. Online since 2002, it's one of the oldest and largest model railroad forums on the web. Whether you're a master model railroader or just getting started, you'll find something of interest here.


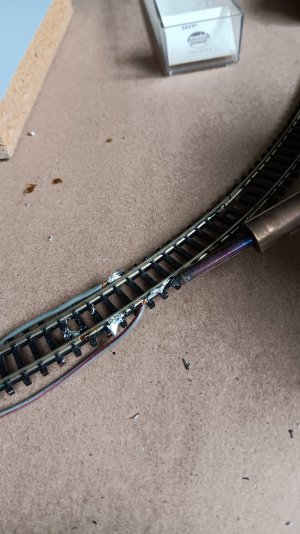
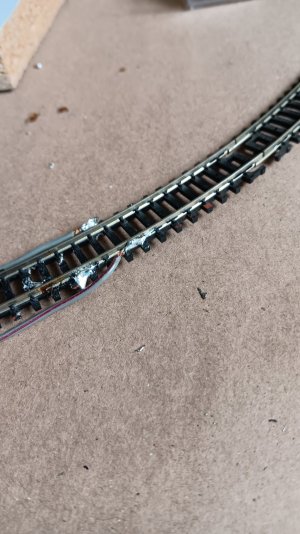
My only goal was to supply power and make it run. Success. My soldering job is garbage. I did use to be ok at it. Just have to learn again. Speaking of learning. I have been reading and some put the feeds onto the rail joiners. I feel this would be an easier option for me until I become use to it again. But is this recommended? If not, why not. I did attach a pic of our old control board from 40 years ago. We were young. Keep that in mind. But it looks like we did have switching cards of some sort made up. Any way. Now that I have power, my attention will go to updating the couplers. I'm still looking for the part suggested to me and have others on the lookout. I'll probably still play with track a little but the couplers will be my focus. Fyi. I just used what I had handy. So an old Solder iron. I guess I need a finer one. A 3/4 inch piece of plywood. And old wire. I can't seem to find any wire around here. May have to look on line. Smallest I can get here is 18. Any way. This is a marathon, not a race, learn as I go.
20250530_213254.jpg
 

Attachments

  • 20250530_213200.jpg
    20250530_213200.jpg
    412.5 KB · Views: 250
  • 20250530_112552.jpg
    20250530_112552.jpg
    401.9 KB · Views: 227
  • 20250530_110510.jpg
    20250530_110510.jpg
    422.8 KB · Views: 225
I buy the rail joiners with feeders already soldered on. Peco and Walthers both make them, probably more too.

The last ones I bought came in a package with 4 or 5 pairs and was made by Peco cor code 100 track. I think I ordered them from Amazon for about $20.

Dave LASM


My only goal was to supply power and make it run. Success. My soldering job is garbage. I did use to be ok at it. Just have to learn again. Speaking of learning. I have been reading and some put the feeds onto the rail joiners. I feel this would be an easier option for me until I become use to it again. But is this recommended? If not, why not. I did attach a pic of our old control board from 40 years ago. We were young. Keep that in mind. But it looks like we did have switching cards of some sort made up. Any way. Now that I have power, my attention will go to updating the couplers. I'm still looking for the part suggested to me and have others on the lookout. I'll probably still play with track a little but the couplers will be my focus. Fyi. I just used what I had handy. So an old Solder iron. I guess I need a finer one. A 3/4 inch piece of plywood. And old wire. I can't seem to find any wire around here. May have to look on line. Smallest I can get here is 18. Any way. This is a marathon, not a race, learn as I go.View attachment 220712
p14: Yup, smaller soldering iron would be good with more practice. It takes time but isn't that all we have?

If I may: Looking at your soldering results, you have 'blobs' of solder that do not seem to be a good mechanical connection to the rail. The solder should flow in/on to both the rail and wire. Heat, cleanliness and time could be the issue with those. Also, I don't see any evidence of flux. Rosin Core paste flux on both mating parts removes oxidation - cleans the metal and makes the heat transfer faster and the solder flow better. You can dip the iron tip and wire into the flux, which most of the time there is enough 'stuff' on the wire that will move to the rail, apply iron tip to both pieces at the same time, wait a second or two, flow the solder. If unsure, you can always use a little brush to paint the rail with a bit of flux. Seems like a lot to do, but with practice you are probably looking at 10 seconds(ish) for each wire connection.

There also looks to be some 'plastic' tie flash on the rail above the ties under the solder. Try to remove those little pieces of scrap before the next solder try. 18Ga is probably overkill for N, 23 or 24Ga would be better. That stuff lives in CAT5 riser cable or TelCo cable ( not flat pack ). Those are solid wires; not stranded which does make things a little easier and that stuff is cheap and easy to find; although you need to be careful of bend radius and flexing.

Rail joiners are probably the worst place to put power drops. Joiners will hold the rail in place somewhat but they are not a good mechanical connection. Over time ( especially on curves ) running trains over those joints causes them to loosen up and sooner or later the electrical connection will become erratic and a real pain to find.

What I do is to cut out that small piece of plastic between two ties and solder the wire to the bottom of the rail. Does take some planning: With the rail in place, mark the rail AND the roadbed. Drill hole in roadbed, solder wire to rail and thread into the hole gently. Remember not to nick the wire conductor when stripping the insulation as it will break at the nick when trying to get it installed. Tiny stuff with N, but can be done.

Have fun!

L8r
 
Thanks for advice so far. Did buy new tips for iron tonight. I know there are differing opinions on everything and I'll most likely try them all to see what works best for me. I did find something out tonight though. I need more track 😃
 
With the properly-sized soldering iron, proper techniques, and a little bit of practice, anyone should be able to produce decent solder joints.
Here's some pic's of a soldering job I did several years ago on a little Atlas N-scale code 80 test layout that I built...................
019.JPG

At #6 turnouts no less, I soldered the joiners to the rails. Notice no blobs, you just get the work hot enough and the solder flows right in.
(Hint: Wet sponges make far better heat sinks than alligator clips). Then I came back in and dropped solid 22 gauge wiring thru drilled holes, bent the stripped ends over, and soldered them directly over the joiners on the outsides of the rails. Once again, no blobs, simply get it hot enough and the solder flows right in.


020.JPG

Here's more of an overhead view of those same joints.


021.JPG

And here's some curved sectional track with the same treatment (slightly blurry, sorry 'bout that). But I think you can still make out the feeder wire soldered over the rail joiner.

I've also done even finer, far more delicate soldering jobs than this (how does soldering new pads on burned 'finger ends' of a Lionel postwar E-unit grab ya'?:eek:). At any rate, with some practice and the right tools, anyone should be able to get reasonably good at soldering, in my opinion.

Hope this helps and/or inspires somewhat. :)👍
 
Nice work. I known I can do better. I used to repair fire department pagers years ago. I think part of my issue is I am afraid of making the rail to hot.
Make the iron hot enough, you can get in, melt the solder into the joint, and get back out without melting the plastic ties. If you have any old rail, you can practice on something that won't ruin your work while you learn.
 
Touch the soldering iron to the work (make sure the work is clean, and the tip is clean and tinned). At the same time, touch your solder to the work, about 1/8" away or so from the tip of the iron. When the work gets to the proper temperature (should only take a few seconds or so), the solder instantly melts and flows into the joint. Immediately remove the iron and cool the joint down with very damp sponges - this will prevent the heat from migrating down the rail and melting plastic ties.

Takes a little bit of practice, but once you get the hang of it, you'll be soldering like a pro!


Affiliate Disclosure: We may receive a commision from some of the links and ads shown on this website (Learn More Here)

Back
Top