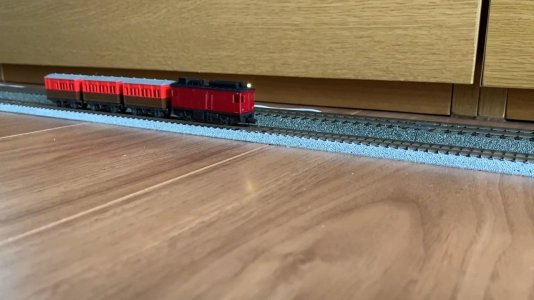
I 3D designed an N Scale Boxcab

ModelRailroadForums.com is a free Model Railroad Discussion Forum and photo gallery. We cover all scales and sizes of model railroads. Online since 2002, it's one of the oldest and largest model railroad forums on the web. Whether you're a master model railroader or just getting started, you'll find something of interest here.


BunkerTheHusky

Well-Known Member
Having just recently finished assembling my Maintenance of Way train, I now have been faced with a new conundrum. What locomotive do I use to pull it? I'm the type of railfan that likes the obscure, ugly relics of the distant past. Horrendously outdated machines that have no right existing on into the modern era. Some may feel that the humble, albiet well loved EMD SW9 belongs in that category, and indeed it was my first choice of loco for the task at hand. However, long hood switchers are not obscure. They are still very much in service in many locations. I feel like it's the obvious choice for one to pull my MoW train. Here on the Fox Creek Terminal Railroad, we don't make the obvious choices. We go for the unique, even if it takes 2 weeks of 3D modeling in Fusion 360 to get there...

I started out where any bad decision starts, browsing Amazon at 3 in the morning, when I discovered the Kato 11-109 Chibi Totsu power unit. The 11-109 is a 2 Axle powered locomotive frame with no body. The perfect platform for the old gears to begin turning, and at the incredibly reasonable price of $26, I just had to add it to the cart. I always thought it would be cool to have an old turn of the century Boxcab in N-scale, but while you can find them, none really scratch that itch for me. Having been inspired by another 3D artist making a Long Island Boxcab over on Thingyverse, I busted out the caliper and went to work creating my masterpiece...

Boxcab 1.jpg

Boxcab 2.jpg


Two weeks of on and off 3D CAD, I now had the body of the horrid little engine that would pull my MoW train. File in hand, and with my brand new Elegoo Saturn 2, I soon had the shell in corporal form. It fit the included tabs of the Kato 11-109 perfectly first try! With the bleep bloops out of the way and the chassis equipped with a Digitrax DN136D, I am finally well on my to completing this build!

I printed the model in transparent resin for several reasons. First off, it was the only ABS-like non-brittle resin I had on hand, plus I am going to attempt masking off the windows instead of gluing in transparency plastic after painting. It's all an experiment, and if things go awry, the shell could always be reprinted!

At some point after I complete this locomotive, I will be sharing the .STL file for anyone who would like to attempt making one of these for themselves! Until then though, I look forward to sharing my progress here for all you fine people!

IMG_20230407_004517310_HDR.jpg

IMG_20230407_004528947_HDR.jpg

Cheers!
-Bunker
 
I spent this Saturday wielding my soldering iron, cleaning up the wiring on the DCC install and adding lights to the locomotive. The headlight and markers are absolutely tiny surface mount LEDs that I super glued to the shell and added a plug so that the shell can still be removed with little issue. Headlights will be masked off with liquid mask when the time comes to paint.

Finally, I ripped off and binned the old rapido couplers, and put on a temporary knuckle coupler to the rear of the locomotive. It dawned on me while soldering that I still hadn't tested to see if this tiny 2 Axle loco could pull it's consist up the 3% grade of my layout. Well let me tell you, this thing pulls! It handles the incline like it's nothing!

IMG_20230408_172447864_HDR.jpg

IMG_20230408_172453552_HDR.jpg

IMG_20230408_175433860_HDR.jpg

IMG_20230408_175509293.jpg


Next up is masking and priming, but that's enough squinting into a magnifying glass for the evening.
-Bunker


I spent this Saturday wielding my soldering iron, cleaning up the wiring on the DCC install and adding lights to the locomotive. The headlight and markers are absolutely tiny surface mount LEDs that I super glued to the shell and added a plug so that the shell can still be removed with little issue. Headlights will be masked off with liquid mask when the time comes to paint.

Finally, I ripped off and binned the old rapido couplers, and put on a temporary knuckle coupler to the rear of the locomotive. It dawned on me while soldering that I still hadn't tested to see if this tiny 2 Axle loco could pull it's consist up the 3% grade of my layout. Well let me tell you, this thing pulls! It handles the incline like it's nothing!

View attachment 166243
View attachment 166250
View attachment 166245
View attachment 166246

Next up is masking and priming, but that's enough squinting into a magnifying glass for the evening.
-Bunker
Very nice work, look forward to seeing this progress.
 
Thank you all! Having people to share this project with, besides myself and my halfway interested wife, makes working on it so much more fun and exciting!

Very cool!
I love MOW and oddball stuff and the wife says she also likes the obscure, ugly relics of the distant past.
Wait… what?!
The oddball, weird one offs are fun because they share a unique insight to how things were! They show the thought and methods engineers came up with to problem solve before the status quo of modern day railroading was written!

Appropriate color train for a scale like this.
Thank you! I was actually worried after I first had them painted. I thought they were too bright, but after toning them down with the dirt and rust, I really ended up loving the colors. I'm glad others think it was a good choice as well!


Now, as for today, what I originally thought was going to be a busy day seeing family became a day of staying home keeping my self occupied. That, thankfully, was easily achieved as I had a locomotive to paint. I had it masked and primed before slipping off to bed last night, so after putting a base coat of flat white on in the morning and walking the dog, I printed out some decals. That didn't take long, however, as I was wanting to keep it simple. Referencing other locomotives of the type show most railroads put nothing more than a logo and a number, and I followed suit. After a couple more rounds of masking and airbrushing between house chores, and a whole whopping 8 decals applied, I present to you Fox Creek #208!
IMG_20230409_183536779_HDR.jpg

IMG_20230409_183552251_HDR.jpg

IMG_20230409_185222654_HDR.jpg

A bit of touch up is still needed, and I am still waiting for my Micro-Trains body mount couplers to show up. The couple mounts shipped with the Kato 11-109 are terrible! Then all that's left is to make it match the rest of the train. Dirt, oil, rust. I'm talking a century of abuse and decay to finish her off! See you all then!
-Bunker
 
Last edited:
I haven't gotten around to weathering this loco yet, but in the mean time, I posted the 3D file online for anyone who wants to try to make one of these for themselves

 
I found your design on Thingyverse Cults3d and printed it out. This thing is awesome and you did an awesome job! It fit perfectly on the chassis and I did notice the holes for the tabs.

I did install a headlamp but didn't know those two indents were for tail lamps. May have to do that as well.

I printed mine out the lazy way with two colors instead of painting. First iteration came out horribly as I can't paint for squat.

I also added 5 grams of tire weight and now this thing can pull 7 passenger cars with no issues. This thing is my daily runner.
 

Attachments

  • BOXCAB AND COACHES.jpg
    BOXCAB AND COACHES.jpg
    131.8 KB · Views: 250
Last edited:


Forgot to add that I like this thing so much that I have upscaled it to OO/HO size. Problem is that nobody makes a power bogy that has a 13mm wb. So, I bought a Hornby 0-6-0 chassis and will use that for power. Upscaled size is a bit over 110mm in length and the chassis is 110mm. Will just have to add the supports for mounting the chassis. I'll kinda sorta be like a class 08 diesel.
 
I have only created the upscaled shell so far. The mounting part for the 0-6-0 chassis has not yet been started since that order hasn't arrived yet. Should be soon as I am expecting it in the next couple of days.

Would you like a copy? I guess If I zip it, it can be attached.
 
If you are asking me, it'll depend on what it is. I am limited in what I can do as I am still learning. I can build a frame but for the life of me, I can't figure out how to get a flare going.

What do you want to change?
 
I spent this Saturday wielding my soldering iron, cleaning up the wiring on the DCC install and adding lights to the locomotive. The headlight and markers are absolutely tiny surface mount LEDs that I super glued to the shell and added a plug so that the shell can still be removed with little issue. Headlights will be masked off with liquid mask when the time comes to paint.

Finally, I ripped off and binned the old rapido couplers, and put on a temporary knuckle coupler to the rear of the locomotive. It dawned on me while soldering that I still hadn't tested to see if this tiny 2 Axle loco could pull it's consist up the 3% grade of my layout. Well let me tell you, this thing pulls! It handles the incline like it's nothing!

View attachment 166243
View attachment 166250
View attachment 166245
View attachment 166246

Next up is masking and priming, but that's enough squinting into a magnifying glass for the evening.
-Bunker
You did a great job! Keep up the good work!
 
Cool to see this model is taking off! Glad everyone is loving it!

Can I ask for a couple of modifications ?
What do you have in mind?

I made my own post so as not to hijack this one.
I appreciate you doing a spin-off thread!

Also, the pictures I have at the start here are terrible! I gotta get some better ones of mine, especially now that she's all weathered up and matching her work train!

Ya'll are making me want to print another one, as I had originally planned to XD


Affiliate Disclosure: We may receive a commision from some of the links and ads shown on this website (Learn More Here)

Back
Top