Getting Started, need thoughts opinions on layout.

ModelRailroadForums.com is a free Model Railroad Discussion Forum and photo gallery. We cover all scales and sizes of model railroads. Online since 2002, it's one of the oldest and largest model railroad forums on the web. Whether you're a master model railroader or just getting started, you'll find something of interest here.


NIKO_SUAV3

Member
So for those who haven't seen my introduction thread, I'm kind of a newbie in model railroading. I recently purchased some track from someone who said they didnt have time to start the layout they were planning. I purchased it mostly for the switches, but it came with a bunch of other pieces as well. Anyways he had given me a track plan for a layout that essentially sat on two 4'x8' tables put together in a "L" shape. After some comments on that layout, and some thinking on accessing all the track, I decided to try and take a stab at coming up with more of a "U" shaped layout build on 2' boards around the space I have. Well after a couple hours of tinkering here and there, I think I may have a starting point, and I was hoping to get some thoughts and opinions on the layout.
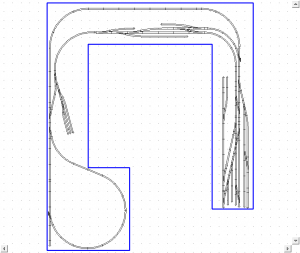
Layout.png

Well anyway, there it is, I was hoping to give myself some room for a couple of industry and also added a reverse loop on one side for a longer "there and back" type run. I have never really operated a switching layout either so again, not sure how things look from that standpoint. I also know I may have to tweak the baseboard to give myself a couple more inches here and there, but left the baseboard as kind of a reference of the space I have. Thanks for the help in advance.
 
Looks interesting you planning what kind of buildings are you going to us for your industry. It good to know their foot print when laying track or you you my place your building and it gets into the track.
 
The reason for the "door" question was about access to the area and how it would restrict/determine a layout plan. You're very fortunate to have that open end, because in the case of the loop you have the option for a larger radius if desired. You could extend the track across the opening, employing either a duck-under or lift-up or swing-away section for access to the layout's centre to gain continuous running.


FWIW, I'd look to add the ability to do continuous running. Then you can have a 'thru train' circling the main, while you do some local switching, 'in the hole.'
 
I think I may have a starting point, and I was hoping to get some thoughts and opinions on the layout.
I have always liked the out and back type layouts.
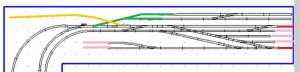
For starters, my thoughts on this one:
1. Seems like the center of the loop is a huge opportunity for some industry or industries.
2. Out-and-backs are a bit nicer if one can go out and run several laps before returning to the yard. Otherwise all one is doing is switching. You might be able to squeeze a second turn around in the upper left.
3. In the yard, a turnout cannot end two tracks. There has to be at least a car or engine length track after the turnout. I see two places where this was done. (First to the left and 5th from the left) See Red modification.
4. Question - Is the yard supposed to represent a passenger coach yard on the right and freight on the left, or why the apparent separate between the two?
5. If one is going to make a second track with a switch, make the new track as long as is possible (green). In adapting for the turnout tail track (#2 above) it allows the other tracks to be longer too (pink).
6. There is a good spot for an freight station, team track, or other yard related industry is along the upper right (gold yellow color).
7. OR instead of the gold-yellow track for an "industry" one could move the crossover between the two AD tracks to the top one more position and make them longer by that far.
8. While it looks cool, I am not certain this yard is big enough or busy enough to need a ladder by-pass track. In this case it just seems to reduce the capacity of the yard, especially since getting to it fouls the yard lead/ladder anyway.
NIKO_Yard1.jpg
 
Last edited by a moderator:
You're yard tracks are extremely short. Like 1-3 cars short. You need to simplify the yard. You only need a run around and a yard ladder. Your yard ladder needs to start as close to the left side as possible to make a usable yard.
 
29c66d3117bed69e7c1b01c678d07a54.jpg
c2e2569b00d53de2d2a88d184c51f0bd.jpg
4044c2d0185170233969f60f903b1ab2.jpg
eb913f17882f69b86044f7441ceb7d1a.jpg
c1d323bee0a0115f6ad83dae470f909f.jpg


Well, still getting settled into the house and decided to try my hand at weathering some of the rolling stock I've had sitting around for a long while. They were just a couple of cheap cars that came with a Bachman starter set I got years ago. Figured I wouldn't lose any sleep if I messed them up. I'm particularly pleased with how the gondola came out!

I'm still tinkering with the layout plan, and back and forth on doing a "closed loop" layout for continuous running or something like the out and back I already have with some modifications. The main thing with my layout is that I'm not yet a homeowner so I'm trying to plan with a modular type bench work in mind that is easy to take down and transport. Thanks again for the thoughts and feedback, I am certainly going to try and incorporate as much of it as I can.


Sent from my iPhone using Tapatalk


For the Gondola:
1) Started by priming the inside of the car with grey primer spray.
2) Applied a clear dull coat to the exterior of the car.
3) Added a layer of black wash to the car to make it look a little dirty.
4) Painted the inside of the gondola a dark grey
5) went over the dark grey with a light coat of "burnt sienna" model master acrylic paint.
5) added blotches of "Hull Red" Tamiya acrylic paint using a cosmetic wedge.
6) Using powder pigment from Tamiya's Weather Master Kits, I applied some "Orange Rust", "Rust", and "Soot" (From kits B and C)
7) seal it all with a dull coat

For the Coal Car: (You can probably notice only one side of this car is weathered, since I planned to try a couple different things)
1) Apply dull coat
2) Painted some black blotches
3) Applied a layer of black wash (more heavy handed than the coat applied to the gondola to make it look more sooty.
4) Applied some of the Tamiya Weather Master, "Orange Rust", "Rust", and "Soot" (From kits B and C)
5) layer of dull coat to seal it in.
 
Last edited by a moderator:
Been traveling for work the past few weeks so haven't been on here much admittedly. Still tinkering with the layout planning, but no breakthroughs yet.

On another note I continue to try my hand at weathering some of my rolling stock. Got started on a couple of my Athearn Bluebox centerflow hoppers and here is my progress. It's a little easier to stay patient and work on building up some layers when I'm away for a few days.
07583021675ca936ef19a24a3fd4b16d.jpg
7373b66f04654d82ec67c9d4277cd8f4.jpg


Sent from my iPhone using Tapatalk
 
Niko,

Great job and as I said to Jody, you are braver than I by doing that - it really does look very good and is very close to what I see on rolling stock every day going past my home. In fact, the graffiti looks so good, I was wondering (and please don't take offence at this) if they were decals or if you painted it. If you painted it, then holly smoke batman - robin just had a heart attack!!!!!!!!!
 
In fact, the graffiti looks so good, I was wondering (and please don't take offence at this) if they were decals or if you painted it.

Not offended at all because sadly I am not at the level where I can paint my own Graffiti on, maybe someday hahaha. These were some decals that I picked up at my local train shop and figured they would enhance the look of some of my cars. It was about $6 for 8 decals. I cant remember the brand, but I believe they are available on Amazon as well. using a decal setting solution helps them melt into the shape of the car, then after about half a day of drying, just hit the whole car with a dull coat.

For the particular car I posted the picture of I cant decide if it is good as is with that dirty grimy look (there are some areas I'm not happy about), or if I want to add some more weathering elements. I have another couple of these I'm going to try some other things on, again I I don't worry myself about messing these up because they are Athearn blue box cars I picked up on eBay for around $10 each. Still not confident enough to apply some weathering to my two locos, also doesn't help that I am contemplating whether or not to sell them.
 
Just getting around to weathering my freight cars. Your cars are providing inspiration, although most will not be quite so dirty. Only used chalks so far, but next will use a black wash on selected cars, then chalks. Good to experiment. :)
 
Thanks Alan, I think I picked a couple cars as Guinea Pigs for my weathering, admittedly the plan wasn't to make them quite that abused, but more weathering is a good way to cover up mistakes! But I I'm picking up some things I hope will help me be more subtle on the next couple. Anyway, tried to add some rust using powders to the green Centerflow I pictured above. I was very happy with result until I added a dull coat to it which seemed to darken it up and make it look more grimy than before haha.


Anyway here are two pics of the look before spraying it.
c65e6d5662ed83bdb5fe3fbc399ba280.jpg
e05aca269e613546a60ef552051296ba.jpg


I'm going to try a couple of other things this weekend and see what I come up with, but overall this has been an enjoyable experience and certainly keeping myself busy. Powders by far are my favorite thing to use since they are more forgiving (just wash it off if you aren't happy, unless you dull coat it...) plus I feel it gives it a nice authentic look.


Sent from my iPhone using Tapatalk
 
I reckon they look great, and I'm glad to see someone else with a long big toe. Do you get holes in your socks fast too?


Affiliate Disclosure: We may receive a commision from some of the links and ads shown on this website (Learn More Here)

Back
Top