Espeefan's Passenger Car Modeling

ModelRailroadForums.com is a free Model Railroad Discussion Forum and photo gallery. We cover all scales and sizes of model railroads. Online since 2002, it's one of the oldest and largest model railroad forums on the web. Whether you're a master model railroader or just getting started, you'll find something of interest here.


Well folks, we're almost there! Passengers are in, window blinds and/or shades are in. All I need to do is install the trucks, button up the cars, and install the couplers and diaphragms. From here, I'll be doing different things, adding interiors to finished cars, updating diaphragms, normal maintenance stuff that really doesn't need posting as it's already here in other projects. Fortunately I found some black folk in a box of Preiser figures. There's a reason they're more expensive!

passengers.jpeg


Shades and blinds.jpeg


Other ongoing things are: Finishing the F units, plus a set of Santa Fe ABBA Warbonnets I'm doing for the club. After that, probably another steamer to paint, or I might pick up a structure kit I've been working on that has sat idle for a while. I don't want to get too repetitive here, as over the last couple of years we've covered a bunch.


Welp, thought I was done but nope! The RPO/Coach is fine, ready to test. The 72-C-1 air-conditioned coach had to be pulled apart. Seems the trucks were sitting too close to the bolsters, which would have caused radius and shorting issues, and unfortunately, this model's design has the trucks attaching from inside the model, so you have to pull the chassis to get the trucks off. That's done, along with some trimming and bending of detail parts so things can move where and when they need to, and installing the diaphragms. That one is back together.

The "Oliver Millet" lounge also had to come back apart. I drilled the holes for the marker lamps, and one kept getting pushed back out of the hole by the plastic window. Pesky bad luck! In order to trim and re-install the offending window I had to pull three seats out, so now I have to wait for canopy glue to dry. Fiddly little things, not difficult but they can't be rushed. 🤷‍♀️ They'll be done today, in plenty of time to test at the club Thursday. That's life in the brass passenger car racket. Some models are made to run, some are made to sit on a shelf. Converting a shelf queen to a runner can be...interesting.
 
Well, here they are. Now comes the fun part: Seeing how they perform on the layout. I've found over the years that brass models have to be tuned to the layout they operate on. Hopefully I'll break out of the run of bad luck I've had with the trucks on these models. This batch is likely the last of the brass cars I''ll be doing. I've said this to the wife a number of times over the years, then found something else I wanted, but I think this may actually be it unless a News Agent car surfaces somewhere. News Agent coaches had a news stand compartment where you could get a newspaper, magazine, or a candy bar, and maybe a cup of coffee or a cold drink. That's probably the only model that could tempt me at this point. I thought about just labeling a coach as one, but the window pattern was different. 🤷‍♀️ Here they are:

60-CP-15-1 Finished.jpeg


72-C-1 Finished.jpeg


Oliver Millet Finished.jpeg


Now on to the F units. I have about a bajillion holes to drill for rails and grabs. :oops:
 
Alan, as skilled as you are in your work, would you be able to kitbash the correct window placement for a News Agent car from some of the plastic Roundhouse Harriman coaches?
Probably, but truth be told I'm so up to my keister in projects that I should be doing that I'm less than thrilled at the prospect. I know a guy, Jason Hill, who authors a blog called "Night Owl Modelers" who could probably advise me on this. Maybe I'll give it a shot, but to be honest its way down the "to do" list. 😁
 
Well group, my fingers and most of the rest of my hands are ruined, at least for the day. 😁 I drilled #76 holes for railings in ten F unit shells. Only cost me two #76 bits, both my own fault for applying stress when I shouldn't have. How did I break only two bits? I'll show you! First rule is: Have a LOT of bits!!! I bought this set at Amherst a couple of years ago. The pin vise is crap, Zona makes a better one, but I didn't use that either. The method to my madness:

61-80 Set.jpeg


Awl .jpeg


Each tube has 5 bits. I use a sharp awl to dimple the dimples as shown. This gives me a positive place to start drilling. Below, the top shell has been dimpled, the bottom has been drilled:

Drilling before and after.jpeg


Dremel has come a long way from the old days. My wife bought this one for her crafts. I stole it. It's light weight makes it very easy to handle for fine work. I told her she can borrow it whenever she wants. 😁 The chuck came from Amazon.

Dremel.jpeg


When I drill, I set the tool to setting #1, lowest speed. Then I rest the bit in the dimple power off. Once it's settled in, I push the button and it drills right through. Let the tool do the work. apply only enough pressure so you can feel the bit advance. Avoid any sort of angle, or you'll lose the bit.

One thing I was worried about was if the Walthers dress up kit and the discontinued Detail Associates Stewart detail kit had the same dimensions for the railings and grabs. Lucky me, they do, or I'd have had to hand bend a boatload of railings. Not my favorite chore, especially in these quantities!

I figured I'd get all the suffering done at once, so in addition to my SP units I did the club's Santa Fe Warbonnet ABBA set.

Santa Fe F-7 Set.jpeg


The Walthers railings press in, but I think I'll use a little ACC from the inside to secure them. They'll have to be painted as well, white for the SP units, and silver or red for the Warbonnets.

Here is a set installed on the lower shell:

SP F-3 B's.jpeg


That's all for tonight. my hands need some rest!
 
My old [ancient] pin vise died on me a few years ago and I replaced it with an Army Painter one. It is SO well made. It will definitely outlast me.
I have one of those. It's similar to the twelve dollar one Wal-Mart carries. Quite serviceable. My default. I bought that drill bit set for the bits though. The included pin vise is poorly machined, like they included it as an afterthought. I've always been a "buy the good tool once" instead of "buy the cheapie 5 times" kind of guy. 😁


Morning all. Sore hands this morning. I installed the truck details on the four Santa Fe F units this morning. Upon reflection, I can't recall the last time I drilled a loco shell for grabs or installed truck detail, but when you consider that I paid 35 bucks each for these things, I guess my time was worth it. I have two F-7A shells left to drill but to give the hands a break I think I might do dome decoder installs today.
 
Happy Friday everyone! The cars' debut at the club went well. Debugging was required on the 72-C-1 and the Oliver Millet. The little RPO coach ran perfectly. Debugging required the following: Turning one truck around to minimize shorting. having all insulated wheels on one side really helps here. This particular design of PSC truck is a real stinker! The brass brake shoes had to be bent away from the wheel treads and shortened with a nipper, as they touched the rails as soon as you put the car on the track. I had immobilized the journals (who needs spring equalized brass trucks anyway?) but that wasn't enough. I may eventually replace the trucks. maybe with Walthers units, but for now they run. I also had installed Kadee 148's, but upon failure to couple reliably, I swapped those out for #5's. Full length passenger cars do better with 5's and you can't see them under the diaphragms anyway.
 
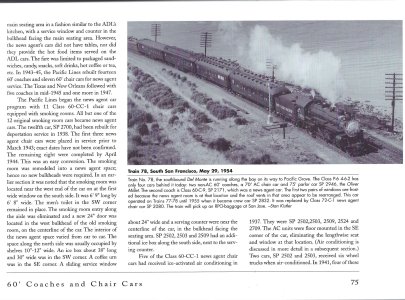
Two of those previous three cars are for the Del Monte, as I mentioned previously. I'm modeling the train on a specific day, this one:

Del Monte.jpg

60-C-4 New Agent pic.jpg

I have the air conditioned coach the regular coach and the Oliver millet. All I needed was a News Agent coach. Lucky me I found one! I already had it, so no purchase necessary. Putting interiors n these cars has gotten a little addictive. It's not terribly hard. The problem is, once you start you get into situations where an empty car looks bad in a train full of cars that have interiors. Like a missing tooth. I had this happen a couple of weeks ago, so I went downstairs and fished the car out of the box and brought it up here to get seats, passengers, and replace those clunky diaphragms. Looking at the plans for the car I found several had been rebuilt into News Agent coaches. No changes necessary, just frost a couple of the big windows, and we'l be good to go! I'll do the news agent compartment which will be easy, as you won't be able to see much with the frosted windows.

60-C-4 News Agent.jpg


I like this train for a couple of reasons. Its history. It's a short train. They don't all have to be 15 cars long. Trains like this would fit nicely on a home layout. It won't take a 4-8-4 to pull it. I love the Historical Society's books. It's always nice to have an idea of what you're trying to replicate. The explanation on how these cars worked was interesting as well.
 

Attachments

  • Del Monte.jpg
    Del Monte.jpg
    721 KB · Views: 31
Two of those previous three cars are for the Del Monte, as I mentioned previously. I'm modeling the train on a specific day, this one:

View attachment 264792
View attachment 264791
I have the air conditioned coach the regular coach and the Oliver millet. All I needed was a News Agent coach. Lucky me I found one! I already had it, so no purchase necessary. Putting interiors n these cars has gotten a little addictive. It's not terribly hard. The problem is, once you start you get into situations where an empty car looks bad in a train full of cars that have interiors. Like a missing tooth. I had this happen a couple of weeks ago, so I went downstairs and fished the car out of the box and brought it up here to get seats, passengers, and replace those clunky diaphragms. Looking at the plans for the car I found several had been rebuilt into News Agent coaches. No changes necessary, just frost a couple of the big windows, and we'l be good to go! I'll do the news agent compartment which will be easy, as you won't be able to see much with the frosted windows.

View attachment 264790

I like this train for a couple of reasons. Its history. It's a short train. They don't all have to be 15 cars long. Trains like this would fit nicely on a home layout. It won't take a 4-8-4 to pull it. I love the Historical Society's books. It's always nice to have an idea of what you're trying to replicate. The explanation on how these cars worked was interesting as well.
Well done! Your explanations have been as stellar as the work you illustrated. Thanks for sharing
 
Well, here they are. Now comes the fun part: Seeing how they perform on the layout. I've found over the years that brass models have to be tuned to the layout they operate on. Hopefully I'll break out of the run of bad luck I've had with the trucks on these models. This batch is likely the last of the brass cars I''ll be doing. I've said this to the wife a number of times over the years, then found something else I wanted, but I think this may actually be it unless a News Agent car surfaces somewhere. News Agent coaches had a news stand compartment where you could get a newspaper, magazine, or a candy bar, and maybe a cup of coffee or a cold drink. That's probably the only model that could tempt me at this point. I thought about just labeling a coach as one, but the window pattern was different. 🤷‍♀️ Here they are:

View attachment 264466


View attachment 264467

View attachment 264468

Now on to the F units. I have about a bajillion holes to drill for rails and grabs. :oops:
Excellent work on the SP cars. Very nice.

John
 
That is so interesting. I can see why you decided to do this train, as it is something that is able to be accomplished, instead of being a pipe dream. This makes it even more enjoyable following your work.

Keen observation! I think we lose some people in the early stages of the hobby because they try to do too much too fast. Setting attainable goals is a must for beginners, and even for seasoned modelers. If you've followed the whole thread, you know I've assembled three "Pipe Dream" trains. If you are a recent arrival, go back and read the posts on the 1941 City of San Francisco. The Lark and the San Joaquin Daylight were less demanding because I was able to use some plastic models, but even they were years of work. Picking a project that gives you results in a reasonable amount of time is important to enjoying the hobby. I'm a big proponent of layout sized trains. Smaller four axle diesels and 2-8-0 or 2-8-2 steamers that look at home on a layout you can build in your basement in less than two decades and the locos and cars don't overhang all the way to Cleveland going around curves. 😁
 
Hi Guys! Been a bit busy at the homestead, not much modeling time, but things are progressing. I pulled the tinted windows out of that coach I'm converting to a news Agent coach, and I'm currently installing shades and white blocks for the blanked out windows. I roughed out a News Agent room. It's pretty crude, but the only thing visible once the cars is together will be the counter and one wall, so fiddly work wasn't required. I had to remove one row of seats because of an interior brace, and adjust the News Agent room to clear an end brace. Interiors are fun! It will look much better once finished. One car with tinted wndows, and everything else with interiors and passengers looked odd and out of place in the train 🤷‍♀️

News Agent Coach Interior.jpeg


In other news, all 12 decoders are in the Stewart F's, and I have to install and paint railings and grabs. No pics of that, you've seen it all before! An editorial comment, these are older models, and while no drive exists even almost 40 years later that exceeds the Kato unit's performance IMHO, they were old style mechanisms, and all decoder installs required hard wiring. A blast from the past and a reminder of how much we've been spoiled by current offerings!

I have a combine waiting in the wings for seats and passengers, then for now we'll be done. After that, we'll see. I don't want to get repetitive here.
 
News Agent buttoned up and the combine getting done! This model has opening baggage doors, and I figured why not do something with the baggage compartment. I don't have any HO baggage, but the car has REA decals on it so I figured some small crates, bags, and a drum or two, and a guy. I pit down some styrene wood car siding to serve as a floor, painted and lightly weathered it, and here we are:

Coach Baggage .jpeg


Now I just have to wait for the canopy glue to dry!


Affiliate Disclosure: We may receive a commision from some of the links and ads shown on this website (Learn More Here)

Back
Top