Cork RB and Track installation

ModelRailroadForums.com is a free Model Railroad Discussion Forum and photo gallery. We cover all scales and sizes of model railroads. Online since 2002, it's one of the oldest and largest model railroad forums on the web. Whether you're a master model railroader or just getting started, you'll find something of interest here.


johnflitz3000

John F Litz
Hello all, because I am a newbie with no experiance at all in this hobby I could use a little help with the installation of cork RB and track. I am wondering what the best method of installation is for cork RB is. I have read that gluing the cork down as well as tacking it down is ok. I am open to any suggestions at this point. I saw this layout on Youtube and I like the way he chose to install it but there is no video on how it was built. Check it out and feel free to comment.

http://www.youtube.com/watch?v=wR9c_2MKsvE
 
Last edited by a moderator:
I glue my cork and Woodland Scenics foam roadbed to the subroadbed with Tacky Glue or an acrylic adhesive caulk. I glue the track to the cork with the same stuff. I've found that nailing cork to plywood is a pain but nailing cork and track to Homasote is pretty easy. It is harder to move track after you've glued it down.

I switched to using extruded foam only so nails are not a good choice anymore anyway.
 
Get the cheapest latex caulk tube used in a gun at Home Depot or Walmart. Should be something like two bucks a tube. It will hold the cork and track fine and it can loosened up with water and a putty knife should ever need to change out any of the track. The latex caulk has the additional advantage of being safe to use with foam.

I don't know how the guy in the video built the ceiling track but he's asking for trouble. With no barrier, it's just a matter of time before something will cause a train to derail and all his expensive rolling stock will end in pieces on the floor.


I am wondering what the best method of installation is for cork RB is.
Regarding the cork roadbed, something that may not be obvious is that it must be split in half before you glue it down.

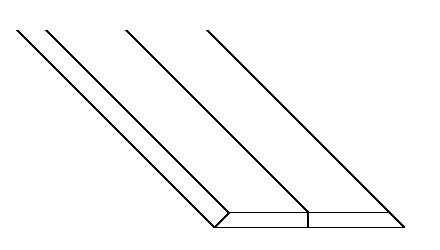
The cork is pre-cut down the middle part way through and on an angle. When you separate the two halves, you end up with two pieces that are each beveled along one edge. The beveled edges should be placed on the outside so you end up with a beveled profile on each side, thus:
cork_roadbed_profile.gif


I've found that when I separate the two halves of the cork, the bevel on one side is pretty good, while the bevel on the other side is very rough. Some people actually discard the half with the rough bevel. I chose to use it on parts of the layout where it's not easy to see. Ballast will mostly disguise the rough bevel, anyway. I suppose you could also sand the rough edge to a better bevel, but that seemed like too much work to me!

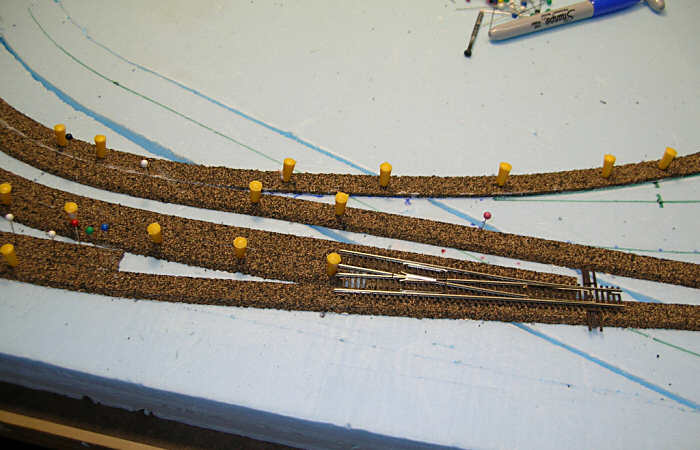
As recommended by so many others, I used cheapest latex caulk available (from Wal-Mart) to glue the cork to the base (foam in my case) and also to glue the track to the cork. I lay one half of the cork at a time, following the track centerline and pinning it down until the caulk dries. Then lay the other half of the cork up against the first. In the photo below, you can see where only half the cork has been glue down in some areas.

cork2.jpg


I hope this helps you along the learning curve.

- Jeff
 
I use plain old Elmer's white (or school) glue to glue my cork to extruded foam.As long as the two pieces of cork are butted tightly together the cork will hold the track nails very nicely.

If you would rather not use track nails you can use latex or silicone caulk and use push pins or T pins to hold the track while your adhesive of choice sets up.
 
I did a similar thing only in G scale (couldn't pass up a bargain on the G scale! LOL).

I say similar because I didn't use any roadbed at all. It's probably a little noisier without the roadbed, but it's not noisy enough to bother me.

The shelving is made from inexpensive pine 1x6" lumber. The corners were all custom cut to fit. Each shelf is connected to the next with pocket holes and screws. 4x4" metal "L" brackets were screwed into studs with the L part at the bottom. Shelves were screwed from underneath to the L brackets. That way, the supports aren't as noticable. I neither painted not stained the lumber.

The track is secured directly to the shelf with fender washers screwed between the ties. Since the shelf is so high, no one can see them and I didn't try to hide them.

I made no provisions for a barrier to prevent the trains from falling off the shelf. I spent a lot of time getting the track right to elimate derailings. So far, no problems, even at the turnouts.

One shelf is twice as wide to accomodate a siding. Two trains sit in each siding facing opposite directions. I run whichever one I feel like while the other sits in the siding. Insulated joiners and a small toggle switch direct current to one siding at a time.

When the mood strikes me, I fire up a loco and let it run while I'm doing other things in the train room (like answering questions on the forum!).

It's a big hit with my grandkids when they come to visit. They can run the trains and I don't have to worry about them grabbing them! LOL

Here's a photo of one train one the track:

Longwallwithcompletedsiding.jpg


Darrell, quiet...for now
 
Good point on the cork roadbed needing to be split...I've seen some guys using it "as is"....As for the rough edge, I sand BOTH edges after the yellow glue (over plywood) has set and before laying the track. it makes for a nicer looking edge, and makes ballasting much easier. I also use El Cheapo latex to glue the track to the roadbed. Removing the track, if required is actually very easy: just slide a spatula or sharp knife under the ties and it lifts up without any trouble. Easier than removing track nails....
 
I'm a convert to the Woodland Scenics black foam roadbed after building many layouts using cork. No splitting, no rough edges, and I think the ballast profile looks a little better than cork. It also never dries out and gets stiff and crumbles like old cork. I really got turned off to cork when I was building my current layout. Having no local hobby shops, I had to order it on-line. When I got it, the stuff looked and felt like it had been left out in the Sahara Desert for a few months. :) Obviously, that retailer was selling some mighty old stock. If you're going to use cork, make sure you can touch it first and that it's still firm and flexible.

Darrell, if you lived in Alabama, you'd still worry about derailments, no matter how good you've done the trackwork. We have bugs the size of small dogs that like to get in the house, and seem to find the middle of the mainline a pleasant place to hang out. I lost a really nice P2K E-7 to one of these guys, who happened to be taking a trip across town. I didn't notice he was there until it was too late. That's when everything went into slow motion. :eek: That fall was only four feet, which is why I'd feel more comfortable with a barrier if I had an around the ceiling track. As long as you live somewhere that doesn't have bugs on steroids, you're probably OK, especially with G scale, which might be able to push one of those monsters out of the way. :D
 
I used cork sheet since I bought it in bulk and it was loads cheaper than the Woodland Scenics stuff, other than that I would have used the WS stuff. None the less, I like to use latex caulk, I like that I can make minor adjustments while its still drying but it has enough grip which works better than normal carpenters glue.
 
If you're going to go with cork I'd recommend the cheap latex caulk. I use it for tons of stuff and it works great......good for sound deadening too!

For my own roadbed, I took the less traveled (or never travled?) path.

When building my current layout I was looking for a cheaper alternative to the foam roadbed I used last time and with none of the drawbacks associated with cork (it dries out and gets hard and brittle as well as acting like a noise amplifier when it gets that way). As I was walking through the local home improvement store I spotted something that might work, and even better, it was out of season so it was on sale!

I use a foam base with my roadbed and track secured by the latex caulk. For roadbed I use rope caulking. It comes in a roll about 15' long, and it's perfect width for HO scale track right out of the box. Since I model N (obviously), I just tear it along the already formed centerline and I get about 30' of roadbed per box with no waste. The advantages are that it never dries out, so it's always soft and pliable (absorbs sound!), it can easily be molded to any curve radius you want, it's easy to cut with just a xacto knife to form turnout pads, crossovers and such, or you can use a wallpaper roller on it to flatten it like a ramp and make trasitions in rail heights or lower passing sidings in just a few seconds. As if that isn't enough, the latex caulk holds well to it, but you can still slip a putty knife in there and take up the rails without damage if you need (Spread the caulk very thin with a putty knife when you lay it down and then lay the tracks and use some canned goods laid lenthwise along the tracks to hold it while it sets up). If you get it in the off season like me you can often find it for a buck or two a box. It comes in gray and brown that I've seen, though other brands may come in other colors.

Here's what I bought...........

http://i83.photobucket.com/albums/j319/pcarrell/Autumns Ridge/Picture016.jpg

It comes in a roll like this........

http://i83.photobucket.com/albums/j319/pcarrell/Autumns Ridge/Picture019.jpg

And I use a wooden wall paper roller (the kind used to do the edges when hanging the paper) to smooth it and create trasitions in rail height easily.

http://i83.photobucket.com/albums/j319/pcarrell/Autumns Ridge/Picture024.jpg

It's flexible, and stays that way for many years, so it's quiet, and it's very easy to work with.

http://i83.photobucket.com/albums/j319/pcarrell/Autumns Ridge/Picture023.jpg

I can lay dozens of feet of it in just minutes, and since it's just a little tacky, it stays where I put it with no further adhesive if you feel so inclined. Ballast and scenery will hold it in place when all is said and done.

http://i83.photobucket.com/albums/j319/pcarrell/Autumns Ridge/Picture021.jpg

This was all layed and caulked in about ten minutes and is ready for track.

http://i83.photobucket.com/albums/j319/pcarrell/Autumns Ridge/Picture002.jpg

http://i83.photobucket.com/albums/j319/pcarrell/Autumns Ridge/Picture012.jpg

http://i83.photobucket.com/albums/j319/pcarrell/Autumns Ridge/Picture011.jpg

(This shows with the track installed, but it was part of that which went down in about ten minutes. Obviously, the track took longer.)

http://i83.photobucket.com/albums/j319/pcarrell/Autumns Ridge/7-15-077.jpg



Dang, Phillip, I've seen that stuff but never thought about using it for roadbed material. Looks like it has a lot oaf advantages, including being able to use your finger to make the type of ballast shoulder you want in HO. Good thinking.
 
You guys are the greatest, after the cork is installed and I am ready for some track what would be the best track to use and is there a trick or two in laying it? I understand that many guys prefer the flex track and since I adopted the rule of do it nice or do it twice I would rather listen to you guys for the right choice here. I can't thank you guys enough for your efforts in responce to my thread. I know my redundant questions as a newbie get old after a while but I will tell you that I will pass this great info. on to others as you guys have helped me.Thanks again and I will take some pictures as I get started with this project and feel free to comment at any point. Thanks again
 
Unfortunately, there really isn't a "best track" in N scale. They're all tradeoff's in one way or another. The trick is finding which one is right for you. There was a pretty good thread on track a couple months ago. It's right here: http://www.modelrailroadforums.com/forum/showthread.php?t=13040

As for flex track and curves, there's a few different opinions. (A friend of mine always says that opinions are like armpits......everyones got a couple, and some of them stink!) I always put the movable rail on the outside because the gap will slightly widen which allows trains to pass without event. If it's on the inside it can tighten the gap and loco's and cars that are on the large side of proper guage can ride up on the rails and cause problems. Also, I go ahead and lay 95 percent of a curve and secure it that way, then bend the rails through the rest of the turn and trim. Then I let it go (so it straightens out on the end again) and solder the next piece on (soldering the rail joiners). Then I continue laying and securing the track till I come towards the end of the next piece and repeat. This insures no kinks at the joints.
 
Last edited by a moderator:
I think most people prefer flex track, but newbies might have an easier time with Snap Track. You don't have to worry about forming curves or cutting (much) track. The downside is you are limited to preset radii curves and you (usually) have a lot more rail joints which can add to connectivity problems.

It might be worth your time to build a small test layout - just an oval of track with some different roadbed and track types to see what you like best. Lay a couple of turnouts too - don't glue them or ballast them and you can reuse them easily on your real layout. That can hard to do because the urge is to jump in and build, build, build but charging into things can lead to frustration and a lot of rebuilding down the line...
 
Last edited by a moderator:
You can use a sanding block on that rough section of cork to shape it up, or better yet, don't split the 2 pieces, use a knife and cut the seam to get a better edge.
 
Hey guys, I purchased enough Atlas Code 80 flextrack and cork to finish the layout. With all of the great suggestions I decided to go the cork route just to give it a try because it was my first layout. I think once I get my hands involved in some track and cork installation I will advance myself into some of the ideas that I saw you guys using on this thread when I move to a larger layout. I do have one question though aboutthe flextrack and how to get a centerline on the straights and curves. I was wondering if there are any tips or tricks to keeping the track straight while you make a mark for the centerline. Thanks again, I should have some pics by the next week sometime so you guys can see my progress so far.
 
I do have one question though about the flextrack and how to get a centerline on the straights and curves. I was wondering if there are any tips or tricks to keeping the track straight while you make a mark for the centerline.

Not sure what you mean. I draw straight centerlines with a steel ruler and draw curve centerlines with a trammel ( I drilled holes in a wooden yardstick at different radii. Anchor one end and stick a pencil or marker in a hole and swing an arc for your curve centerline.) before laying any track.

To keep track straight when laying it, you can use a steel ruler or pick up a Tracksetta tool - it's a steel guide that drops between the rails. There are also curve templates that lie between the rails but I've only seen them in HO. And many people just eyeball their tracks.
 
Last edited by a moderator:
I do have one question though aboutthe flextrack and how to get a centerline on the straights and curves. I was wondering if there are any tips or tricks to keeping the track straight while you make a mark for the centerline.
The usual method is to draw the track centerline on your sub-roadbed (plywood, foam, whatever) so that you have a guide for gluing down the cork. This can be done as described by Beachbum using a long straightedge and a trammel (or even a pencil tied to a piece of string)

I used a different method to draw the centerline -- and after doing so discovered that others had used it long before me!

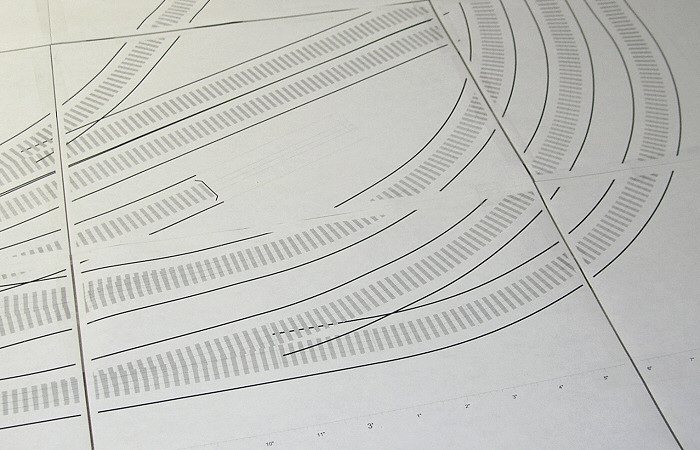
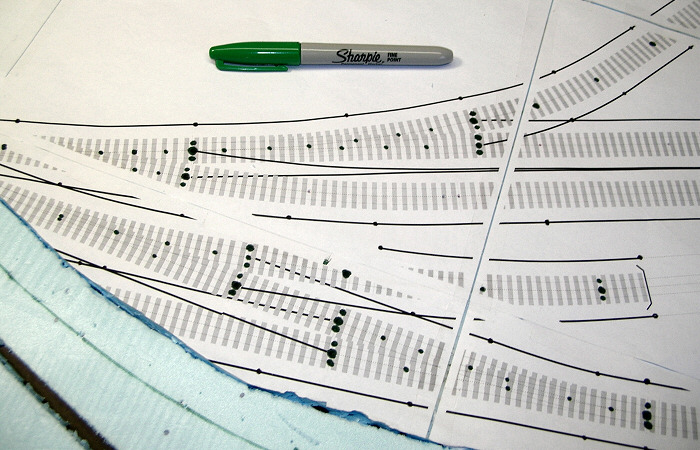
What I did for my small layout was to use track planning software to print my track plan full size. This may not be practical for a very large layout, but it worked fine for my small one and required 20 sheets of 8.5 x 11 printer paper. First I taped the sheets together:
printout_close1.jpg


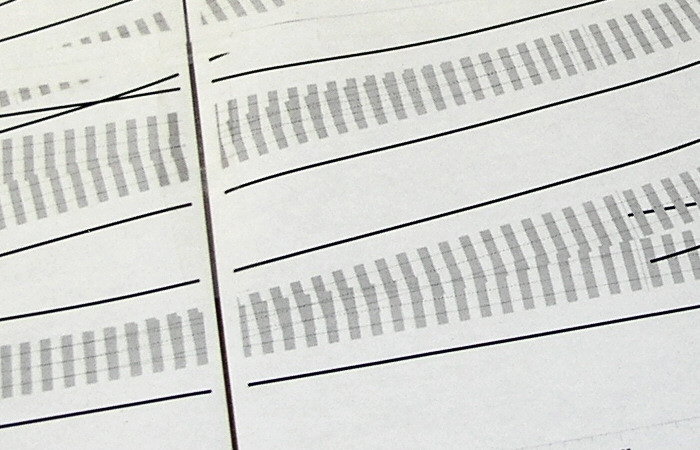
The printout includes the track centerline:
printout_close2.jpg


With the printout laid on top of my layout base (blue foam), I used a Sharpie marker to mark dots every few inches on the centerline and at other important locations:
marking_dots1.jpg


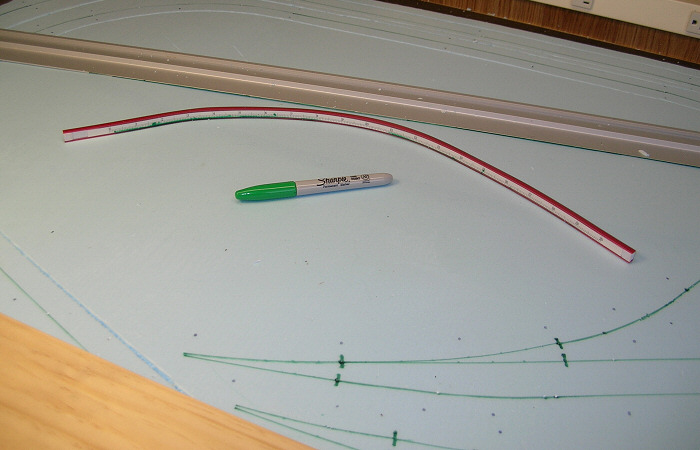
The Sharpie easily bled through the paper to make dots on the sub-roadbed. Then using a straightedge and a flexible ruler, I connected the dots:
drawing_tools1.jpg


With the dots connected, I had the track centerline for the entire layout on my sub-roadbed. From there, I started gluing down cork and laying track.

- Jeff
 
Last edited by a moderator:


Agree with the above post, I printed out my track plan full size and its in HO. But this helped tremendously with track placement and all the rest of it. One way to help keep track straight while you're laying it is to use a straight edge. Try get one that's as long as possible, mine is just shy of 3' and its a pain to work with on really long straight sections like in a yard.
 
Last edited by a moderator:


Affiliate Disclosure: We may receive a commision from some of the links and ads shown on this website (Learn More Here)

Back
Top