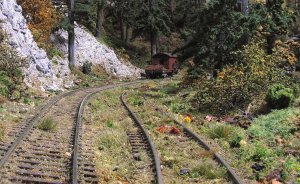
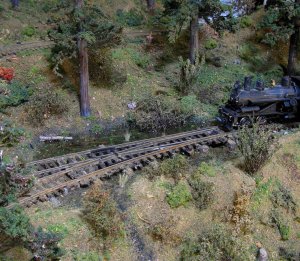
Building the Pinnacle Creek Mining & Timber Co. RR

ModelRailroadForums.com is a free Model Railroad Discussion Forum and photo gallery. We cover all scales and sizes of model railroads. Online since 2002, it's one of the oldest and largest model railroad forums on the web. Whether you're a master model railroader or just getting started, you'll find something of interest here.


I'll vote to have the moderators put a sticky on this thread so it never gets lost.

It won't get lost, too valuable for builders who are just starting in the hobby, all they have to do is Read; Study then do their best, I believe then their efforts will be something they can be proud of and improve on as each becomes a more accomplished modeller.
I've made a couple trys on layouts, none that really pleased me so were never completely finished. I've learned a lot from this thread and now know the same basics apply no matter what your plan is. One of the most important points made here is "Think outside the box, that's where you will find the most satisfaction for your own pleasure". We may be all considered model railroaders, BUT! we all have our own financial limits, personal likes and dislikes, wants and needs in the hobby.
There have been many good threads in the past, however this one tells us How! and Why!, and that we must do the best we can for our own satisfaction. It's as simple as that.

Cheers
Willis
 
Willis and Chris, Your comments and compliments appreciated.

Now with over 7600 views folks seem to be enjoying this thread. Hopefully learning from it as well.

No comments on the previous picture yet. Hopefully, folks are too busy adding to their own trackside scenery. That's what this is all about. Jim:)


Yea, I'm still trying to catch my breath after seeing that last photo.
All the pictures are certainly inspiration on my layout build.
 
Jim, you must wear a magnifier when you work. Your detail is so balanced and real. I expect to see a bear poke its head out from the picture corner, but the lonely flat says, "Quiet, do not disturb". Does the static grass come blended or is that something you did? I can't get over the placement and variations of grasses and other ground cover. Man, I could go on and on. Well done!
 
Thank you Railrunner130, waltr, and Rex. Glad you can appreciate this scene and respond to it. It is really a simple scene. I just love viewing it. Only the log car to give use something to take our eyes off the 'grass.' Basically there is nothing in the scene but the scene itself and that's what I should talk about.

This photo is a special one for me. It can be for all of you as well. I used the same products shown in that earlier photo with them all laid out on the floor. I don't use a magnifier for this kind of modeling. Just my 'readers.' The maginifer goggles are for fiddley things.

This scene, the roadbed part, was accomplished before and mostly after the track was laid. The first pourings were the WS Earth stain on the plaster cloth. Second was a couple of pouring/shakings of WS Earth Blend. I probably added some fine brown and green shakes here and there just break up the monotony of the Earth Blend even though it will be mostly covered after laying the track.

Next I laid the track. I use WS Foam Tack Glue, of course any white glue would work, to glue the track down. I let it dry overnight. Since I'm not using ballast and going through that process I don't have any worries that my track will "unglue." From here on out the only liquid on this scene is WS Scenic Cement spray, cut 50/50, so it is always gluing everything down in addition to the Foam Tack Glue.

After the overnight drying I begin the scenery on top of the Earth Blend and the track. I don't cover the track. It is already weathered and I will clean the tops and inside top thoroughly after I'm done scenicing. First I line up all my products I think I will use on the floor. Once I start I don't stop until I'm finished, no overnight drying this time usually. I usually only do about 2 to 3 feet at a time. I begin with three different colors of static grass. I just shake the bottles to create the electricity. I sprinkle all over the spray glued area. I mix up the colors in patterns and get most of the Earth Blend covered. Remember, I don't use a static grass applicator. That is really not the look (park like) that I want. I want my static grass to be every which way. The way it would be in a rainy climate.

On top of the static grass I use WS Coarse Turf in various colors. Then larger clusters for small bushes. I create most of the larger bushes with Super Trees on this layout. Of course I see some 'furnace filter' bushes and some WS Foliage and Poly Fiber bushes in this scene. Seldom do I use Foliage or Poly fiber plants straight out of the package. It is Fall on my layout so some fall coloring is added to these products before planting. To keep the scenic materials from completely covering the track and ties I simply wipe with my finger. I pack the excess from the ties down between the ties to simulate the track and ties sinking a bit into the earth. I don't worry about small amounts of static grass and foams to not get completely wiped off. Don't forget some applications of the forest ground cover materials. I let all this dry over night. It is pretty wet from the spray glue. I left a couple of quart paint cans holding the track down just in case.

Lastly comes the tufts. I got these from Scenic Express and I'm really happy with them. I use a spot of Foam Tack Glue to glue them down.

So there you have it. Most of us have sidings and while some may be in an urban environment it is not hard to add some "extra" material to enhance your siding scenes. Jim:)Take a look with new eyes.

testing again1.jpgtss.jpg
 
Last edited by a moderator:
Thanks Jim for all the information on how-to and what materials you've been using. Instead of worrying about my results I'm now looking forward to them. Of course there's no substitute for your knowledge of nature.
 
That last picture is just perfectly composed. Simple? Well less is more for sure.

For Jim and the others here that like logging RRs are links to old photos. Do check the site as they have hundreds of photos covering all aspects of logging.

1st-
http://content.lib.washington.edu/c...OOT=/clarkkinsey&CISOPTR=1481&CISOBOX=1&REC=7
2nd-
http://content.lib.washington.edu/c...ROOT=/clarkkinsey&CISOPTR=481&CISOBOX=1&REC=6
The Collection:
http://content.lib.washington.edu/clarkkinseyweb/index.html

enjoy
 
That last picture is just perfectly composed. Simple? Well less is more for sure.

For Jim and the others here that like logging RRs are links to old photos. Do check the site as they have hundreds of photos covering all aspects of logging.

1st-
http://content.lib.washington.edu/c...OOT=/clarkkinsey&CISOPTR=1481&CISOBOX=1&REC=7
2nd-
http://content.lib.washington.edu/c...ROOT=/clarkkinsey&CISOPTR=481&CISOBOX=1&REC=6
The Collection:
http://content.lib.washington.edu/clarkkinseyweb/index.html

enjoy
Wow Waltr , Thanks for the link.
I like the packard truck. Can't figure out why it is right hand drive??

Mike


Mike, waltr, and Rybcon, Thank you, much appreciated.
I know I'm weird, but I think I like this picture so much 'cause there really aren't trains in it. If you get my meaning?

waltr, I've done some Post Graduate work at the U of Dub and am very familiar with your links. For those that are into logging especially, the University's library is hard to beat. Thanks for posting. Jim:)
 
Last edited by a moderator:
Back to business. Let's say you have your layout finished or nearly so in your mind. Your friends drop over and give the normal lip service and pat you on the back for your efforts. Really?

Maybe yes, maybe no. We've looked primarly at scenery in this thread, perhaps it's time to take another look at some different scenery elements. How about "extras?" We are blessed in HO and O scale especially in that we have many sellers and producers of 'extras.' By extras I mean things that seem fairly simple but are seldom used to great effect.

We have many, usually small, companies that make all sorts of cool 'extras', accessories if you will. Some make loads for our gondollas, some laser cut kits. I've mentioned one such company earlier, Rusty Rails. (I'm not afflliated with RR in anyway other than being a satisfied customer) RR makes some of the nicest resin castings. If you can paint, even at a beginner level, you will like their offerings as well as those from other makers. Resin is fun. My lower mine is resin, though not from RR.

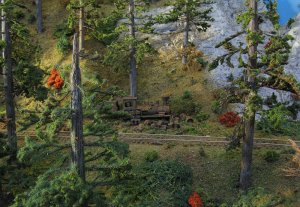
One of the things these 'extras' items can do is add some "life," beyond trains and everday buildings to your layout. And, perhaps draw more positive attention to your layout. Take this beauty below:
derelict.jpg

For all those modeling early railroads a scene and model like this is sort of a given. Unfortunately, until Rusty Rails, you had to use that broken down loco you fried the motor in a couple of years ago! Of course, there may be another company making these types of things but I haven't found them yet so I use RR because I like their stuff.

This photo, as you can see, is taken dead on. On the layout I had to use the telephoto for this shot. I didn't put the derilict loco right in front. I put it out of the way, where it may have actually in real life, bit the dust.
Visitors actually have to move around a bit to see this scene since it is semi-hidden in the trees. Once found it is easily enjoyed and appreciated.

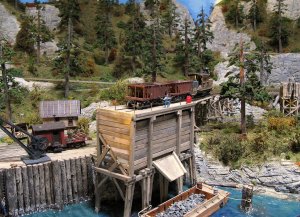
This next photo will give you and idea what using these types of items in tricky places will enhance even the most typical of layouts into something special. See the derelict? More later. Jim

Unloading day.jpg
 
Last edited by a moderator:
Thank you Waltr.

Now, some may say, "He can do these scenes, but my railroad isn't out in the woods." I say, "Wrong." Striking scenery can occur on layouts modeling the Midwest or Southwest or anywhere for that matter. The key is not big trees but the little trees if you will. Detail, that is the key to better scenery. Find Jon Grant's HO modeling. Exceptional by all standards. There is not a fir tree in sight in his work. He models mid America if I remember correctly and does a wonderful job. So, it is possible to enhance scenery, (your scenery) simply by adding details and more 'layers' to exsisting work. Jim :)
 
More easy stuff. I don't know why, but I have a thing for ponds, small lakes, and swamps. The PM&T features just one of these items because of the basically steep land relief. We can all generally find a depression on some hillside or semi-flat land to pour some water into and make a pond.

The ponds are so simple and, so very common in the prototypical world. By simply putting some green and brown ground foams in a depression on our layouts and adding 'water' to them creates a whole new environment on our layouts. Rivers, and larger lakes can be poured and made with any of the 'water' products. But small ponds lend themselves to simply pouring on top of the ground foams with Woodland Scenics Realistic Water. No mixing. Just pour and be done with it. Generally a first pour is used to seal the pond cavity then after drying overnight you can fill the pond up. Don't forget twigs and fallen branches in your pond. Putting newspaper or carboard on the floor will catch the first pour drips.

Creating a simple pond like this allows for a nice place to put those deer you have roaming the hills. Deer need water! Ponds are a fun addition for the grandchildren too.

I like swamps as well. Swamps are cool and just a bit more difficult than our simple ponds. Most swamps have different type and sizes of ground foams added to muck up the water. Maybe some plants sticking up out of the water too. I just dump them in and they will settle to the bottom. Swamps can be almost anywhere, but I'm not keen on their being on SW desert type layouts.

Small lakes are more of a challenge in that they are deeper. I like to create my pond and lake bottoms using ground foams. Darker green or even dark brown or black in the deepest parts with lighter greens working out toward the edges. Using ground foams gives you a much more realistic pond than a painted bottom. imho. A simple pour of Realistic Water or any of your other favorite water mixes can be used for small lakes. HINT: I generally install/plant my brownish bank after the lake is filled and dry. The reason is that these water products tend to creep up the banks. It is a simple task to brush some glue on your lake bank and sprinkle some brown foam on it. Leave it to dry. Then vacuum. The normal 'creep' shine is now gone.

On the PCM&T as you might expect I've taken this "pond" business to the next level. Ponds and swamps are nice, but...let's try something prototypical on backwoods railroads and make a more creative pond. How about this?

more swamp3.jpg

I've seen photos of rails on logs so I thought this would be just the thing for me. I had a flat spot and couldn't move my track so I simply planted my track on top of the water. A close look reveals that mossy log look and there is also a drain exit so the turnout doesn't go swimming. Jim:)
 
Last edited by a moderator:
Again a perfect scene that I have seen in mountainous/hilly areas.

The only thing that stands out are the guard rails on the turnout. You are planning on a little paint to bend them in, right?
 
Gary, Thank you. Did you read all the way through or just look at the photos? I'm curious how folks view this thread. Jim:)


Jim,
I enjoy your explanations as much as the pictures. So much so that I've saved everything to my local PC for reference.

I do have a question about Fascias. I do really like the way you did then on this layout, they just get out of the way when viewing and photography. But if the terrain being modeled is more flat, slightly rolling or hilly, I don't see how the terrain can just drop away to keep the fascia low? It would seem that the one photo you posted of the 'old way' is about all that can be expected.
Comments please.


Affiliate Disclosure: We may receive a commision from some of the links and ads shown on this website (Learn More Here)

Back
Top