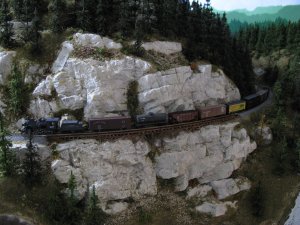
Building the Pinnacle Creek Mining & Timber Co. RR

ModelRailroadForums.com is a free Model Railroad Discussion Forum and photo gallery. We cover all scales and sizes of model railroads. Online since 2002, it's one of the oldest and largest model railroad forums on the web. Whether you're a master model railroader or just getting started, you'll find something of interest here.


Rex, I happy you found this thread. Thanks.

Looks like a hundred peeks to see what's up since I left for softball. We lost 19-10 by the way. I went 3 for 4. Anyway, below is photo that may interest you.

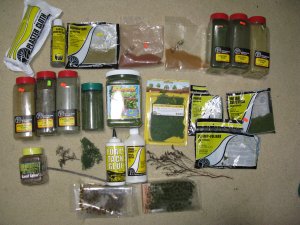
Starting in the upper left you can see the first item I used in building this scene. Going to the right like reading a book you can see all the items I used to create the previous scene. They are in the approximate order I used them. These items in this order are used practically everywhere in the front half of the layout. Towards the back I cut down on some of the items because I want to portray the far distance and the loss of visual acuity we would have in real life.
IMG_3604.JPG

You can see a predominance of Woodland Scenic's products. When I started modeling this was the most visible scenery product at my LHS so I bought the WS Subterrain and Scenery manuals be simply followed the directions in the books. You will also see some nice fall color items that some other company made. I use them in some ground cover situations but mostly as color for my bushes. In this layout most bushes are made from Super Trees. Remember I'm modeling October in SE Alaska.

Notice the WS Static Grass bottles. Here is a step left out by most modelers. I simply shake the containers to cause static electricity and then shake on to the layout. I have, but have never used a static grassinator appliance I made, because the grass always sits up too nicely. Check out the close up photo. If you've ever been in the light woods this is what grass really looks like. If you've never been in the woods, trust me. I was a school teacher!:eek:

From Europe I got that Flock and Turf and the Super Turf Leaf litter (Scenic Express). These are really nice products especially in HO scale. The use of these two products and the Static Grass really separate the men from the boys.

Below in the photo are some sticks for tree trunks/stumps, a piece of Super Trees, a furnace filter from WalleyWord, and a piece of Caspia. At the very bottom are a couple of different colors of tufts.

So what do we have here? A lot of items that you may or may not use. If you want scenery to look as 'real' as I do, then you will probably want to rethink the way you do it and give my way a go. It is all up to you. Too many modelers base their scenery on their local city park. I base mine on many years living and playing in the outdoors. Not much I can add except to give this a try and give your layout a possible chance at looking a bit more 'real.'

Coming up. My layout construction philosophy. Is it like yours? Probably not. Stay turned. Jim:)
 
Last edited by a moderator:
LOL there will be more than Jim tuned in for your layout construction philosophy including myself. Fantastic modeling and a great layout.

Cheers
Willis


Gary and Willis, Thank you, glad you like my stuff.

Willis, I'm really happy you seem to have me figured out. As far as philosophy goes there will be nothing earth shaking or Zen like. Just some thoughts, like I always try to give, to make modelers take that 'next' step.
If I can get my points across with a bit of humor that is even better. Jim:)
 
Rybcon, In a way yes I do. In the 'parts' photo the second product is WS Earth Undercoat. I use it. I started using it when I began model railroading because I didn't know any better. It isn't cheap, but once painted on top of the plaster cloth it gives me the look I want.

Ultimately the Earth Undercoat gets covered up when I'm done with my scenery applications. Or does it? I know many folks go to a home center and buy latex paint in some brown color. Trust me you do save money, but I think you sacrifice that one intangible, the one I for one, don't want to lose, a chance at more realistic looking scenery.

Earth Undercoat has one important thing that latex paint doesn't have, translucency. I water it down and simply paint it on. Cheaper that way. The problem with latex paint is that it, for the most part, gives you a solid wall of what ever color you choose. And unless you do one important thing to it it will ultmately show through all the scenery you think you have correctly applied over it.

You can do this test yourself. Take two pieces of cardboard and lay down a square of wet plaster cloth on each. Let dry. Paint one piece with Earth Undercoat and the other with latex. Let dry. Then sprinkle with WS Earth Blend on each and spray with glue. Let dry. Then sprinkle another layer of WS Earth Blend on each and before you let dry sprinkle some different colors and maybe a final sprinkle of static grass on each. Spray and let dry. Ultimately if you do this test you will see two different effects to your final scenery "look." To me, the Earth Undercoat piece will have a more lively lighter color to it than the latex undercoat. Maybe it is just me and I'm the weird one, but I can immediately see a photo or a layout and tell what covered the white plaster cloth.

So are the latex users wrong? No way. Like me, if they started using latex then they are used to the 'look' and in their minds it is the way to go. I'm simply telling you my way not the way to do it.

The important thing: Now for all the latex users and folks that don't want to use WS Earth Undercoat because of cost here is my helpful answer to you. Latex is a water based paint. Therefore you can dilute it! Please do. If you want more realistic looking scenery add water, a lot of it. You are only trying to cover the white on the plaster cloth, not painting a wall. If you buy half the paint and add water you will make latex paint a viable alternative to WS Earth Undercoat!

I did a diorama for a fellow in FL. I used straight light brown latex paint. I sent it to him and he didn't really like it. Said it was, "Okay." He couldn't tell me what was not right, but something bugged him. That wasn't good enough for me. I did it again with WS Earth Undercoat exactly like the first one to make it right for him, and me. He tossed the first one in the garbage and I was out a couple of hundred dollars. Lessen learned. But a happy customer.

I know I've mentioned Woodland Scenics a hundred times or more in these posts. I do not work for them or have any affilation. So I'm not endorsing their products anymore than any other company I may or may not mention. I drive a bright red Mustang convertable. Is it the best car, because I drive or mention it? NO. I use it because I like it that's all. Jim:)
 
Last edited by a moderator:
Thank you for the thorough response and guidance. I'm really more about the scenery than the operation. My current "project" is a 2' x 10' shelf layout hopefully depicting the inner city of Chicago 1950s/1960s. Apartment buildings. Some industries. I'm picturing a lot of it as overgrown ground so the right earth look is important. I'm less worried about expense as I am with results.
 
Rybcon, "I'm less worried about expense as I am with results." That's a great line. In fact I've used it myself. The line reminds me why I've never been or will be rich! lol Jim:D
 
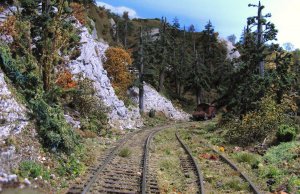
I got a Private Message overnight asking what's up with the no ballast on the tracks picture. I will address this question for him and anyone else who is curious.

There is no ballast on these tracks simply because in this setting, this era (1931), this class road,there was no way a small mining or logging outfit could afford to ballast their rails. Remember, I said earlier that these types of back woods types of railroad were made to be 'portable' for the most part. Those, like my layout, that portray some hint at longevity in this location would simply save money by letting the trains themselves 'sink' the track and ties into the ground and that was the way to ballast. Remember all the types of logging/mining locos seldom moved faster than a man could run so there was diminished danger of derailing and disasters.

Problems did occur of course, but the bean counters have a way of covering up these types of "issues" from the stockholders. So if you didn't hear about or see your company's Shay dissappearing into the quicksand, then it didn't happen!:eek: Jim
 
Last edited by a moderator:
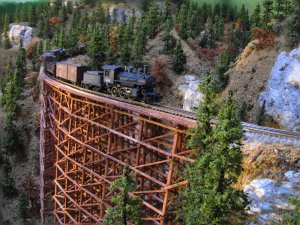
So where were we? Oh, yes, layout building (philosophy)

When I first started all this in 2005 I didn't know diddly about woodworking, electricity for model railroading, or scenery good or bad. Complete newby. I read my Kalmbach magazines on all these subjects. I would still recommend this approach to any and all who may be new to this hobby.

I guess what I'm going to talk about is what I think those who've gone before me, my peers today, and those that will follow us all down the road should think about while they are building their layouts.

First: As noted before I build my layouts back to front. It should be obvious that by using a 2-step stool you increase your layout potential and size. I consider things like my stomach into the equation, arthritis, and being 67 year old. I don't abide at all with those who caution against more that 30 inches of reach into your layout. BS. It is your layout. Build it the way you want to, not the way I, or anyone else who suggests the norm used in 1950.

Second: Do follow your forerunners in this hobby when it comes to benchwork. Like real buildings it is the foundation that makes the whole thing work. No shortcuts. L-girder or boxframe. Pick one or do parts of both. They are tried and true and allow you to create more than that 4'x8' piece of plywood.

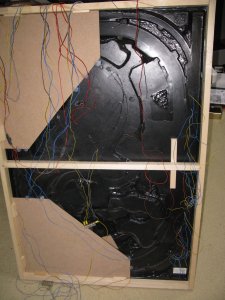
Third: Before the PCM&T layout I built all DC. Sorry, but never again. Get on board go DCC and do it asap. There is zero benefit for DC, imho, on anything but an oval of track around the Christmas tree. I fought the trend my whole career until five months ago and you could never convince me to go back. DCC, especially in HO with sound is really a dream come true. Don't forget that in the wings is remote control and other radio control devices. Here is what I'm talking about. I'm doing this layout 2'x3' for a guy. It is DC with almost all the wiring done. Picture this picture with just two wires for DCC operation. Looks like enough wiring to launch my own satellite!

IMG_3605.JPG

Fourth: And this is to me so very important. When you are doing your scenery try to always take those extra few steps to make it more realistic. You've seen my photos. You've probably seen even better photos from someone else. Question should be, why not me? By simply adding a few more layers of these wonderful products we have available to us these days it would be difficult not to be able to make your layout or modules look more 'real'. Take the steps necessary. Do you really think that grass is simply two shakings of green foam? Look at your lawn. Take a drive through the neighborhood. Grass is mixture of different green colors. Same as the colors in a forest setting like the PCM&T. I've shown you that I may use twenty different pourings, shakings, plantings and layers to do my scenery. It is all up to you to give this a try.

Fifth: This is perhaps the most important topic. Fascia boards. I'm not talking about colors or materials or any of that. What I'm talking about is trying to convince you to get away from fascias like these:

IMG_2867.JPG

IMG_2215.jpg
Program won't let me upload this photo. The photo above explains it all.

We've all seen this style. It started back in the 1400's and is still with us today. These are photos of my first roomsized layout. I didn't know any better. I followed the books, learned from everyone's photos and built the fascia into the 'scene' so to speak. Wrong! I don't know how long a post can be here so I'm posting this so far and will be back later. Jim:)
 

Attachments

  • IMG_3605.JPG
    IMG_3605.JPG
    824.8 KB · Views: 434
  • IMG_2867.JPG
    IMG_2867.JPG
    699.7 KB · Views: 440
Last edited by a moderator:


Fifth continued. So here are a series of photos to illustrate some reasons why you may want to rethink traditional fascia building.

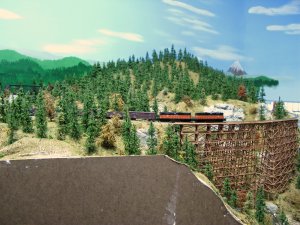
Imagine my favorite bridge scene with the fascia in it!

MogulTrestleFour1.jpg
attachment.php

Or this one:

IMG_959412.jpg

Most would say great photos. And, maybe, how did you do that or just how big is your layout? Well, my layout is not really that big. I've done building from back to front and a different fascia approach. All with the goal of enlarging the layout and making it more "photo friendly." Photography is very important to me. So where is the fascia? Well it is still there, I just lowered it. Check it out:

IMG_5939.jpg

During construction you simply extend and lower the traditional fascia anchoring points, thus lowering the fascia and use your cardboard webbing or in my case the netting and apply plaster cloth. What you can achieve is better photographs, a more realistic layout 'look,' and a chance to do some of that more realistic scenery I've been talking about. Trust me, you will really like the final result and if you have model railroading buddies they will to. With a lowered fascia you stand at the layout and sort of become a part of it. This instead of having a wall separating you from the layout.

I saw this at a trainshow on a module and since then I've done my fascias this way. Just a simple tip that I find the most rewarding and ultimately crowd pleasing. This is what your layout should look like. Try and raise the fascia in your mind and see which method you like the best.

Sorry no photo. Thanks photobucket.

I notice that there have been 6600 views of this thread and I hope some of you have learned a thing or two. I only aim to help with alternatives. My ways of doing things work for me and maybe they won't for you. That's okay. Use what you want, do what you can. Most of all enjoy your modeling adventures. I only wish I wasn't 60 when I discovered this hobby.

I will post a few more photos. Mostly scenery views and such. Class is out, but I will gladly answers any an all questions. Jim:)
 

Attachments

  • IMG_7038.JPG
    IMG_7038.JPG
    800.1 KB · Views: 677
Last edited by a moderator:
Railrunner, Thank you. Glad you find the thread interesting.

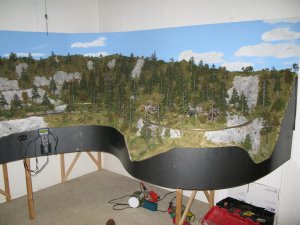
Private Mail bag: What's with the backdrop? I mean it seems too short or something. Answer: Indeed this backdrop goes against all my backdrop thinking. It is, of course, the backdrop that served a couple of Z and N scale layouts. It was perfect for them.
When I decided to changed scales I was hurting with gout and arthritis and I just couldn't bring my self to take this backdrop off the wall and raise it up. You know, go through reduing the seams and such. Basically too much work. At the time I didn't realize how tall my rock cliffs would be so I took the easy way out and left it.:( So now that I'm busted let me say this about the way I think a backdrop should be.
First they should extend above the highest point on your layout by about two feet. These sheets come in four foot widths so with the right planning you should come close. The basic reason for a tall backdrop is photography. Many times you want some 'sky' in that background and many times a backdrops about a foot high messes you up. Taller is better.
Recently I saw a backdrop with a electrical wall plate and socket in the midde of it. I'm still trying to get my mouth closed. Please! That's no way to treat your layout and backdrop. Jim:eek:
 
Last edited by a moderator:
Another PM question: "I noticed something in one of your photos that really appealed to me. I noticed you have a photo of train going away from you. Isn't this against the norm?"

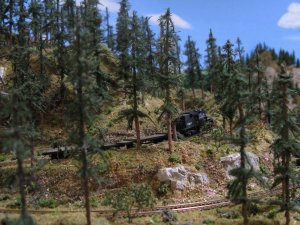
You bet it is. I'm not sure anyone ever said the loco has to be the key object in most photos. In fact unless I'm showing a particular loco off then I try to use 'other' creative ways to make my photos different from the 'norm.' On the PCM&T the main focus is mining so why not focus on the ore cars? Seems to make sense to me.

As for 'norms,' I think most of you that have read through this whole thread realize that normal is not my first choice of adjectives to describe myself. Jim:D
 
I like your attitude! :)
That's the way it should be and IMHO, original thoughts, methods, and plans are much needed in our hobby. Who wants a rubber stamp layout. Not I!
 
I've been reading this thread from near the beginning. Must be one of the best I've seen on any forum. Very well done and the layout is also great.

I'll vote to have the moderators put a sticky on this thread so it never gets lost.

Thanks Jim.
 
Rex and Waltr, How kind. I don't know anything about 'stickies' or stuff like that. I'm not sure a moderator here has ever even seen this thread. I don't post often on the main forum page so other than the 7000 plus views and the repeated comments by only a few, I doubt anyone knows who or what this thread is about.

My only goal is to let folks know that like all things model railroad continues to evolve whether we like it or not. If I've contributed anything towards that evolution in positive way then good for those that are open to new ideas. As a relative newcomer to this hobby I think I was lucky to be able to bring my own unbiased point of view to it. We all know it is sometimes futile to attempt to change those who can't or won't change their 'ideas' on something. I'm not into that. However, if this thread helps those who can change or simply read this for the first time and learn something then it is all good. Thanks, Jim:)
 
I've been reading this thread from near the beginning. Must be one of the best I've seen on any forum. Very well done and the layout is also great.

I'll vote to have the moderators put a sticky on this thread so it never gets lost.

Thanks Jim.
I'll second that and Jim , I have to tell you I agree that there are few threads that hold my intrest but this is certainly one of them !!!!!
Thanks for the build!!!

Mike
 
Mike and Waltr thank you of course. If you and others think that this should be 'stickied' I think it is up to you to make it so. I just post here. I couldn't name or would I contact a mod with such a request. Ok by me though. :) Jim


A bit more. Below is one of my favorite photos. It shows the essence of all I've tried to explain and show in this thread. The photo itself is quite simple, or is it??? More later. Jim:)

testing again.jpg
 
Last edited by a moderator:


Affiliate Disclosure: We may receive a commision from some of the links and ads shown on this website (Learn More Here)

Back
Top