I got a 4-6-0 today from ebay. I never thought that it might not work on my ez tracks with an 18" radius. I was really disappointed to see I wasted my money. The seller has a great reputation but I received it with a cab that won't stay on with a piece of plastic broken out on the cab. He sold as is and it does run well. Is it normal for a 4-6-0 to derail on an 18" curve? Thanks.

You are using an out of date browser. It may not display this or other websites correctly.
You should upgrade or use an alternative browser.
You should upgrade or use an alternative browser.
4-6-0 derailing?
- Thread starter skypup
- Start date
ModelRailroadForums.com is a free Model Railroad Discussion Forum and photo gallery. We cover all scales and sizes of model railroads. Online since 2002, it's one of the oldest and largest model railroad forums on the web. Whether you're a master model railroader or just getting started, you'll find something of interest here.

How and where does it derail? Is it the pony truck? Is it one of the drivers? Does it derail at the same place? We need a little more info. The loco is a Mantua 4-6-0 that was originally released as the engine on the old TV show Petticoat Junction. Actually based on Sierra Railroad #3. These are good reliable locos, and only with a little tweaking should turn into a great runner.
The quick answer is yes...but the real answer is it depends. It depends on which period of time you're looking at. If you would like to read the history of Tyco and Mantua, click on this link. It is interesting reading.
http://ho-scaletrains.net/tycotrains/id64.html
I would check the joints between the tracks, carefully. Run a fingernail along the top and inside edges of the rail. If the rail joint is rough, misaligned slightly, or the rail joiners "missed" the other rail, these all can cause the derailments you've been having. The roughness can be eased some with the use of a file on the edges, the slight misalignment can be corrected with a good eye, and shifting of the track into better alignment. If the rail joiners missed the other rail, take the track apart and rejoin the track pieces, making sure that the joiners go onto the rail each piece is joining to.
A couple of things you may want to attempt on the locomotive. Just remove the screw holding the pilot truck in place. Take the truck off and remove the spring pushing down on the truck. On the top of the truck, cement some small pieces of lead onto the truck to provide the downward pressure. I would also place a small washer on the screw to give it a better "hold" on the truck. This would also be a good time to check the wheels for how well they roll. The "nubs" that hold the axles in place are sometimes pushed down too tight and prevent the wheels from rolling well.

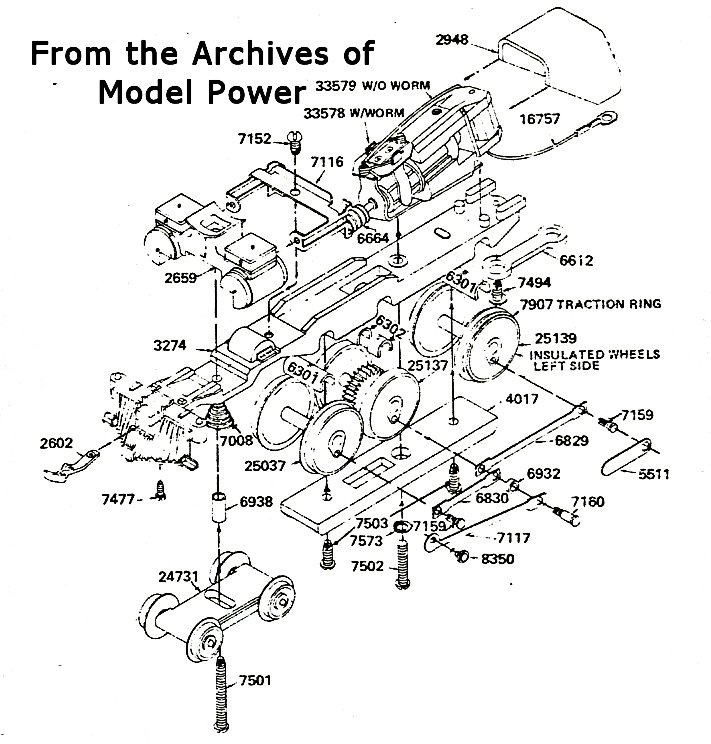
The pilot (cowcatcher) should be removable by means of a small screw that goes through a hole in the front end of the frame downward into the pilot casting. You'll probably have to remove the boiler to get at it. As shown in the diagram, the pivot screw for the lead truck also holds the boiler and cylinder block to the frame.
The pilot should have about 1/8-inch between the bottom of it and the top of the rails. Extending the pilot truck bushing will either lift the lead drivers off the rail, so that's no good. If the front of the frame isn't bent, then the pilot casting extension may be. If you are leary of trying to bend the pilot extension upward, you have two choices. Either file some material off the frame or the pilot extension so as to raise the pilot up. One other thing you might consider is to replace the pilot altogether with a different one. Cal-Scale makes several "wooden"-style pilots, though you'd have to see which one would go with your locomotive.
Green board all the way!

Affiliate Disclosure: We may receive a commision from some of the links and ads shown on this website (Learn More Here)
SABRR
Member
What part of the engine is derailing? If it is the front truck, the Mantua 4-6-0 requires it to be in a certain position. The front is supposed to clear the steam chests and that can be easily checked. If it hits, reverse the leading truck.
You can get a replacement cab at www.yardbirdtrains.com. Just tell Dan I sent you and he'll take care of you.
Manny
You can get a replacement cab at www.yardbirdtrains.com. Just tell Dan I sent you and he'll take care of you.
Manny
Cjcrescent
Master Mechanic
I got a 4-6-0 today from ebay. I never thought that it might not work on my ez tracks with an 18" radius. I was really disappointed to see I wasted my money. The seller has a great reputation but I received it with a cab that won't stay on with a piece of plastic broken out on the cab. He sold as is and it does run well. Is it normal for a 4-6-0 to derail on an 18" curve? Thanks.
How and where does it derail? Is it the pony truck? Is it one of the drivers? Does it derail at the same place? We need a little more info. The loco is a Mantua 4-6-0 that was originally released as the engine on the old TV show Petticoat Junction. Actually based on Sierra Railroad #3. These are good reliable locos, and only with a little tweaking should turn into a great runner.
hamltnblue
Active Member
also make sure your track work doesn't have any kinks that the wheel flanges can grab.
hamltnblue
Active Member
Here's a thread that mentions the mantua 4-6-0. This owner says his requires a 22 inch radius. It's the 10th post.
http://cs.trains.com/TRCCS/forums/p/156715/1728478.aspx
http://cs.trains.com/TRCCS/forums/p/156715/1728478.aspx
Thanks all
I tried reversing the truck but that derailed also. I need to find out what the truck is suppose to look like. The mounting screw head just barely stays in the slot on the truck with a spring under the truck. The truck and driver wheels derail. I made it about three track sections on the curve and it derailed. This is the reply I got from the seller:
"The cab on the 4-6-0 Tyco engine are not attached to the boiler. I have known some people to glue them to the boiler but I do not recommend doing this. there is a slot on the back of the boiler that the cab slides down on and will stay in place. When I restore one of these engines I run then on an 18 inch radius circle test track for 5 minutes. The engine you purchased had not problem. They will NOT tolerate anything less that 18 inch radius. I clearly stated in my write up that I can not give refunds and also stated ?these are older engines and are sold as is.? If the engine is not for you, you can just resell it on ebay. I am very sorry you are disappointed as I put a lot of time restoring them."
Are tyco and mantua the same people?
I tried reversing the truck but that derailed also. I need to find out what the truck is suppose to look like. The mounting screw head just barely stays in the slot on the truck with a spring under the truck. The truck and driver wheels derail. I made it about three track sections on the curve and it derailed. This is the reply I got from the seller:
"The cab on the 4-6-0 Tyco engine are not attached to the boiler. I have known some people to glue them to the boiler but I do not recommend doing this. there is a slot on the back of the boiler that the cab slides down on and will stay in place. When I restore one of these engines I run then on an 18 inch radius circle test track for 5 minutes. The engine you purchased had not problem. They will NOT tolerate anything less that 18 inch radius. I clearly stated in my write up that I can not give refunds and also stated ?these are older engines and are sold as is.? If the engine is not for you, you can just resell it on ebay. I am very sorry you are disappointed as I put a lot of time restoring them."
Are tyco and mantua the same people?
Last edited by a moderator:
Cjcrescent
Master Mechanic
Thanks all
...
Are tyco and mantua the same people?
The quick answer is yes...but the real answer is it depends. It depends on which period of time you're looking at. If you would like to read the history of Tyco and Mantua, click on this link. It is interesting reading.
http://ho-scaletrains.net/tycotrains/id64.html
I would check the joints between the tracks, carefully. Run a fingernail along the top and inside edges of the rail. If the rail joint is rough, misaligned slightly, or the rail joiners "missed" the other rail, these all can cause the derailments you've been having. The roughness can be eased some with the use of a file on the edges, the slight misalignment can be corrected with a good eye, and shifting of the track into better alignment. If the rail joiners missed the other rail, take the track apart and rejoin the track pieces, making sure that the joiners go onto the rail each piece is joining to.
A couple of things you may want to attempt on the locomotive. Just remove the screw holding the pilot truck in place. Take the truck off and remove the spring pushing down on the truck. On the top of the truck, cement some small pieces of lead onto the truck to provide the downward pressure. I would also place a small washer on the screw to give it a better "hold" on the truck. This would also be a good time to check the wheels for how well they roll. The "nubs" that hold the axles in place are sometimes pushed down too tight and prevent the wheels from rolling well.
hamltnblue
Active Member
Interesting reading about TYCO and Mantua, Thanks for the link.
So Model power is basically the modern TYCO/Mantua?
So Model power is basically the modern TYCO/Mantua?
trailrider
Well-Known Member
4-6-0 Derailing
I just checked my Mantua/Tyco Ten-Wheeler and test ran it on 18" radius curves. No problem (other than 20 years accumulated dirt and oxidation on the wheels needs cleaning).
Here is what I would check:
Lead truck: the screw hole is located off-center front-to-rear. The LONG end should be in front. Get an official NMRA wheel/track gage (local hobby shop or Walthers). Check your track. Check the gage on all flanged wheels, lead truck and drivers. Look for burrs or defects in the flanges on the lead truck wheels.
Remove the lead truck altogether and see if the engine still derails. If NOT then the problem is with the lead truck. If it still derails then there are other problems. The lead truck screw rides in an elongated recess in the truck base. If the wrong screw is holding the truck on, you may need to replace it with one that has a smaller head. You also may need to remove some material from the inside of the cylinders where the truck wheels go on a curve. Take a piece of 18" radius sectional (Atlas) track and turn the engine upside down, holding the track to see where the wheels are in the curve. Do this for the curvature held in both directions.
Since this locomotive was "restored", did the person from whom you got it put a set of flanged drivers on the middle axle, instead of the blind (flangeless) drivers that were original? If the drivers are flanged, you need to find a set of blind drivers with the bull gear or remove the flanges on the middle axle.
How does the engine run on straight track? If it "hippity-hops" the drivers may be out of quarter. This can be fixed, but you need a NorthWest Short Line quartering jig and wheel puller.
Definitely check the track for proper gaging and curvature. (There are 18" gages you can buy.
Hope this helps. Happy New Year!
I just checked my Mantua/Tyco Ten-Wheeler and test ran it on 18" radius curves. No problem (other than 20 years accumulated dirt and oxidation on the wheels needs cleaning).
Here is what I would check:
Lead truck: the screw hole is located off-center front-to-rear. The LONG end should be in front. Get an official NMRA wheel/track gage (local hobby shop or Walthers). Check your track. Check the gage on all flanged wheels, lead truck and drivers. Look for burrs or defects in the flanges on the lead truck wheels.
Remove the lead truck altogether and see if the engine still derails. If NOT then the problem is with the lead truck. If it still derails then there are other problems. The lead truck screw rides in an elongated recess in the truck base. If the wrong screw is holding the truck on, you may need to replace it with one that has a smaller head. You also may need to remove some material from the inside of the cylinders where the truck wheels go on a curve. Take a piece of 18" radius sectional (Atlas) track and turn the engine upside down, holding the track to see where the wheels are in the curve. Do this for the curvature held in both directions.
Since this locomotive was "restored", did the person from whom you got it put a set of flanged drivers on the middle axle, instead of the blind (flangeless) drivers that were original? If the drivers are flanged, you need to find a set of blind drivers with the bull gear or remove the flanges on the middle axle.
How does the engine run on straight track? If it "hippity-hops" the drivers may be out of quarter. This can be fixed, but you need a NorthWest Short Line quartering jig and wheel puller.
Definitely check the track for proper gaging and curvature. (There are 18" gages you can buy.
Hope this helps. Happy New Year!
trailrider
Well-Known Member
Another trick to help prevent derailing coming out of tight curves is to place a thin (.010-.015" shim between the 6301 bearings and the frame. (You have to drill or punch a small hole in the shim so the pins moulded into the frame that locate the bearings and keep them from shifting side-to-side will pass through. Then, make two shims that fit UNDER the twin bushing for the main (geared) driver. This will lift the center (blind) driver up off the railheads. If necessary, cement the shims to the cover plate to keep them from shifting and shorting against the insulated driver.
Mantua/Tyco used separate connecting rods between each set of drivers, so you don't have to worry about the difference in the height of the axle centerlines caused by shimming. Unless you get right down to the top of the rails with a light behind the locomotive, you can't tell the center wheels don't touch the top of the rails. Does this work? I didn't find it necessary with my 4-6-0, but I've done it with a pair of 2-10-2's and another pair of 2-10-4's, plus a 4-8-4. These were all kit-bashed from Mantua 2-8-2's for the ten-coupled locos and from 4-6-2 Pacifics for the 4-8-4. I also did a 4-8-2 Mountain using a combination of Mikado and Pacific parts. This one has the 63" drivers of the Mikado, with part of the boiler from each model, and the four-wheel lead truck of the Pacific. All received the shim treatment, and run on 18" radius curves with no problems! All were fitted with the stamped brass gear boxes sold by the late Herold Mellor, and were re-motored using Canon coreless motors. I have thought about converting them to DCC for sound, but haven't gotten to it yet, and am reluctant to "mess" with them to insulate the motors from the frames.
Anyhow, just some tips that might prove useful.
Happy New Year!
Mantua/Tyco used separate connecting rods between each set of drivers, so you don't have to worry about the difference in the height of the axle centerlines caused by shimming. Unless you get right down to the top of the rails with a light behind the locomotive, you can't tell the center wheels don't touch the top of the rails. Does this work? I didn't find it necessary with my 4-6-0, but I've done it with a pair of 2-10-2's and another pair of 2-10-4's, plus a 4-8-4. These were all kit-bashed from Mantua 2-8-2's for the ten-coupled locos and from 4-6-2 Pacifics for the 4-8-4. I also did a 4-8-2 Mountain using a combination of Mikado and Pacific parts. This one has the 63" drivers of the Mikado, with part of the boiler from each model, and the four-wheel lead truck of the Pacific. All received the shim treatment, and run on 18" radius curves with no problems! All were fitted with the stamped brass gear boxes sold by the late Herold Mellor, and were re-motored using Canon coreless motors. I have thought about converting them to DCC for sound, but haven't gotten to it yet, and am reluctant to "mess" with them to insulate the motors from the frames.
Anyhow, just some tips that might prove useful.
Happy New Year!
Thanks for all the helpful tips guys. I checked and the middle driver is non flanged. I removed the truck and it still derails. It appears that the cowcatcher doesn't have enough clearance above the rail and in the turn the edge catches the inside rail. I put paper between the rails and cowcatcher and it will slip under but without much extra space. What would happen if I lengthened the brass bushing in the truck? Could that work or would it lift the drivers too much? I have a lathe so I could make the bushing.
SABRR
Member
It is possible that the frame on the 4-6-0 is slightly bent downward in the front. Just enough to cause you an issue. Take a file and file down the steps/lip of the pilot until it clears. You can also try and bend the pilot up a little with your hand easy, not too hard. The object is to elevate not break off.
Selector
Well-Known Member
I had to sand the bottom edge of a Spectrum J Class 4-8-4's pilot because it was snagging places near the rails that all my other, mostly BLI, steamers seemed to run right past. That did the trick.
A bent pilot is a possibility as was just pointed out. Be careful if you decide to try to force its nose upward a bit.
I haven't read-in very well for this thread, but is it possibly the tracks could use some realiignment, maybe the vertical curves or superelevation is too abrupt?
This steamer has a long wheelbase that can have its far end horsed up and to the side enough from what's happening on the other end of the frame due to irregularities and other problems in the rails. I had to relay a turnout once because of this problem when I introduced a Lionel Challenger to the layout. Once I figured out that my turnout was not level, and that it was sagging a wee bit in the middle, and supported it properly, the Challenger was much happier, even at track speed. These tiny un-noticeables make quite a difference at this tiny scale world.
A bent pilot is a possibility as was just pointed out. Be careful if you decide to try to force its nose upward a bit.
I haven't read-in very well for this thread, but is it possibly the tracks could use some realiignment, maybe the vertical curves or superelevation is too abrupt?
This steamer has a long wheelbase that can have its far end horsed up and to the side enough from what's happening on the other end of the frame due to irregularities and other problems in the rails. I had to relay a turnout once because of this problem when I introduced a Lionel Challenger to the layout. Once I figured out that my turnout was not level, and that it was sagging a wee bit in the middle, and supported it properly, the Challenger was much happier, even at track speed. These tiny un-noticeables make quite a difference at this tiny scale world.
trailrider
Well-Known Member
Thanks for all the helpful tips guys. I checked and the middle driver is non flanged. I removed the truck and it still derails. It appears that the cowcatcher doesn't have enough clearance above the rail and in the turn the edge catches the inside rail. I put paper between the rails and cowcatcher and it will slip under but without much extra space. What would happen if I lengthened the brass bushing in the truck? Could that work or would it lift the drivers too much? I have a lathe so I could make the bushing.
The pilot (cowcatcher) should be removable by means of a small screw that goes through a hole in the front end of the frame downward into the pilot casting. You'll probably have to remove the boiler to get at it. As shown in the diagram, the pivot screw for the lead truck also holds the boiler and cylinder block to the frame.
The pilot should have about 1/8-inch between the bottom of it and the top of the rails. Extending the pilot truck bushing will either lift the lead drivers off the rail, so that's no good. If the front of the frame isn't bent, then the pilot casting extension may be. If you are leary of trying to bend the pilot extension upward, you have two choices. Either file some material off the frame or the pilot extension so as to raise the pilot up. One other thing you might consider is to replace the pilot altogether with a different one. Cal-Scale makes several "wooden"-style pilots, though you'd have to see which one would go with your locomotive.
Green board all the way!
I checked everything again. On a glass table there is clearance, of course on the rails that changes. Going around an 18" right hand curve the front two lead wheels on the truck move to the left leading to the derailment. The front left wheel lifts off of the track and the left wheel is outside of the rail leading to the derailment.
Affiliate Disclosure: We may receive a commision from some of the links and ads shown on this website (Learn More Here)