Ye Olde Huff-N-Puff


spotcheem

New Member
Hi, maybe you can help me?
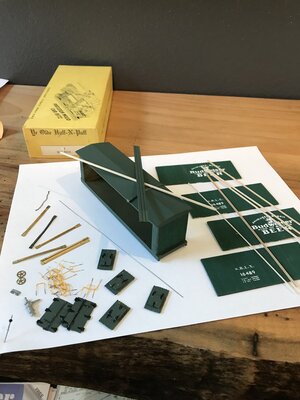
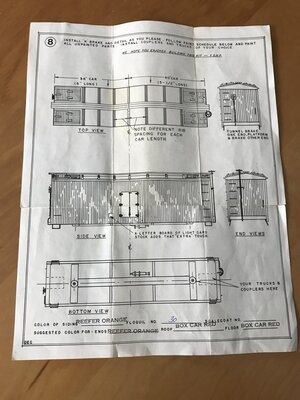
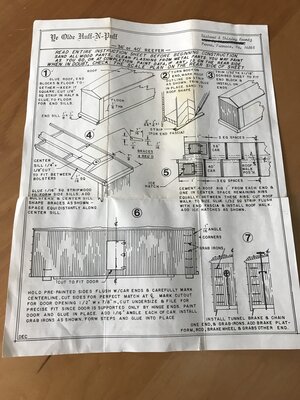
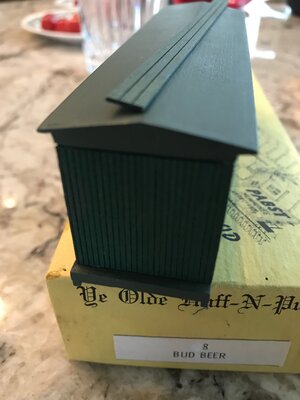
I am building kit 8, HO scale Budweiser Beer. It’s a great kit, lots of fun so far. I’m stuck on step 5, which is adding a piece of 1/32 x 1/32 strip wood . But I have no idea where it is supposed to go, even though it states in step 5 to mount it, the instructions are not clear….
The kit is a real pleasure so far. There is also a black “seed bead” included, but there is no mention of where to position it! Anyone have any idea of where to put these parts?!
The photo shows the 1/32 square strip wood, and also the black “seed bead” on a pin.
Where do they go?!
98F918A7-8A44-4426-9E57-CC56CE99EAE3.jpeg
 
What does the roof walk look like? Guess, but it sounds to me like it goes down the center of the roof ribs and ends up under the roof walk. Maybe to keep it from bowing between each rib?

No guess on the seed bead.
 
Thanks for your help! The roof wall is flat, and longer than needed. It will need to be trimmed since the kit is made for both 40 and 36 foot reefers. I have the 36 foot and the instructions are therefore a little confusing. There are 7 brass roof rails, four ice hatches, a piece of chain, etc. Actually a complex kit! There is no mention of the black bead, but I’m assuming it may be used to simulate a brake valve? Possibly on the vertical brake shaft leading to a brake wheel? The roof walk cannot possibly sit flat on the roof, so I think the 1/32 square wood piece somehow is included to provide a surface to glue the flat roof walk onto? The 1/32 square piece is on top of the boxcar. I’m probably overthinking this little project?!
 

Attachments

  • A5B4724D-2A2F-401D-AC5A-D5508CEF8243.jpeg
    A5B4724D-2A2F-401D-AC5A-D5508CEF8243.jpeg
    422.4 KB · Views: 102
  • 38B18608-475E-4E09-950C-9E4A853A7D02.jpeg
    38B18608-475E-4E09-950C-9E4A853A7D02.jpeg
    477.2 KB · Views: 107
  • FC4F96CC-8F54-4314-9844-DFDC8CC4CFA4.jpeg
    FC4F96CC-8F54-4314-9844-DFDC8CC4CFA4.jpeg
    618.1 KB · Views: 104
  • 632F1582-4C44-47B0-BD10-C4E1C4E21021.jpeg
    632F1582-4C44-47B0-BD10-C4E1C4E21021.jpeg
    268 KB · Views: 104
Thanks for your help! The roof wall is flat, and longer than needed. It will need to be trimmed since the kit is made for both 40 and 36 foot reefers. I have the 36 foot and the instructions are therefore a little confusing. There are 7 brass roof rails, four ice hatches, a piece of chain, etc. Actually a complex kit! There is no mention of the black bead, but I’m assuming it may be used to simulate a brake valve? Possibly on the vertical brake shaft leading to a brake wheel? The roof walk cannot possibly sit flat on the roof, so I think the 1/32 square wood piece somehow is included to provide a surface to glue the flat roof walk onto? The 1/32 square piece is on top of the boxcar. I’m probably overthinking this little project?!
Hmmm, the roof ribs are metal, and go across the whole car. I could not tell that from the first image. That blows my theory, that as you said it was just to provide a flat surface to glue to. Without a notch in the ribs it wouldn't be flat, but "bump" over each one. Then that picture of the end of the car shows the roof walk just teetering on the crest of the roof. It is puzzling. Sorry I couldn't help.
 
Hmmm, the roof ribs are metal, and go across the whole car. I could not tell that from the first image. That blows my theory, that as you said it was just to provide a flat surface to glue to. Without a notch in the ribs it wouldn't be flat, but "bump" over each one. Then that picture of the end of the car shows the roof walk just teetering on the crest of the roof. It is puzzling. Sorry I couldn't help.
Thanks for your help! I will figure something out. Even if I left it off, it's still a cool little kit. Someone suggested to put a short piece of the wood under the roof walk at each end, only as wide as the roof walk, and flush with the car end. Probably will try that after shaping the wood for the angle.


Back
Top