The Blue Top RR


Numbers

Member
...since my first, and only post. A lot has changed.

I couldn't get DCC to work consistently on the 2x4, I then had. Perhaps there were too many switches and grades. One problem with it, that I only discovered recently, was that a Kato terminal connector was wired backwards. Stuff happens.

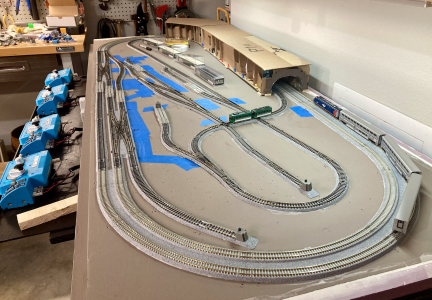
Anyway, I abandoned that layout and stripped it down to the 2x4 base. I found a way to squeeze a door size layout in my garage. I cantilevered some shelving so I could work under it. The 28x80 door is attached to the base via a 4' piano hinge, at the back. This will let me hide all wiring between the base and the door, with the added benefit that I won't have to crawl underneath anything to do wiring. At my age, that has become an issue.

I added casters to the existing legs, so the whole thing pulls out easily, once I roll the car out of the garage. Putting it back in place is a snap. To further brace the legs, I built a shelf under the base, supported and braced by the four legs. This provides additional storage under the layout. The whole thing is quite stable and strong.

I've decided to have all track at one grade. To avoid that flat look, about 25% of the track will be under a mountain, with an adjoining plateau for a residential area. A commercial district will be at the foot of the mountain.

Wanted a double track mainline to run Amtrak on one, with freight on the other. Then a simple switching area. To facilitate the participation of my 4-year old grandson, I added a trolley line in a figure 8. Its justification is bringing town folk to the mainline passenger station. The only industry is the cement plant. I don't think that I can squeeze in another industry.

So, I temporarily wired everything to see how the DCC would work out. It's still just as flaky as ever. I do think that I fried one decoder. I've decided to abandon it and go back to reliable (for me, anyway) DC. Did learn that the fun part of DCC was the sounds of the engine. The one working engine works well under DC, with sounds and light all functioning. I'm going to replace the decoder in the other one, sometime in the future.

I thought of going to the old block system until I figured out that Kato's power routing switches are a great way to control movement. Of course, this layout will need multiple DC controllers: one for each mainline, one for the inner switching area, and one more for the trolley line.

Once all the wiring is complete and tested, it'll be tunnel and town time. Hopefully it won't take another year.

Screenshot 2024-06-08 at 9.07.10 PM.png
 
...since my first, and only post. A lot has changed.

I couldn't get DCC to work consistently on the 2x4, I then had. Perhaps there were too many switches and grades. One problem with it, that I only discovered recently, was that a Kato terminal connector was wired backwards. Stuff happens.

Anyway, I abandoned that layout and stripped it down to the 2x4 base. I found a way to squeeze a door size layout in my garage. I cantilevered some shelving so I could work under it. The 28x80 door is attached to the base via a 4' piano hinge, at the back. This will let me hide all wiring between the base and the door, with the added benefit that I won't have to crawl underneath anything to do wiring. At my age, that has become an issue.

I added casters to the existing legs, so the whole thing pulls out easily, once I roll the car out of the garage. Putting it back in place is a snap. To further brace the legs, I built a shelf under the base, supported and braced by the four legs. This provides additional storage under the layout. The whole thing is quite stable and strong.

I've decided to have all track at one grade. To avoid that flat look, about 25% of the track will be under a mountain, with an adjoining plateau for a residential area. A commercial district will be at the foot of the mountain.

Wanted a double track mainline to run Amtrak on one, with freight on the other. Then a simple switching area. To facilitate the participation of my 4-year old grandson, I added a trolley line in a figure 8. Its justification is bringing town folk to the mainline passenger station. The only industry is the cement plant. I don't think that I can squeeze in another industry.

So, I temporarily wired everything to see how the DCC would work out. It's still just as flaky as ever. I do think that I fried one decoder. I've decided to abandon it and go back to reliable (for me, anyway) DC. Did learn that the fun part of DCC was the sounds of the engine. The one working engine works well under DC, with sounds and light all functioning. I'm going to replace the decoder in the other one, sometime in the future.

I thought of going to the old block system until I figured out that Kato's power routing switches are a great way to control movement. Of course, this layout will need multiple DC controllers: one for each mainline, one for the inner switching area, and one more for the trolley line.

Once all the wiring is complete and tested, it'll be tunnel and town time. Hopefully it won't take another year.

View attachment 191383
You can really fit a lot of stuff in a small space there! Those small radii areas allow a lot more options.

Thanks for sharing !!! Dave LASM
 
Hopefully, the ordered two additional Kato power packs arrive today. Preparing for them, I drilled four 9/16" holes in the front fascia to allow for their feeders, and switch feeders, to enter the wiring area. I also had to make a large hole in the right side (toward the back) for the surge protector's power plug. Then I gave the front drop down shelf a second coat of poly stain, and touched up the drilled holes.

Supporting the drop down shelf, one can see the right folding bracket. The shelf is in two pieces because I salvaged the shorter ½" thick shelf from the former 2x4 layout. The door, being 4" wider than the supporting frame, overhangs the old shelf, forcing its extension. It's all screwed and glued together in my typical over engineered fashion. The door is propped up, when needed, with a suitable wood stick, securely sitting in pockets, top and bottom. Thankfully, these hollow-core doors are lightweight.

One can also see the track and switch feeders coming through the door, from above. There are several extra holes because I had additional track (including a third Kato double crossover) and switches in a trial design. Alas, lots of ideas work well in the mind but the Amtrak passenger cars don't like to be pushed backwards through several switches.

I used hot glue to secure the wiring through the styrofoam and door. Big mistake if you want to make changes, as that stuff is tough to remove and clean up. Now just covering up the holes with painters tape. The wiring has lots of slack to allow the door to lift.

Screenshot 2024-06-09 at 9.59.32 AM.png
 
Today, the under-table wiring was completed. Four Kato DC controllers are up and running. Even one of the DCC BLI locos works well once the throttle is turned up about 2/3. The other BLI loco will not operate in reverse. I'm afraid that its board is partially fried. I'll replace the decoder at some future date. Meanwhile I ordered a replacement Kato DC loco at a very reasonable price.

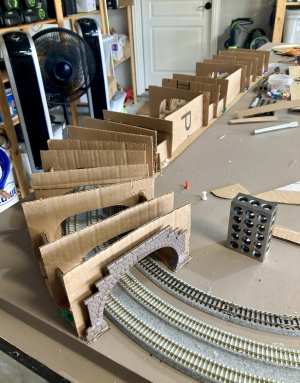
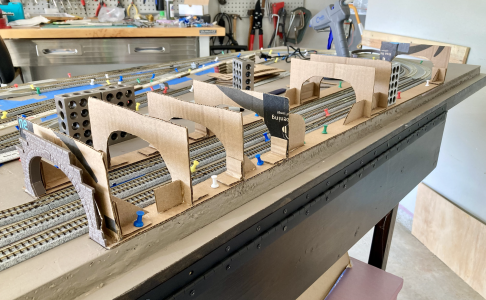
Thus, tunnel construction began. I've viewed maybe a dozen videos on tunnels, stealing bits, here and there. This is a basic cardboard and hot glue method. The 3-track tunnel will continue a bit longer, partially around a curve. The portal is actually an HO scale unit, partially lowered.

At some point, I'm going to have to decide if I'm going to ballast the Kato track. I'm wary of placing materials and adhesives on the track because of the possible negative effects on reliable running. What is everyone's feeling on this? Ballast looks good, but has it created other problems?
 

Attachments

  • Tunnel Start.png
    Tunnel Start.png
    4.1 MB · Views: 69
Your problem with the locos could be your command station DC emulation.
When you run address 00 on your layout, it's able to run the DC locos by skewing the AC sine wave to one side of its curve or the other. When that is left on then you run a DCC loco, it affects how the decoders respond to the basic AC sine wave with the DCC data mixed in.
Just turn off the DC emulation to your command station and you may see your locos improve.
 
Another way to get 'grades' is to put in several layers of foam and then carve gullies, rivers, and such. And stacking and carving more foam for hills.
That's what I was planning. Above the tunnel I was thinking about a hilly area with enough of a plateau to have residential housing. Then a road leading down to the base level where there'll be a commercial area.
 
Your problem with the locos could be your command station DC emulation.
When you run address 00 on your layout, it's able to run the DC locos by skewing the AC sine wave to one side of its curve or the other. When that is left on then you run a DCC loco, it affects how the decoders respond to the basic AC sine wave with the DCC data mixed in.
Just turn off the DC emulation to your command station and you may see your locos improve.
Last time I tried, couldn't get the non-reversing loco to respond to it's address. That I don't know what I'm doing with DCC is an understatement. At this point, I've given up on DCC and am using DC with ease.

I have to say that Kato's power routing switch system seems to work well with DC, in this size layout.
 
Tunnel construction is proceeding somewhat well.

All the arches are in. There are two large gaps for open areas to allow access from the back. I haven't exactly figured out that detail.

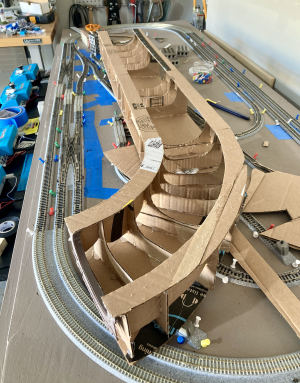
The top of the arches received a layer of cardboard to stiffen the whole assembly.

Turned upside down, I was able to hot glue the arches more securely.

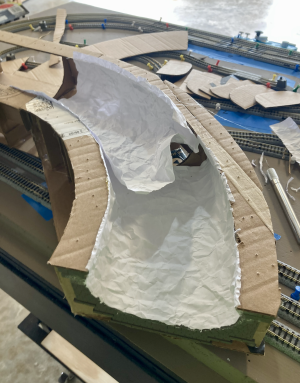
The third photo shows the beginning of the liner installation. Originally, I thought of using parchment paper for the liner. I then discovered that hot glue simply won't stick to parchment paper. Then, remembering a video I saw, I began using regular printing paper.

To get an approximation of a rock surface, you take a sheet of paper, wad it into a ball, open it up, wad again, and reopen. The wrinkles look like rock. Amazing. After the liner is installed, the plan is to stiffen it with something like diluted glue. Then paint it with a medium gray wash.
 

Attachments

  • Tunnel Arches.png
    Tunnel Arches.png
    2.8 MB · Views: 79
  • Tunnel Upside Down.png
    Tunnel Upside Down.png
    3 MB · Views: 66
  • Tunnel Liner.png
    Tunnel Liner.png
    2.3 MB · Views: 57
Today, my garage hit 100F. It was a good day for working on the tunnel.

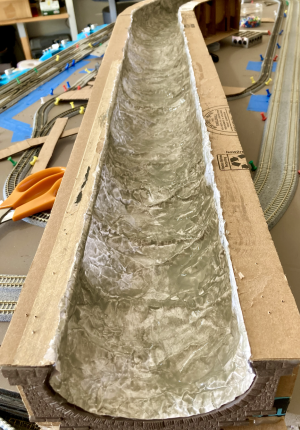
Using a mix of school glue and water, 4 coats were applied to the tunnel ceiling. This stiffened the paper somewhat. For a finishing wash, I added more glue and a few drops of acrylic Pewter Gray. The first picture was taken while the wash was still wet, the second was dry less than an hour later.

To my old eyes, it looks like a decent rock tunnel ceiling. Only the locomotive engineers, and trolley operators, will know.
 

Attachments

  • Tunnel With Gray Wash.png
    Tunnel With Gray Wash.png
    2.4 MB · Views: 86
  • Tunnel Curved With Gray Wash.png
    Tunnel Curved With Gray Wash.png
    2.5 MB · Views: 64
Last edited:
You can really fit a lot of stuff in a small space there! Those small radii areas allow a lot more options.

Thanks for sharing !!! Dave LASM
The small radii are for a trolley line that runs in a figure 8. It's to bring riders from the town to the main passenger station. I put it in to give my grandson something that would be easy to operate.
 
Today I made a final test of all the track and switches. Everything ran smoothly and worked as it should. Then the task of gluing down the track began as I slowly began removing the push pins.

I had already decided to glue the Unitrack down with the cheapest PVA I could find at the dollar store. Not to be cheap, but to have a bond weak enough to allow future changes. It was fairly easy to run a bead of glue underneath the raised edges, skipping terminals and turnouts. It was about 95F in the garage and the layout was at max thermal expansion. We'll see what happens in January.

After gluing the track is complete, the next step will be the installation of the tunnel and testing clearances.

Made a couple of changes to the layout shown in the first picture, at the top of this thread.

1. The double mainline in the back is now entirely double track Unitrack. I felt this would improve reliability in the tunnel section.
2. I filled in the perimeter notch on the two sides and the back, with the same extruded styrofoam. Those three sides will get a raised masonite perimeter.
 
Last edited:
Track gluing was completed, so it was time for a test run through the tunnel. The trolley ran on the inside track while the Amtrak passenger cars (the longest cars that I have) ran on the outside track. They both made it through without touching the tunnel sides. This was a surprise. I was fully prepared to scrap this tunnel in favor of a much larger styrofoam one. Now the tunnel has to be well secured as the whole layout can be tilted on its piano hinge to access the wiring.

Having watched many many videos on track cleaning and conductivity, I've had mixed feelings about using a tunnel because the track has to be maintained, somehow. Access panels are a problem due to the limited height of N scale tunnels (you can only get a few fingers in there). Finally, I've decided to put my faith in a thorough cleaning (that's what the wood block is for), followed by NO-OX-ID A-Special, and a cleaning car of some type. I did order one of the vacuum type cars but it was inoperable Chinese junk (possibly a knock-off). I welcome any advice in this area. The layout, being flat, shouldn't have any traction problems from the NO-OX.

The four controllers are on a shelf that hinges down. They, along with the attached Kato turnout controllers were secured on the shelf with small double stick pads.

Next on the scenery agenda will be building a mountain atop the tunnel with a plateau/residential area at its base. That will slope down to a commercial district at the base level. That's a lot of stuff in little space. I hope it will all fit. I've hade several other ideas that, although doable, just wouldn't look right.
 

Attachments

  • Tunnel Test Run.png
    Tunnel Test Run.png
    4.9 MB · Views: 64
Last edited:
Today saw the installation of perimeter styrofoam (4" high) on the back and the ends. Later, 12" masonite will be placed behind it, to paint a sky or hills.

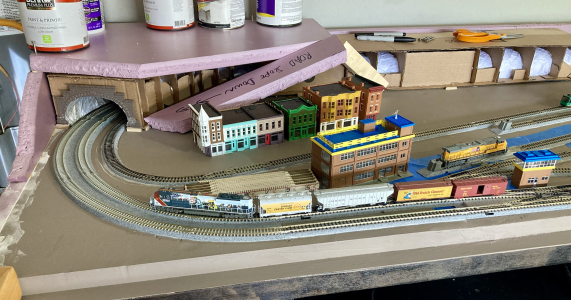
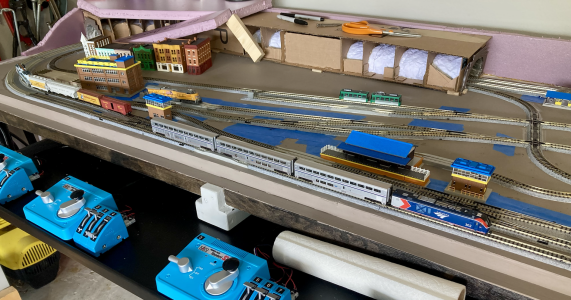
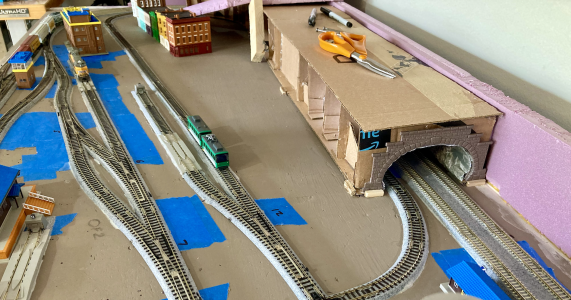
This allowed the beginning of an upper level, for houses and other scenery. Of course, there will be a road from the upper level to the base. It's temporarily represented by the sloped styrofoam piece. The road (on the left) will make a sharp U turn then continue along the trolley line, around the cement plant, and end at the mainline station. That's the plan, anyhow.

Before installing the tunnel, I NO-OXed that section and began running trains to spread it around. Everything has been running smoothly. All power is DC, but the mainline UP diesel unit is DCC with sound. It works well but at max power level.Upper Level 1.pngUpper Level 2.pngUpper Level 3.png


Back
Top