Could Use Some Help


Ima Train Wreck

Less than a Beginner!
So as I continue my odyssey of building my first ever layout, I need some guidance regarding a couple of things. With a basic understanding that things constantly change and technology is always providing us with new products and methods (some of which may not be any better or even as good) I am really interested in how you would do it now, if you were doing this today, not necessarily how you did it when you built your layout. Maybe you would do it the exact same way which is great, but if you were to start over and would use a different product / technique, that is what I am interested in.

Here is my current status:
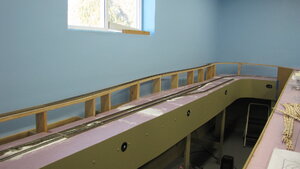
  • I am working to finish my benchwork.
  • I am going to model HO modern era trains
  • I have purchased the Digitrax Evolution Duplex DCC system
  • I have done zero wiring or track laying.
Here are my questions:
  1. How do you operate your turnouts? I am considering servos used in remote control model airplanes. Good idea or bad idea?
  2. How do you power your turnouts and other accessories such as lights and such?
  3. How do you control your turnouts? For example with your DCC controller, with toggle switches, etc.
  4. Where do you get your turnouts? I have Atlas code 83 track, should I stick with Atlas turnouts or something else? Is there a magical place where they don't cost so $$$$ much?
  5. How far apart are your wire drops on your track? I am using 36 inch Flex track and was planning on have a drop on ever section. Too much, too little, just right?
Thanks in advance for your help!
 
John - First, I run with DC because I am a lone operator and I cannot pay attention to two trains at once. I could care less for loco sounds, I would rather listen to music (classic rock mostly) instead of horns and whistles. So my answers take that into consideration. I have a walk-around memory throttle so I do not have to use a centralized control panel. If I were just starting out I might consider DCC, but I cannot afford to convert 80+ engines this late in the game.
1) I use all ground throws except in a couple of cases where the turnouts are less than accessible. My layout is basically around the walls and mostly between 24" and 32" wide so everything is within reach. The remote controlled switches that I have, are somewhat blocked by structures so I have localized Atlas switch machines disguised with scenery and the controls are located on the fascia immediately in front of them.
2) No power is required for ground throws. For lights and accessories, I use an old Tyco transformer (12-18v) for power. I use a different one for switch power. This can be done regardless of whether you use DCC or DC to power the trains.
3) See #2.
4) I use Atlas flex track and almost all turnouts are also Atlas. There is no real reason not to use Peco, Walther's or some other brand other than cost (I have 115 turnouts, so cost was an initial factor to me) or the fact that there is some difference in the looks which may or may not matter to you, but not the functionality. They are all basically compatible with one another. I purchase all of mine at my LHS because they sell everything at 20% off MSRP. Better deals can be gotten at train shows or on E-Bay if you choose to go that route. There are Internet vendors that also discount their products, but may charge shipping. MB Klein, aka Model Train Stuff, has quite a good reputation, but I never had to use them.
5) I consider drops on every section of flex on main lines and passing sidings as being just right, that's what I do. Some might consider that overkill but to me it's cheap insurance against power loss. I do not do so on many industrial spurs, although most have at least one centrally located drop. They are generally short and engines don't always enter them.
I hope that this is helpful to you. As usual in this hobby, there are other opinions which I fully respect.
 
One thing that would help is to know the size of your layout, and how far away from your manual reach are your turnouts? Just generally, the following are my tentative answers:
1. I have several different manufacturer's turnouts: Atlas, Peco and Shinohara. Atlas turnouts can be powered by the Atlas twin-coil switch machines that attach to the turnout itself. This makes for easy access for wiring, and also allows manual operation of the turnout. Peco turnouts do have their own twin coil machines, but I personally don't use them, preferring some older twin-coil machines I happen to have. They can also use Tortise powered stall machines. I suppose you could use servos, but have never tried them.
2. Twin coil switch machines must be actuated with MOMENTARY power only, and AC. The power source can be from an AC accessory portion of a power pack or a separate pack. The output is 12-19V AC. Lights can be powered from "wall warts" which plug into a 110v household outlet, and can put out various voltages.
3. I use a combination of rotary switches in series with a pushbutton or just two buttons, or a SPDT Momentary Center-Off toggle switch (the other wire goes directly to the common terminal on the machine. Why the variety? I have a lot of different stuff left over from previous layouts, and it was easier and cheaper to use them. (I would have preferred to use rotary switches with a pushbotton for visual direction, but ran out.)
4. I don't know of any special place, except your local hobby shop, Wm. K. Walthers, or on ebay. The only problem with ebay is that turnouts offered there are probably going to be Code 100, and you don't know what you are getting. I see that Atlas is now offering improved Mark IV Custom Line turnouts in Code 80. The newer Code 80 Peko are probably made with American guardrail clearances, rather than the slightly larger ones on their Code 100, made to British standards, which in some cases caused problems.
5. Since I originally set up for DC, with blocks, every block in my folded dogbone in a 14'x14' room is wired, which is probably overkill. Use 14 ga. wire for your main bus, and lighter wire, say 24 ga. for the drops.
Best of luck on your layout construction.
Stay well and safe!
 
My Layout:
How do you operate your turnouts? I am considering servos used in remote control model airplanes. Good idea or bad idea?
>>>
Manual pushrods. I use a DPDT toggle switch with a dowel rod as a pushrod. Switch controls frog polarity.
Servos will work, they may need some sort of controller board.

How do you power your turnouts and other accessories such as lights and such?
>>>
I have a separate power supply to power the 7 powered switches in staging or remote areas.

How do you control your turnouts? For example with your DCC controller, with toggle switches, etc.
>>>
Manual pushrods in fascia.

Where do you get your turnouts? I have Atlas code 83 track, should I stick with Atlas turnouts or something else? Is there a magical place where they don't cost so $$$$ much?
>>>
All hand laid except PECO in staging.

How far apart are your wire drops on your track? I am using 36 inch Flex track and was planning on have a drop on ever section. Too much, too little, just right?
>>>
Generally 4-5 ft at most, in yards much closer because of the number of switches.
More drops means less chance of dead spots.

My Son's layout:

How do you operate your turnouts?
>>>>
Manual, push the points over with a finger.

Where do you get your turnouts? I have Atlas code 83 track, should I stick with Atlas turnouts or something else? Is there a magical place where they don't cost so $$$$ much?
>>>
They are a mix of Atlas Code 83 and PECO. Atlas turnouts will work, but you will need something to hold the points. PECO has a spring in the mechanism that will hold the points manually.

Dave Husman
 
Opinions are like as***... er... um... ELBOWS! Yes; Elbows. Everyone has one or two. :) I'll throw my two cents in if, for no other reason, then to give you some more food for through.

1. How do you operate your turnouts? I am considering servos used in remote control model airplanes. Good idea or bad idea?
- The servo concept has been used successfully by many. I have considered it, but it seems to be necessary to have a great deal of electrical knowledge that I simply don't have. 90% (right now 100%, but that might change) of my turnouts are manually controlled.

2. How do you power your turnouts and other accessories such as lights and such?
- Right now, the only lights I have are powered either off of direct track power or through a decoder. I built a round house and fitted it with lights and the turntable a lights are all powered through a spare (basic) decoder I had. Now, granted, I don't have a whole lot of extras on my rails, so this is one thing that might change. Most likely if it does, I'll power everything through DC power packs and toggle switches.

3. How do you control your turnouts? For example with your DCC controller, with toggle switches, etc.
- The Hand of God tell my turnouts which way to point... And sometimes my the hand of my four-year-old... Before I torn apart and rebuilt a huge section of my layout last year, I had a big portion where the turnouts were all controlled by a DC cab and toggle switches. I have a small switching area I've just built which will most likely get the same treatment. Simple... Easy... not a lot of programming.

4. Where do you get your turnouts? I have Atlas code 83 track, should I stick with Atlas turnouts or something else? Is there a magical place where they don't cost so $$$$ much?
- Stick with code 83 for sure, but different manufacturers can be mixed. I have started making my own turnouts when needed. It's not that hard with the right basic tools and you can customize them however you want. (Check out my YouTube channel below. I made a video of the process.)
- Magical place where they don't cost so much? No.
sorry...

5. How far apart are your wire drops on your track? I am using 36 inch Flex track and was planning on have a drop on ever section. Too much, too little, just right?
- I forgot what the "Industry Standard" is for HO, probably 3-5 feet. With that said, I have a couple of sections that go 14 -17 feet between power drops. Not that I am recommending this, but good solid track connections can make it quite a distance though are not always reliable. With THAT said, I am planning to add more power drops into those section for good measure. Track isn't the world's best conductor.

Hope this helps.
 
Thanks everyone...this is some seriously great stuff! I am soaking it all in and will probably take bits and pieces from lots of the ideas I have received.
 
Hey John, as you'll find out, (or finding out,) there are lots of different ways to accomplish something in model railroading. But, it's always good to have options isn't it?....lol
Any way, on my first go around at building a model railroad, this is what I did on.....
----How Do you Operate Your Turnouts----
----How Do You Power Your Turnouts----
----How Do You Control Your Turnouts----
I'm going to combining these three questions....I have facia mounted manual controls, I recessed them into the facia to help keep them from sticking out into the aisle. Even at that you can see the control on the left below, is still protruding out into the isle. The yellow rods are flexible, but I was going to install "bumbers" over the top of the rods to help keep them from getting hit.
IMG_2323.JPG


What I'm using for switch machines are the FastTracks manual turnout controls, and FastTracks control rod kits. With this set up, the "throw" for the switch is kinda long, verses lets say the BluePoint Machine, which has a really nice sharp snappy short throw to it, but for the price of those things, and I found soldering to be difficult on the terminal ends from how they are all grouped together, so I went with FastTracks. The only electrical accessories that I planned on installing initially were indicators for the mainline turnouts. Anything else I figured I'd install sometime after I got trains up & running.
From the very start of track laying, my goal was to build in reliability. I wanted the frogs powered, so with the FasTracks stuff, I could do that. Also for mainline switches, I wanted a "points" indicator that I could see from across the room. ( I have a 12' x 20' around the walls with peninsula, layout HO) I found some LED's with built in resistors, and wired them to the frogs. Here is one wired up below. The thin wires are the LED's.


IMG_2346.JPG

Here is the LED's lit..... The green (a little hidden), lined for through mainline, yellow lined for turnout side...
IMG_2186.JPG

----Where Do You Get Your Turnouts----
All of my turnouts & track is Shinohara. This was recommended by the guy that designed my layout, and that's' been a few years ago now, back when Shinohara was readably available. As I don't have a LHS (local hobby shop), all my stuff is on-line purchasing. I just found who ever had what I wanted for the best price.
----How Far Apart Are Your Wire Drops On Your Track----
John, here again I was going after the reliability thing. I have code 83 track and I have a lot of code 88 wheels on my rolling stock. I soldered a set of feeders to every piece of flex track, be it three feet long or three inches long, for I don't what to rely on the rail joiners for electrical power, because, I am not soldering every joint. On tangent track all the joiners are unsoldered for expansion/contraction. Only on the curves are the joiners soldered.
I staggered the joints on the curves by seven/eight/nine ties before soldering to help keep them from kinking.
If you refer to the top picture you'll see some track upside down with the feeder wires sticking up. I felt I had better control of track feeder wire soldering on the work bench. I got the switches located on the plan, wired and installed first. Then I filled in the track between switches. With each piece of track, I would get it located and mark the feeder wires for soldering on the rail & feeder wire holes in the road bed, solder, install, next piece.
And just a quick note on track laying....in this picture below on the right are a couple of sets of sweep sticks. Way handy in laying track! I'm just talking about mainline track, as anything other than mainline is reduced speed track, and a real fine alignment in not needed, (nor maybe wanted if your after a more prototypical looking track.) So for code 83 track & code 88 wheels, I wanted the track alignment as darn near perfect as I could get it. I got the sweep sticks in what ever curve radius's I have and a couple of straight sets, and they have holes in them to facilitate spiking the track down after you've got it lined up. I used track spikes exclusively, I did not glue any track down.
IMG_2181.JPG

I didn't know this until I had purchased track, but the Shinohara track has mounting holes in the ties, one each just inside the rail and same thing on the outside of the rail. Each set of holes are about 8/9 ties apart, verses lets say Atlas track that has one big hole in the middle of the tie for securing to the road bed. They are also about 8/9 ties apart. Has Atlas changed that anyone? I don't know......I prefer the Shino!
Well John...more info to process...ha ha
Research John, research!
Welcome to Model Railroading! 🙂
Jerry
 

Attachments

  • IMG_2181.JPG
    IMG_2181.JPG
    287.8 KB · Views: 118
Don't use nails. Use a silicone caulk. You can make minor adjustments to the track before it sets up and ya don't have the manhole covers down the center of the track.
 
Thank you so much Jerry for the detailed explanation and the pictures! Your wiring is very neat and looks efficient with your buttons on your facia. Ken, I may have to move and was trying to build it in such a way it would be easy to take apart in sections and move if need be. Would you still recommend silicone caulk?
 
I use track nails because it's easier for me. They are not that hard to remove if needed. I use them in cork roadbed. If you use caulk, make sure to get the right kind or the track will never come up. Since I don't use it, I cannot tell you which type to use. Maybe Ken will chime back in.
 
I use track nails and can always remove the nails once the ballast has harden with diluted white glue. I always use white glue since other types of glue can dry to a very hard medium and not be as water solvable in the future to remove.

Greg
 
Atlas track and turnouts are just fine. I’ve used all kinds of turnouts over the years mainly using Shinohara and Peco. But I’ve discovered Atlas code 83 worked very well. As for the feeder wires , I dropped mine every 6 feet.

Can’t help with the turnout control. Mine are air powered and use toggles.
 
Justy about any of the flexable caulk will be just fine. Ya only need a small line down the middle of the track line to hold the track in place so it doesn't come loose. If you are planning to ballast, that will enhance the hold of the track to the cork roadbed.
 
I use track nails and can always remove the nails once the ballast has harden with diluted white glue. I always use white glue since other types of glue can dry to a very hard medium and not be as water solvable in the future to remove.

Greg
Same here. Paint the track first. After paint is dried then ballast with diluted white glue, pull nails after everything is dried. I don’t glue my track down. If I decide to add turnouts, etc it’s a lot easier. The only thing I glue down is the cork.
 
Same here. Paint the track first. After paint is dried then ballast with diluted white glue, pull nails after everything is dried. I don’t glue my track down. If I decide to add turnouts, etc it’s a lot easier. The only thing I glue down is the cork.
Really interesting! So you remove the nails once your ballast has dried and your track stays in place? That would be my choice if it works for me as it does for you. I was actually thinking of screws as I could back them out easier than pulling nails.

Also, thanks Ken for clarifying what type of caulk to use. That would be the easiest of all, as long as I can move it when and if I need to do so.

The Atlas track nails pull out fairly easy with the right tool. I use pair of side cutters.
 
Here are my questions:
  1. How do you operate your turnouts? I am considering servos used in remote control model airplanes. Good idea or bad idea?
  2. How do you power your turnouts and other accessories such as lights and such?
  3. How do you control your turnouts? For example with your DCC controller, with toggle switches, etc.
  4. Where do you get your turnouts? I have Atlas code 83 track, should I stick with Atlas turnouts or something else? Is there a magical place where they don't cost so $$$$ much?
  5. How far apart are your wire drops on your track? I am using 36 inch Flex track and was planning on have a drop on ever section. Too much, too little, just right?
It must have been a busy weekend as I missed this Friday night.
  1. For remote powered turnouts I use stall motors. There are several brands including tortoise. They are expensive. I have zero experience with model airplane servos, so no help from me there. I have seen a few threads on that topic though.
  2. I power accessories and turnouts with their own separate power supplies.
  3. I control turnouts how the situation dictates. The plan is to power the ones on the main line that a remote dispatcher would be able to change. Inside the yard or industrial area if they are close enough to reach without destroying scenery they are manual. And if they can't be reached they are controlled by a switch on the facia.
  4. I pick up turnouts any time I find them on sale, or ebay, or swapmeets. No magical place anymore. Cheapest is of course to build them yourself.
  5. A drop on every section is great. That is much more than I do. I put one every third section or so. Once again as the situation dictates.
 
Last edited:
I use track nails and can always remove the nails once the ballast has harden with diluted white glue. I always use white glue since other types of glue can dry to a very hard medium and not be as water solvable in the future to remove.
This is what I used to do, but I had a layout I build in 1982 that by 2002 the white glue became brittle and the track started just popping off. I switched to Matt Medium that artists use to paint over their pictures to protect them. It never becomes totally hard and I am told it never turns brittle. A bit harder to "soak off" than white glue is for changes, but compromises must be made.

A few times I have left the nails in. Painted the top of them the color of the tie, after ballast they are hardly noticeable. Plus when one pulls out the nail and there is a little hole there begging to be filled. Leaving them in is bad for photography when someone can sit there and magnify it hunting for every foible.... ha!

When using brads or nails be careful not to pound the nail in too far. If it presses on the tie such that the tie bends it pulls the rails together and you have created a tight gauge problem (especially on curves).
 
I’ll add another option for throwing switches, the NCE switch it or switch eight.
I use Tortoise machines on the mainlines and can operate them from my Digitrax handheld.
I also have bicolour led’s wired on the machine leads to indicate position.


Back
Top