Help with SVdA Error Code with Prodigy DCC


KB02

Well-Known Member
Yes, I have been doing as much research a I can to figure this out and I have found that this means there is a short in the system. I have even figured out exactly WHERE the short is on my layout. I just need help in figuring out a solution.

HO Scale - Prodigy Express - Atlas Snap Switch Turnouts. (yes... yes.. I know that the simple fact that I have snap switches is a problem in an of itself... but please read on...).

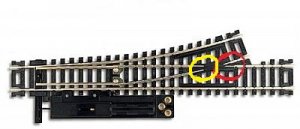
When running my trains across this turn out, I tend to get a short. The short comes when metal wheels cross the frog (see circled area in image below). Even though the rails are eclectically isolated, the wheels are wide enough that they can pull a small spark from the other rail and cause the short. I then get the SVdA error code on my handset and can no longer control the trains (the trains DO, however, keep running... I just can't control them).
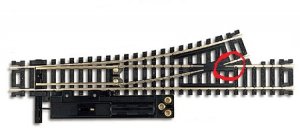
Turnout short.jpg

I found this on another forum from 2002 so I know it must be a known issue:
http://cs.trains.com/mrr/f/11/p/110552/1276803.aspx
Momentary shorts at insulated frogs are known to happen occasionally with Peco Insulfrog turnouts. Back before Pecos were in common use, the same thing would happen on occasion with Atlas turnouts, particularly #6's. I'm not sure the problem carried over to the code 83 and later versions of the Atlas turnouts.What happens is a metal wheel spans the 2 rails that form the frog point, where they first become "live". The 2 rails are of opposite polarity, and are quite close to each other. This only happens momentarily, as the momentum of the train carries the wheel past the point where it can short. In your case... the Prodigy Express does register the momentary short circuit.
My suspicions are reinforced by your statements that it only happens at 2 turnouts, and only with particular wheels, and then not all the time.
To test/temporarily fix, coat the first 1/2" of live rail beyond each frog point with nail polish. Only do this to the 2 offending turnouts. Allow to dry and test. If I'm wrong, remove the nail polish, and no harm is done. If I'm right, you will have to recoat the nail polish occasionally or remove some of the rail head on the inside of the frog point so that the wheels can't short across the 2 rails. I would also check the wheel gauging with an NMRA gauge - chances are the offending wheels will also be slightly wide in gauge.
HTH
Fred W

A.) Would this work?
B.) Would I be able to just cut a gap in one of the rails to cut power from the tip at the frog to prevent the short?
C.) I have also seen mentions of using a 12 tail light bulb to prevent the short from effecting the control unit, but I can't quite wrap my head around how that works. (can anyone here explain it a little better?)
 
A.) Would this work?
Yes, I have used this solution many times for Peco turnouts. I was unaware that Atlas snap switches had the same issue. The fingernail polish lasts longer than one would think. Also I would never go 1/2" that is way too far. It only needs something like an extra 1/64" of insulation there. Remember the nail polish is creating a dead spot. One wants dead spots to be as small as possible.

B.) Would I be able to just cut a gap in one of the rails to cut power from the tip at the frog to prevent the short?
Yes, but it would have to be cut in a spot between the built in jumpers and the frog. I don't know exactly which tie those are jumpers run through. Doing that would also create yet another dreaded dead spot giving the locos a place to stall.
 
Well, I tried out the nail polish last night and it seemed to work really well. All my locos crossed (and backed over) the effected Turnout without a single default stopping the controller (well, I had one short, but that was caused by a derailment which was caused by Horn-hook couplers inherent hatred of backing a train up). I went through and painted all of my turnouts since most at all Atlas snap switches (except for my two old Peco TO's... I painted them, too). Now we're on to laying more track!
 
I am digging this thread back up as the solution above has failed me. :(

I have two turnouts in particular that are causing the issue and no matter how many times I have re-applied the FN polish, the problem keeps happening. NOW, with that said, one of the turnouts is going away (it has been giving me other issues, too) and getting replaced by a brand new curved turnout; this should eliminate a couple of problems. But the other turnout is part of the main line and would really like to send a train into the passing siding without have to hope I can reset my controller prior to the train reaching the end of said siding.

Any ideas? This has been driving me nuts.
 
...I have two turnouts in particular that are causing the issue and no matter how many times I have re-applied the FN polish, the problem keeps happening. NOW, with that said, one of the turnouts is going away (it has been giving me other issues, too) and getting replaced by a brand new curved turnout; this should eliminate a couple of problems. But the other turnout is part of the main line and would really like to send a train into the passing siding without have to hope I can reset my controller prior to the train reaching the end of said siding.

Any ideas? This has been driving me nuts.

Is the fingernail polish solution working on other turnouts, but just not these two? I wonder if maybe the cause of the the short is different on these two.

...the trains DO, however, keep running... I just can't control them...

I must say, this is a very bad design. I don't know of any other DCC system that does that when there is a short.

...I have also seen mentions of using a 12 tail light bulb to prevent the short from effecting the control unit, but I can't quite wrap my head around how that works. (can anyone here explain it a little better?)

A normal tail light bulb probably would not work with the Prodigy Express because it probably draws to much currrent, but you could probably find another one that would. Here is how it works: You place the light bulb in series with the layout. Under normal running there is not enough current flowing to illuminate the bulb. When there is a short, the power to the short flows through the light bulb and the light bulb limits the current flow preventing the DCC system from shutting down.
 
the trains DO, however, keep running... I just can't control them).
I must say, this is a very bad design. I don't know of any other DCC system that does that when there is a short.

When I have a traditional short - like a derailment - the whole system does shut down. As soon as the short is cleared the trains start running again, but I have to unplug the controller for a few seconds to get it to rest. The safety system is in place, but maybe the short is just too quick to cause the shut down? I cannot even see a hiccup in the train's movement when this happens.

Check your wheel gauge, as suggested before. Are you using modern rolling stock?
For the MOST part, this happens with my Rivarossi (early 80's model) 4-6-4 Hudson. sometimes it is caused by the Athern coaches it hauls. Very occasionally one of my Diesels will trip it, but that is rare.
 
Last edited by a moderator:
...As soon as the short is cleared the trains start running again, but I have to unplug the controller for a few seconds to get it to rest...
Well, it should either stop the trains until you reset the controller or it should automatically reset the controller, to let the trains resume with no control over them is a poor design.

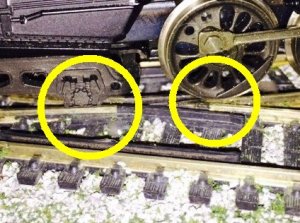
Take a look at the part of the frog I have circled below, could that might be where your short is?

Turnout short.jpg
 
By running the train slowly over the turnout by hand, this is where it is when the SVda error tiggers:
17C3EDEF-C3C1-414D-87FA-012089EB037D_zpsnm58fgsz.jpg


So... to answer your question... it could be either spot.
 
It does look to me like it is the other spot. If you look closely you can see at this point these is a gap between the driving wheel and the opposing rail, so there currently is not a short there. It looks like at the other point the back side of the wheel could be touching the opposing rail that the engine is crossing over. The first thing I would do is make sure that none of the wheels on the trouble engines and rolling stock are too narrow of a gauge because that could allow that to happen. You could also try the nail polish trick on the side of the rail that it looks like the wheel could be touching. This isn't to say that the other point wasn't also an issue, and since you initially said putting the finger nail polish there seemed to work, then it probably was.

short3.jpg
 
Looks like Robert and Old guy were both right. The trailing trucks on the Hudson are a little narrow. The guide rail on the diverging track was pulling the axel a little too close to the opposite rail before the frog causing the short.

I called MRC, too, to see if there was some software upgrade or something that could help get around this error. Their suggestion was that due to the system being so low voltage, the best bet was to upgrade the whole system. The current charge is $40.00.

But it in the mean time, nail polish is holding the short at bay.
 
I am also getting the SVDA error on a MRC Prodidigy advance 2, but it is happening intermittatly with no trains on the layout. any ideas why?
 
I have the same MRC Advance2 Squared an ran into a major power problem. I just completed my layout, cleaned the top rails and turned the MRC on. The HO engine (everything DCC on my layout) started up and I had to increase the speed up to 50 or so as it seemed sluggish (maybe just stepping up?) but it ran fine for about 20' and stopped dead in it's tracks - literally. I turned the power off, cleaned the rails again also inspected for any stray metal objects - there were none. When I turned the power back on, the cab display was blinking "SVDA" and the power unit and transformer were also blinking. Shut it off immediately.

Stupid question regarding the turnout frogs: I did not wire (and probably will not wire) the Peco Code 83 Electrofrog turnouts. But can the same thing happen to mine like the OP's post even though mine don't have turnout machines? The thing is , I ran it without going through any turnouts.

Looked at the MRC user guide's trouble shooting pages but none of the solutions helped. I'm going to try rewiring it and also call MRC for help.

Edited to add: I should have posted this in the HO scale forum - can I move it there?
 
Stupid question regarding the turnout frogs: I did not wire (and probably will not wire) the Peco Code 83 Electrofrog turnouts.
You do not need to wire electrofrog turnouts. You need to use insulated rail joiners or have gaps in the rails coming off the frog if there is power somewhere on down that line - LIke in a loop of track.
 
You do not need to wire electrofrog turnouts. You need to use insulated rail joiners or have gaps in the rails coming off the frog if there is power somewhere on down that line - LIke in a loop of track.

Thank you! I just downloaded an article that shows that and even mentioned that taking a Peco turnout right out of the box and installing it will guarantee a short. I'll insulate the 3 turnouts I have so far and others down the line. Will post the results.
 
I have had the same issue on a past layout. It's been a while since I've had to deal with this this, so my information may be a little rusty...

I had stolen clear nail polish from my wife and painted the tops of the rails around the frog. This provided the insulation in the area where possible shorts would occur. It worked great at first but I found that small engines that had smaller wheel bases could not bridge the gap continuously. A little bit of nail polish remover and it worked fine. That being said, my advice would be to start with a small section of "insulation" and test & adjust from there.

Hopefully this helps. Even if you don't use the method, the knowledge can be applied pretty much anywhere.
I've heard of the nail polish trick as you mentioned. But, I have a couple of short wheelbase things, like a hi-rail inspection pickup truck and a small caboose. So, I'll be cutting some gaps to avoid the short. Thanks for replying! (Are you from Brooklyn, NY? I grew up on Staten Island)


Back
Top