Weekend Workbench: 2023


Rico

BN Modeller
Well okay, we thought we might try this out so here goes.
Show us what you’re working on this weekend, if it's on the workbench, layout, layout room, or whatever!

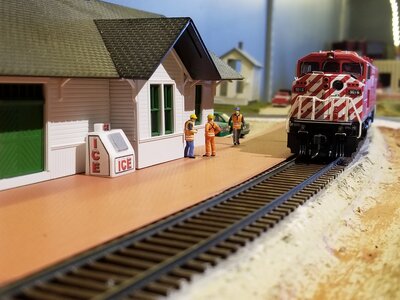
I've been slowly modifyng this Walthers Clarksville Station (bought on Feebay mint in box but missing half the parts with the remainder warped or broken🙄) to resemble a BN station.

99251C82-640D-4AF0-B9AC-2D8D3AB4FEFE.jpeg
 
Here is an old HO Atlas C30-7 I've been working on, trying to make it look like it did back in '96 or so. The cab and one set of truck sideframes is 3D printed. Trying to figure out how to paint the handrails. I sandblasted them with the fine grit sand (at work) and painted them with adhesion promoter. I've used enamels the last 30 years and the paint on this is about 50% original, the rest matched using Testors green and Floquil (in a square bottle with a 70 cent price tag) yellow. I wonder if the same mix would stick to the handrails now. Hopefully, it will look as good as the ESU decoder with 16 cylinder FDL profile sounds. I still need to add windows, handrails and some of the air piping.

thumbnail_IMG_1485.jpg
 
Those sideframes look great. Slightly different in the details, and I couldn't begin to tell you which one is closest to the prototype...or maybe they both are? Two different prototypes, as with the EMD Blomberg trucks which evolved over time?
In any case, you are making good use of 3D printing, which might keep me in the hobby...when shaky hands would otherwise drive me out.
My own 3D printer (SLA) is sitting, unopened, on the tabletop at the other end of the room. I'll finally get to try it any day now. Any day.

After fifty other things (not one of them hobby related) get finished first. Meh!
 
Nice stuff on the “Bench” so far.

Rico. Thanks for starting this I think it’s going to be like a hit. Nice pic it’s ashame we get ripped off on Sleezbay so much.

Paul. I like Engine the color is nice looking. I still have a couple old Pactra paints I use from the very early 1970s
 
Snowman, the trucks match the prototype in the era modelled. At some time the rear truck was replaced and that style sideframe is not available commercially. The front truck is from Atlas. Atlas' early cabs were correct in that they had four walls, 14 windows and a roof but the roof's contour was off which made the walls the wrong shape and the windows were the wrong sizes and in the wrong places. Apparently, the newer cabs are more correct but I couldn't find one. I picked this loco because of the mismatched trucks, early (so I don't need to replace it) exhaust and the number whose digits add up to 21. It is first in a trio, the next will be ATSF 8166, another 21, and the third will be BN 5050. You'll probably make it with 5050 in the lead!
 
Hi folks.
As it happens, I have a model 1/87th truck on the bench, as well. Not as far progressed as Lee's truck is.
My truck is a Sylvan 52 Ford tractor. State of play:

52 Ford_05-08-2022 (2).JPG


Presently, I'm in dry time. Waiting for glue and filler to dry so I can clean it up and get some paint on.
The grill had sink marks that required filling, as well as the fuel tanks. I replaced the filler caps on the tanks with plastic punch-outs. Plus, the differential was a bad resin pour, so I replaced the axle with 0.9mm copper tubing. There's a gear shifter in the tweasers, that I'm building up a shifter knob for with medium CA. Probably wasting my time with that.
I've decided to use a female figure as truck driver. This comes from one of those low cost Chinese figure sets. It just seems better than the resin blob figure that came in the kit. The figure is just positioned for fitting purposes, it will be removed for painting. - The tyres will come off for painting the rims, as well.

And that's what I'm fiddling with on this wet, cold weekend.
 
My homemade wood mill house kit in O scale.
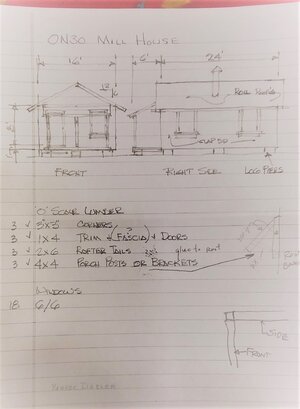
My friend drew the plans and bought the wood for three houses, which we penciled in the cutting lines for the walls, windows and doors. There are three different builders and likely three different versions of the same basic design shown below.
The windows are purchased, but the doors, walls, trim, roof and shingles will be scratch built.
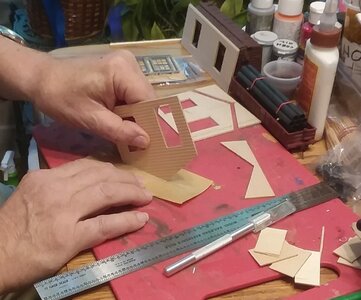
Here are the cut pieces being sanded. Much more remains to be done.
 

Attachments

  • 20220504_144026.jpg
    20220504_144026.jpg
    289.9 KB · Views: 92
  • 20220501_213933.jpg
    20220501_213933.jpg
    341.3 KB · Views: 95
Hi folks.
As it happens, I have a model 1/87th truck on the bench, as well. Not as far progressed as Lee's truck is.
My truck is a Sylvan 52 Ford tractor. State of play:

View attachment 145642

Presently, I'm in dry time. Waiting for glue and filler to dry so I can clean it up and get some paint on.
The grill had sink marks that required filling, as well as the fuel tanks. I replaced the filler caps on the tanks with plastic punch-outs. Plus, the differential was a bad resin pour, so I replaced the axle with 0.9mm copper tubing. There's a gear shifter in the tweasers, that I'm building up a shifter knob for with medium CA. Probably wasting my time with that.
I've decided to use a female figure as truck driver. This comes from one of those low cost Chinese figure sets. It just seems better than the resin blob figure that came in the kit. The figure is just positioned for fitting purposes, it will be removed for painting. - The tyres will come off for painting the rims, as well.

And that's what I'm fiddling with on this wet, cold weekend.
Guy that was my favorite year of Ford trucks that my dad liked. I like the rear axle idea I agree very poorly casted but at least we have one
 
As with Jerry, my project was a workbench. This Black&Decker Workmate 125 was a birthday gift from my son ~5 years ago, and it sat unassembled and forgotten in its box in various nooks and crannies...
PortableBenchNewlyAssembled.jpg


...until today, when I discovered the perfect use for it: A surface to set a laptop on while I use it to control my DSLR.
CanonEOS_CameraControlSoftwareInAction.jpg


There isn't any free space on the layout surface for me to set it on, and the floor was not an option. Now I can control my camera remotely and preview in "real time" how my photos will come out, without having to bring the camera all the way back to the opposite end of the house and offload the image from the SD card onto my C: drive.:cool:
 
Lee - I have this unassembled GMC Crackerbox tandem-axel tractor that's waiting to be assembled:

GMC_CrackerboxTandem.jpg


I've already trimmed the flash off the tires and other kit pieces, but since I don't regularly work with resin kits, I don't have the right kind of cement to put everything together; or more precisely, the "zip kicker" material to speed the drying of the CA when I have the parts properly positioned. All the local hardware stores have CA glue, but I have not seen any of the accelerator material (I don't even know the the "correct" name for it so I could ask about it...)
 
Lee - I have this unassembled GMC Crackerbox tandem-axel tractor that's waiting to be assembled:

View attachment 145665

I've already trimmed the flash off the tires and other kit pieces, but since I don't regularly work with resin kits, I don't have the right kind of cement to put everything together; or more precisely, the "zip kicker" material to speed the drying of the CA when I have the parts properly positioned. All the local hardware stores have CA glue, but I have not seen any of the accelerator material (I don't even know the the "correct" name for it so I could ask about it...)
Ken I just use Gorilla Glue Super glue for all my resin kits. Just wash them with Dawn dishwashing detergent with a Toothbrush let the parts dry and start building it. You can use the kicker with Gorilla Glue. Here’s a pic of what I use.
1A7D8C9E-C724-4FCC-AEB7-94B5BB4BE7B6.jpeg


Back
Top