
You are using an out of date browser. It may not display this or other websites correctly.
You should upgrade or use an alternative browser.
You should upgrade or use an alternative browser.
Weathering Rolling Stock, a Continous thread
- Thread starter TLOC
- Start date
TLOC
Well-Known Member
I’ll have to check the number of the Krylon I have in the inventory. Thanks for checking in RCHI like Krylon 1311 for a matte clear. It looks good and the price is a lot better than Dullcote or Tamiya TS-80.
RCH
Been Nothin' Since Frisco
Sure thing. I started using it because I could get it at Walmart, but on my last visit they were out. I bought a case of it through Amazon instead for a reasonable price.I’ll have to check the number of the Krylon I have in the inventory. Thanks for checking in RCH
RCH
Been Nothin' Since Frisco
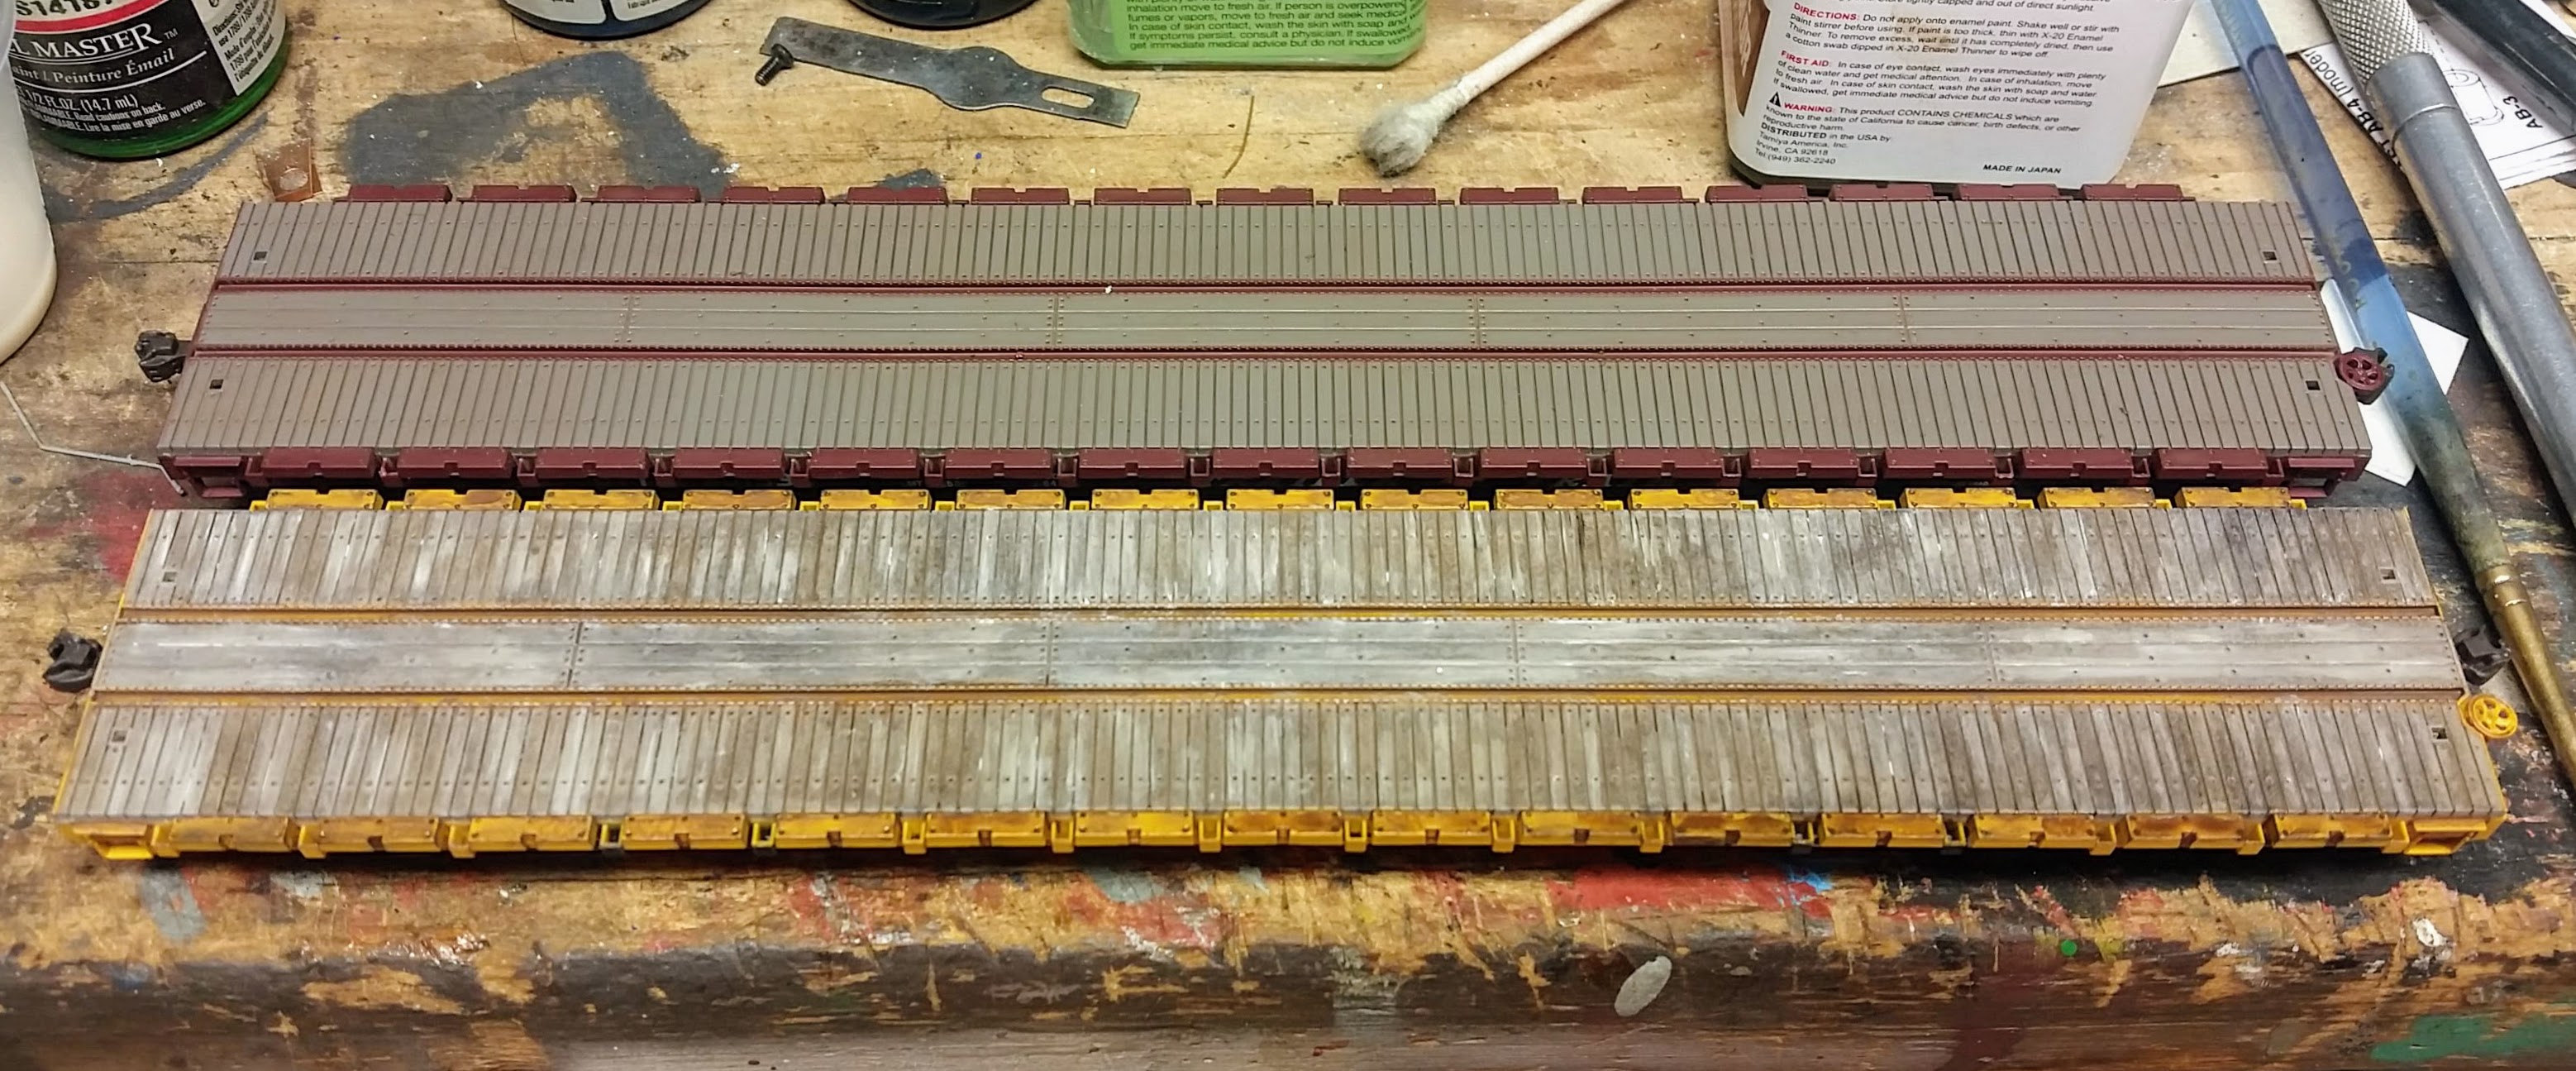
I don't use oils very often, but sometimes nothing else will get the right effect for me. To create the worn wood effect I dabbed on white, raw umber and burnt umber artists oils straight from the tube without thinning. Then I used a soft brush to work the dabs along the grain of the wood to blend them and approximate the weathered wood look. I used a cotton swab to clean the oils off the "metal" parts of the car and limit the colors to the "wood" deck. Before and after with the factory painted deck in the background:
https://pbase.com/mecrharris/image/170663179
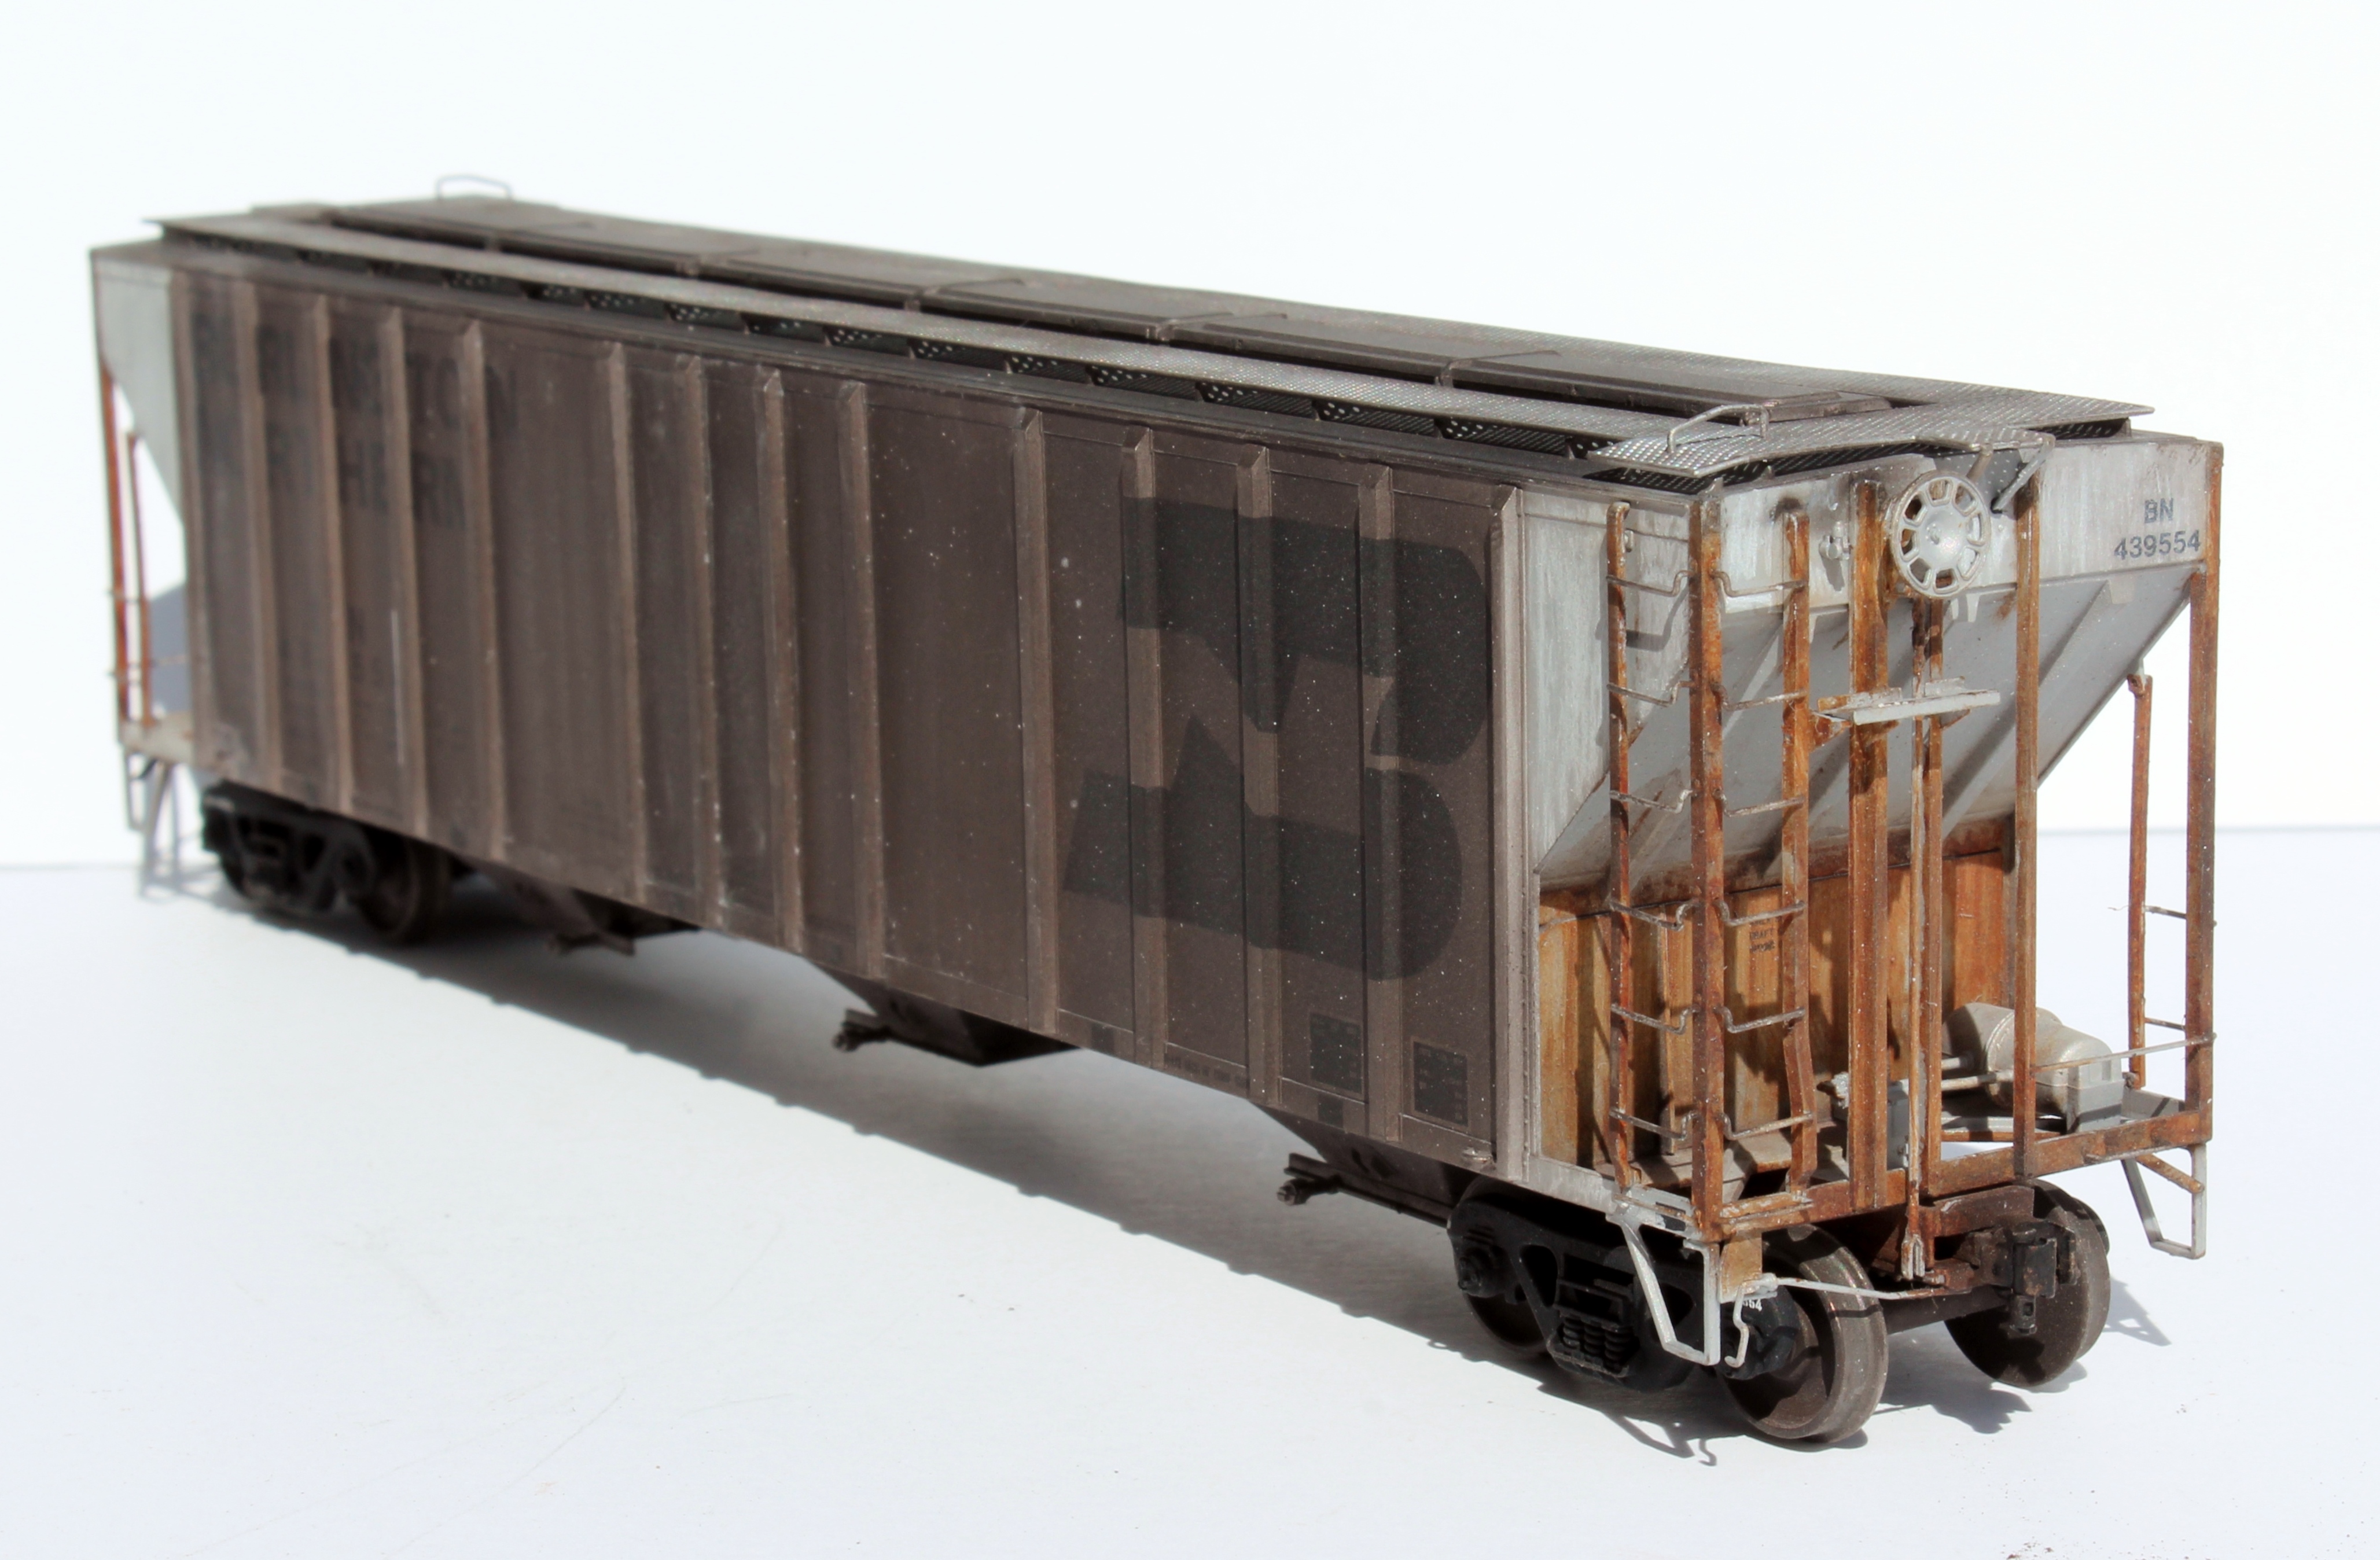
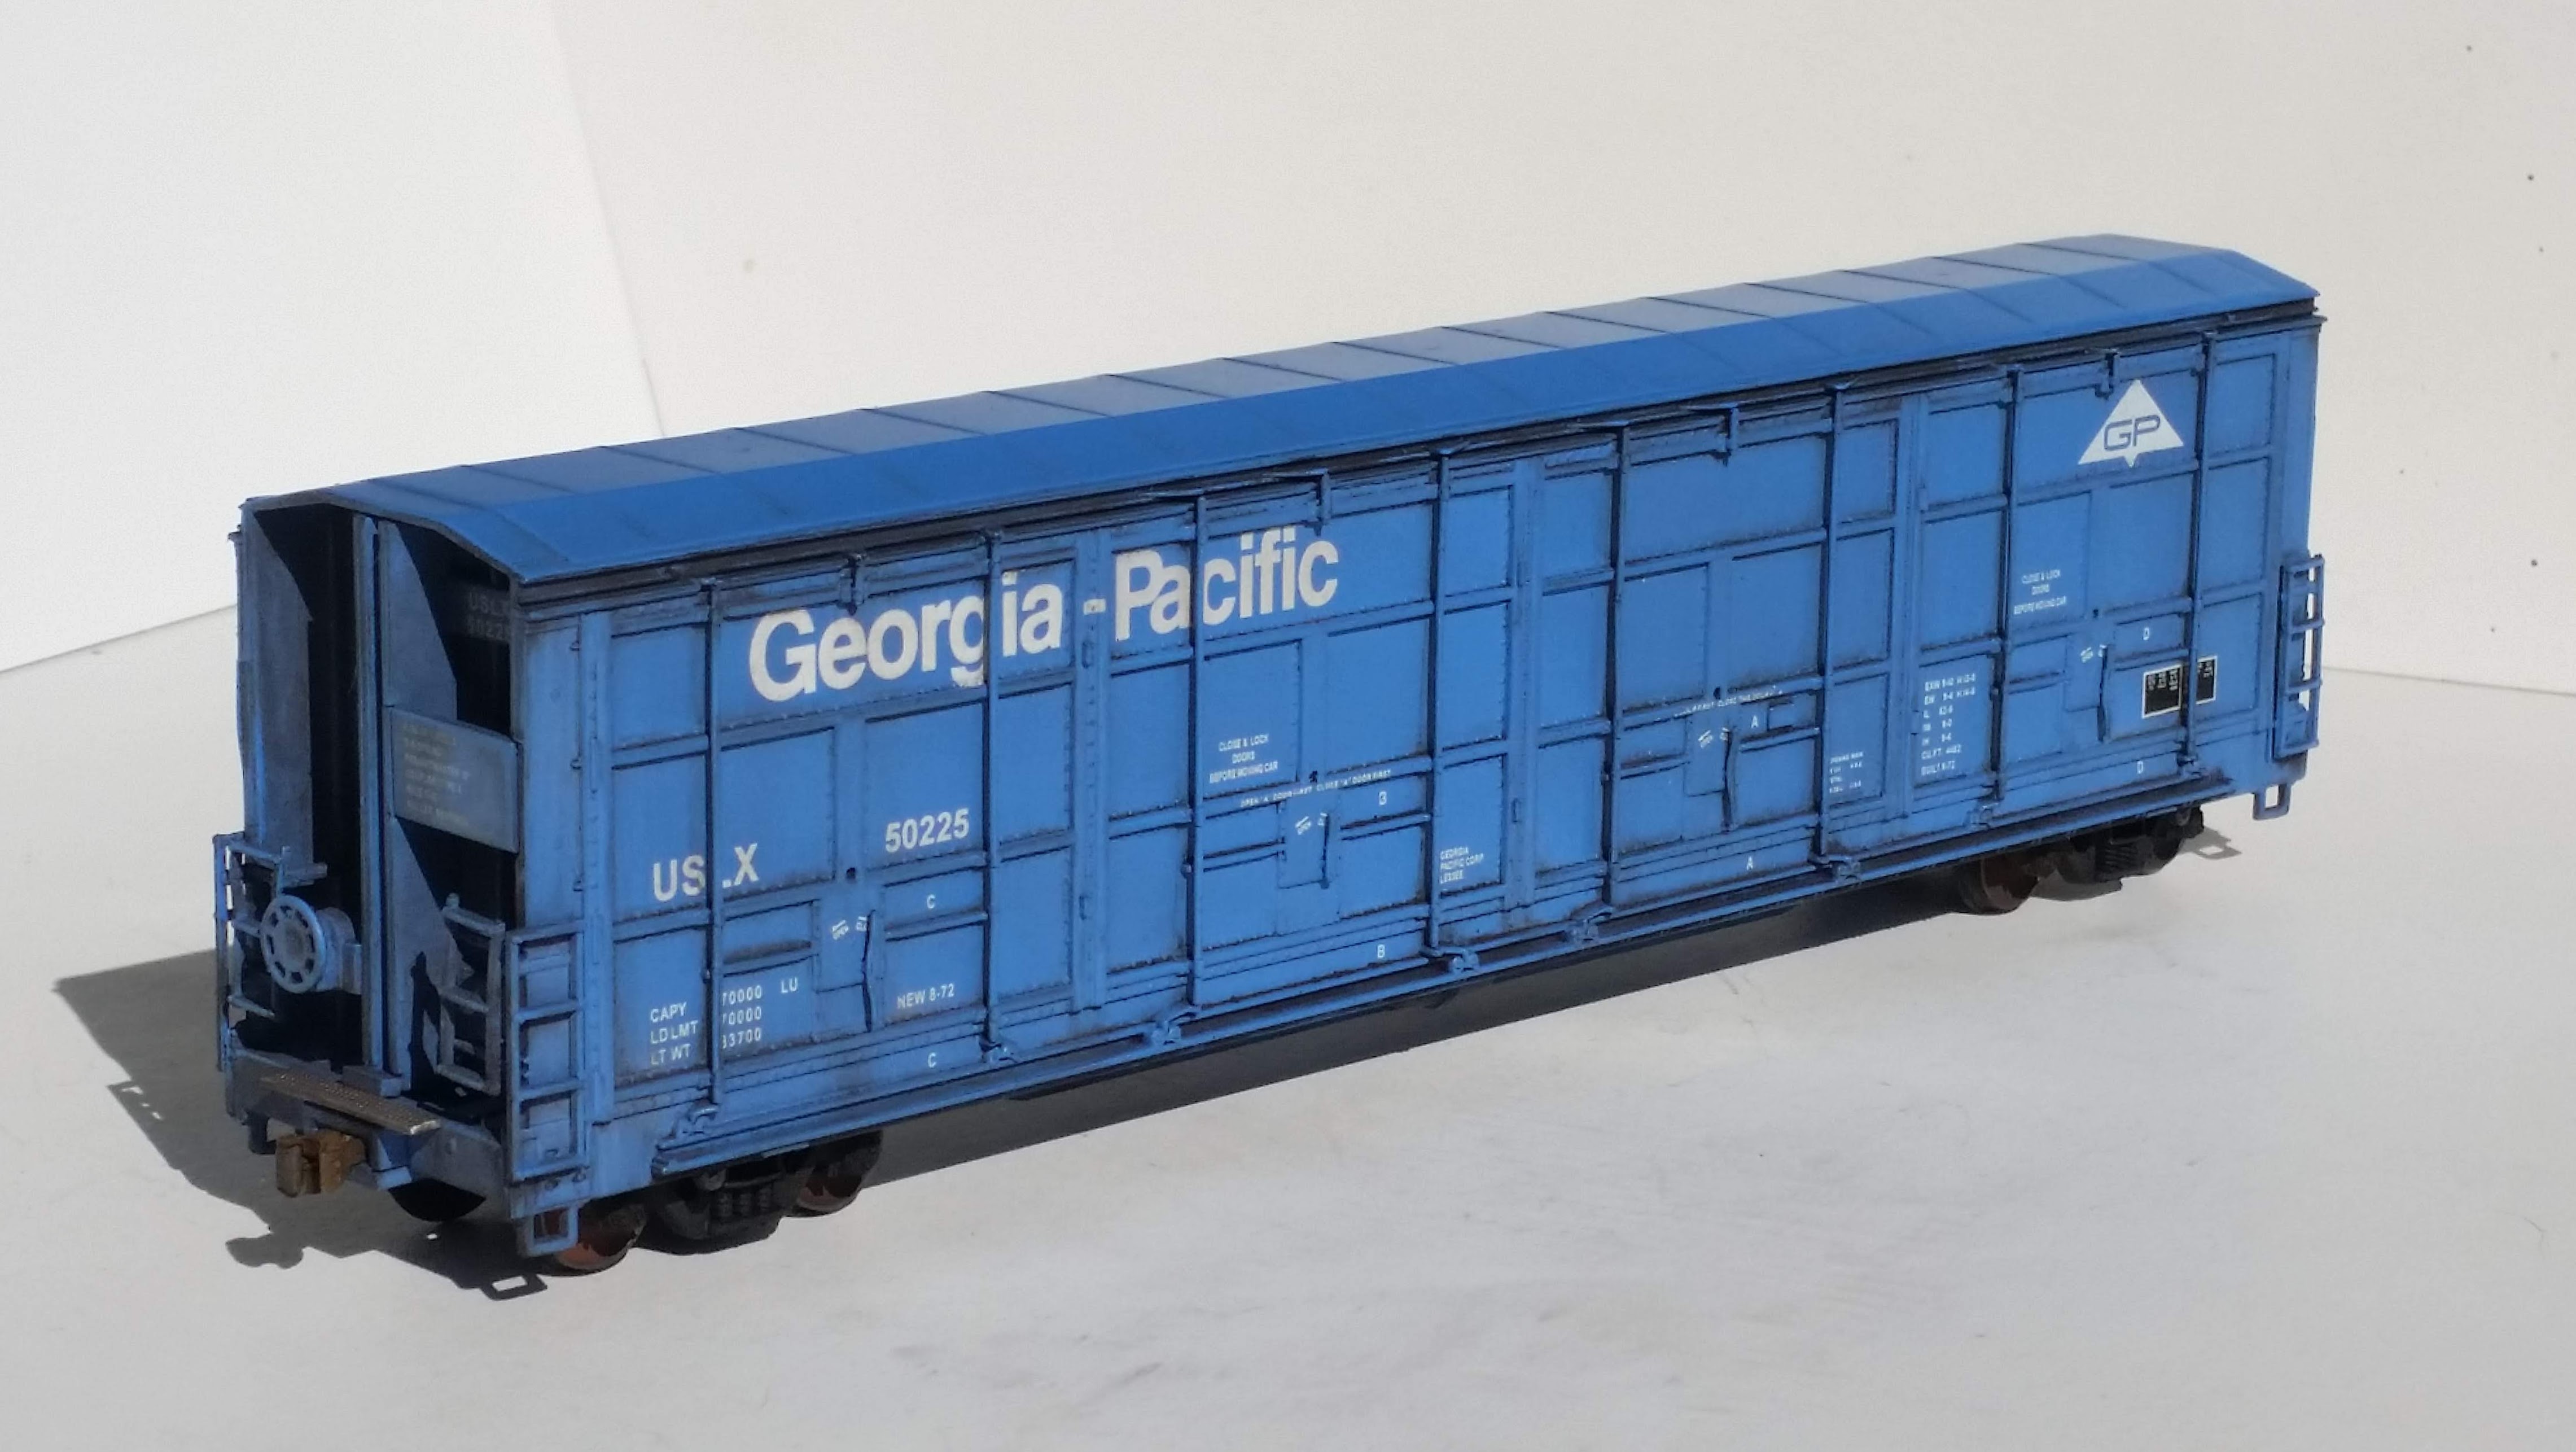
Usually I stick to weathering with powders, but I used some colored pencils to create the rust streaks and chalky white panels on this aluminum hopper. These cars weather strange where the aluminum bodies collect dirt and the steel components rust like crazy in later years. I was lucky enough to catch one on the RIP track at work several years ago so here's my take on it:
 https://pbase.com/mecrharris/image/161312491
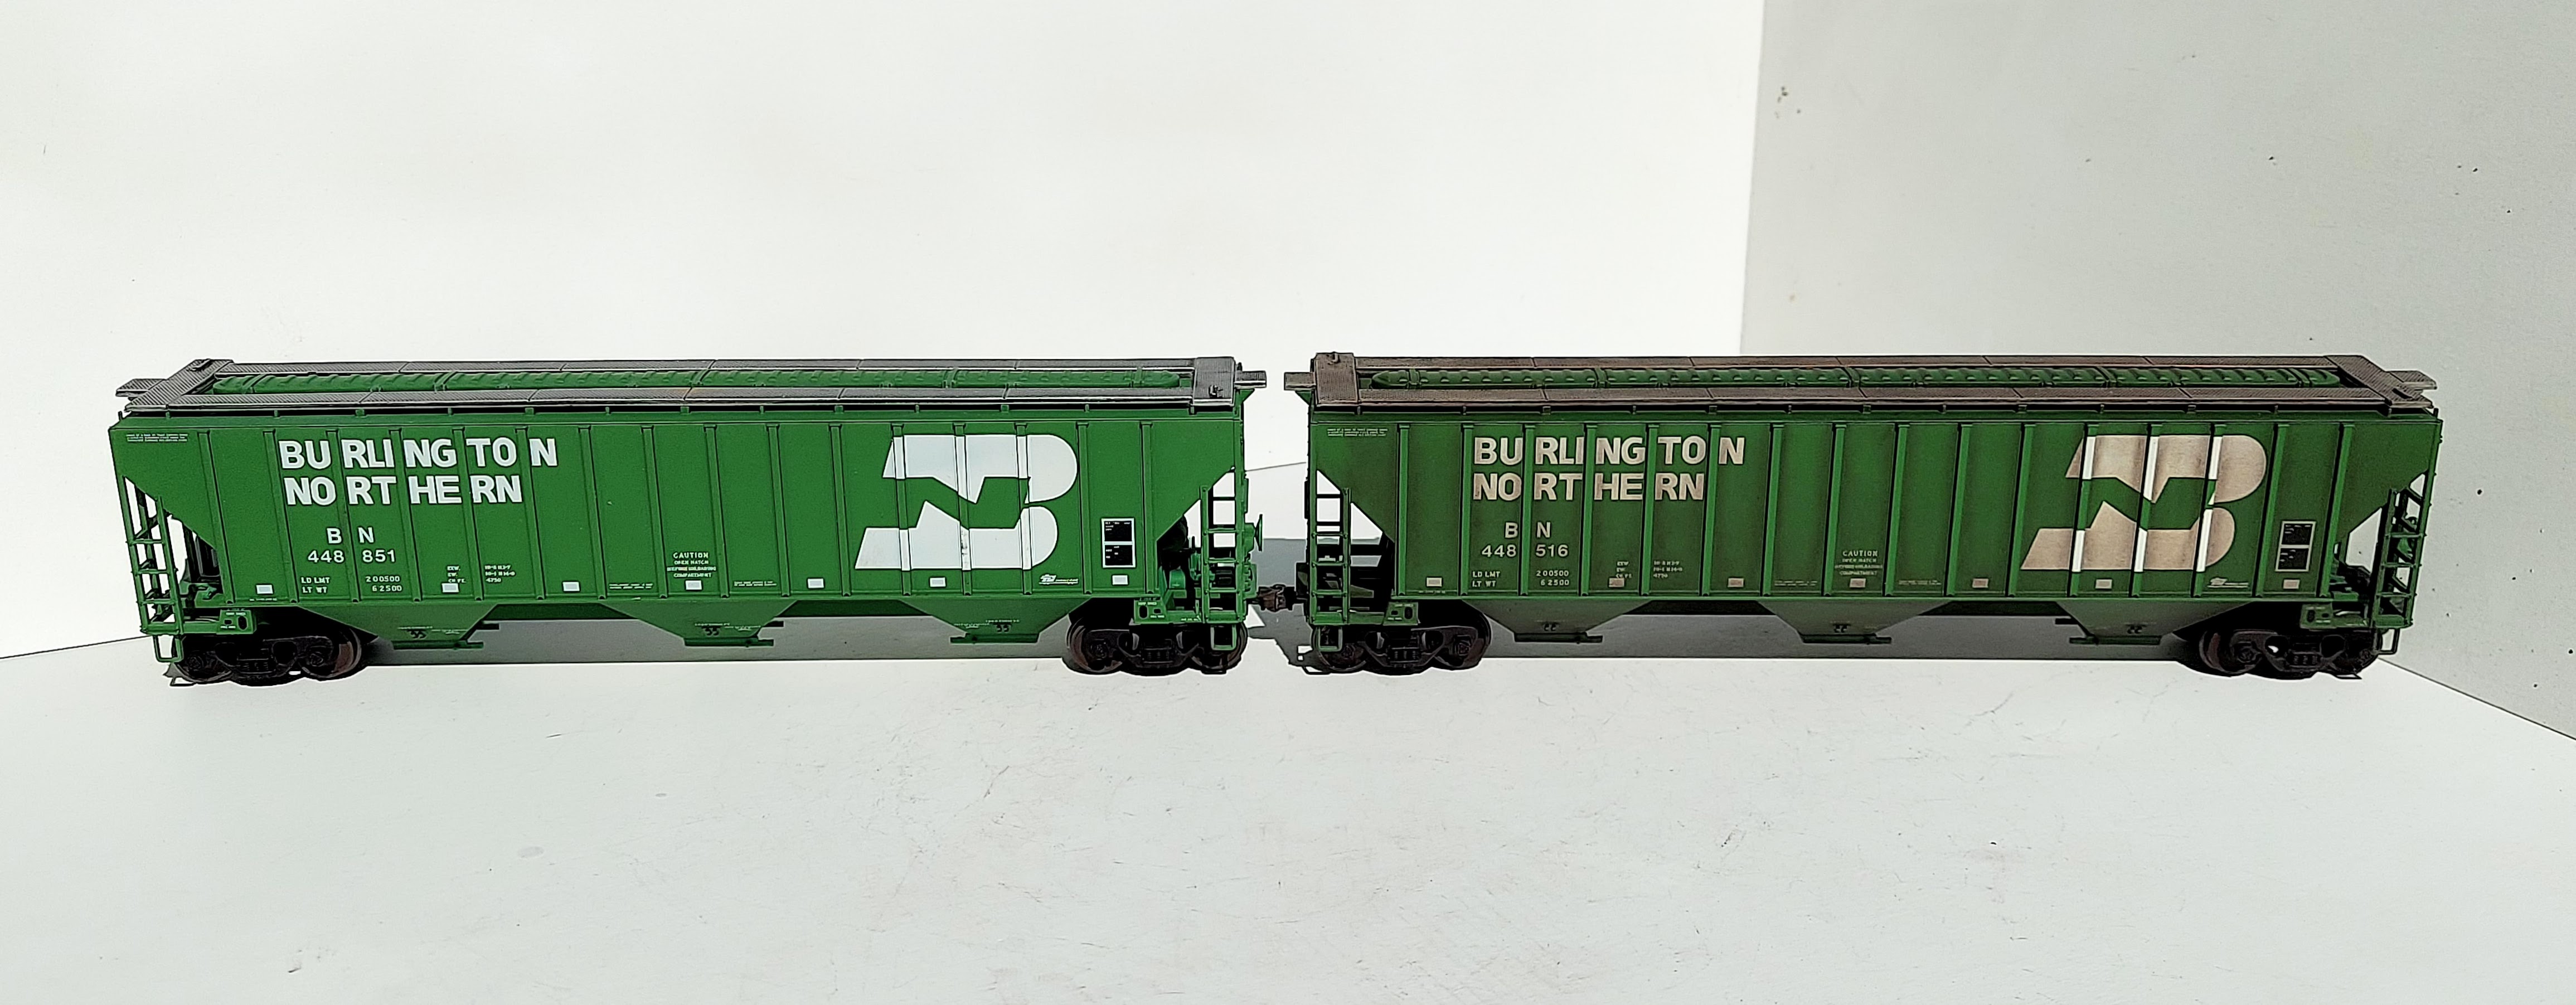
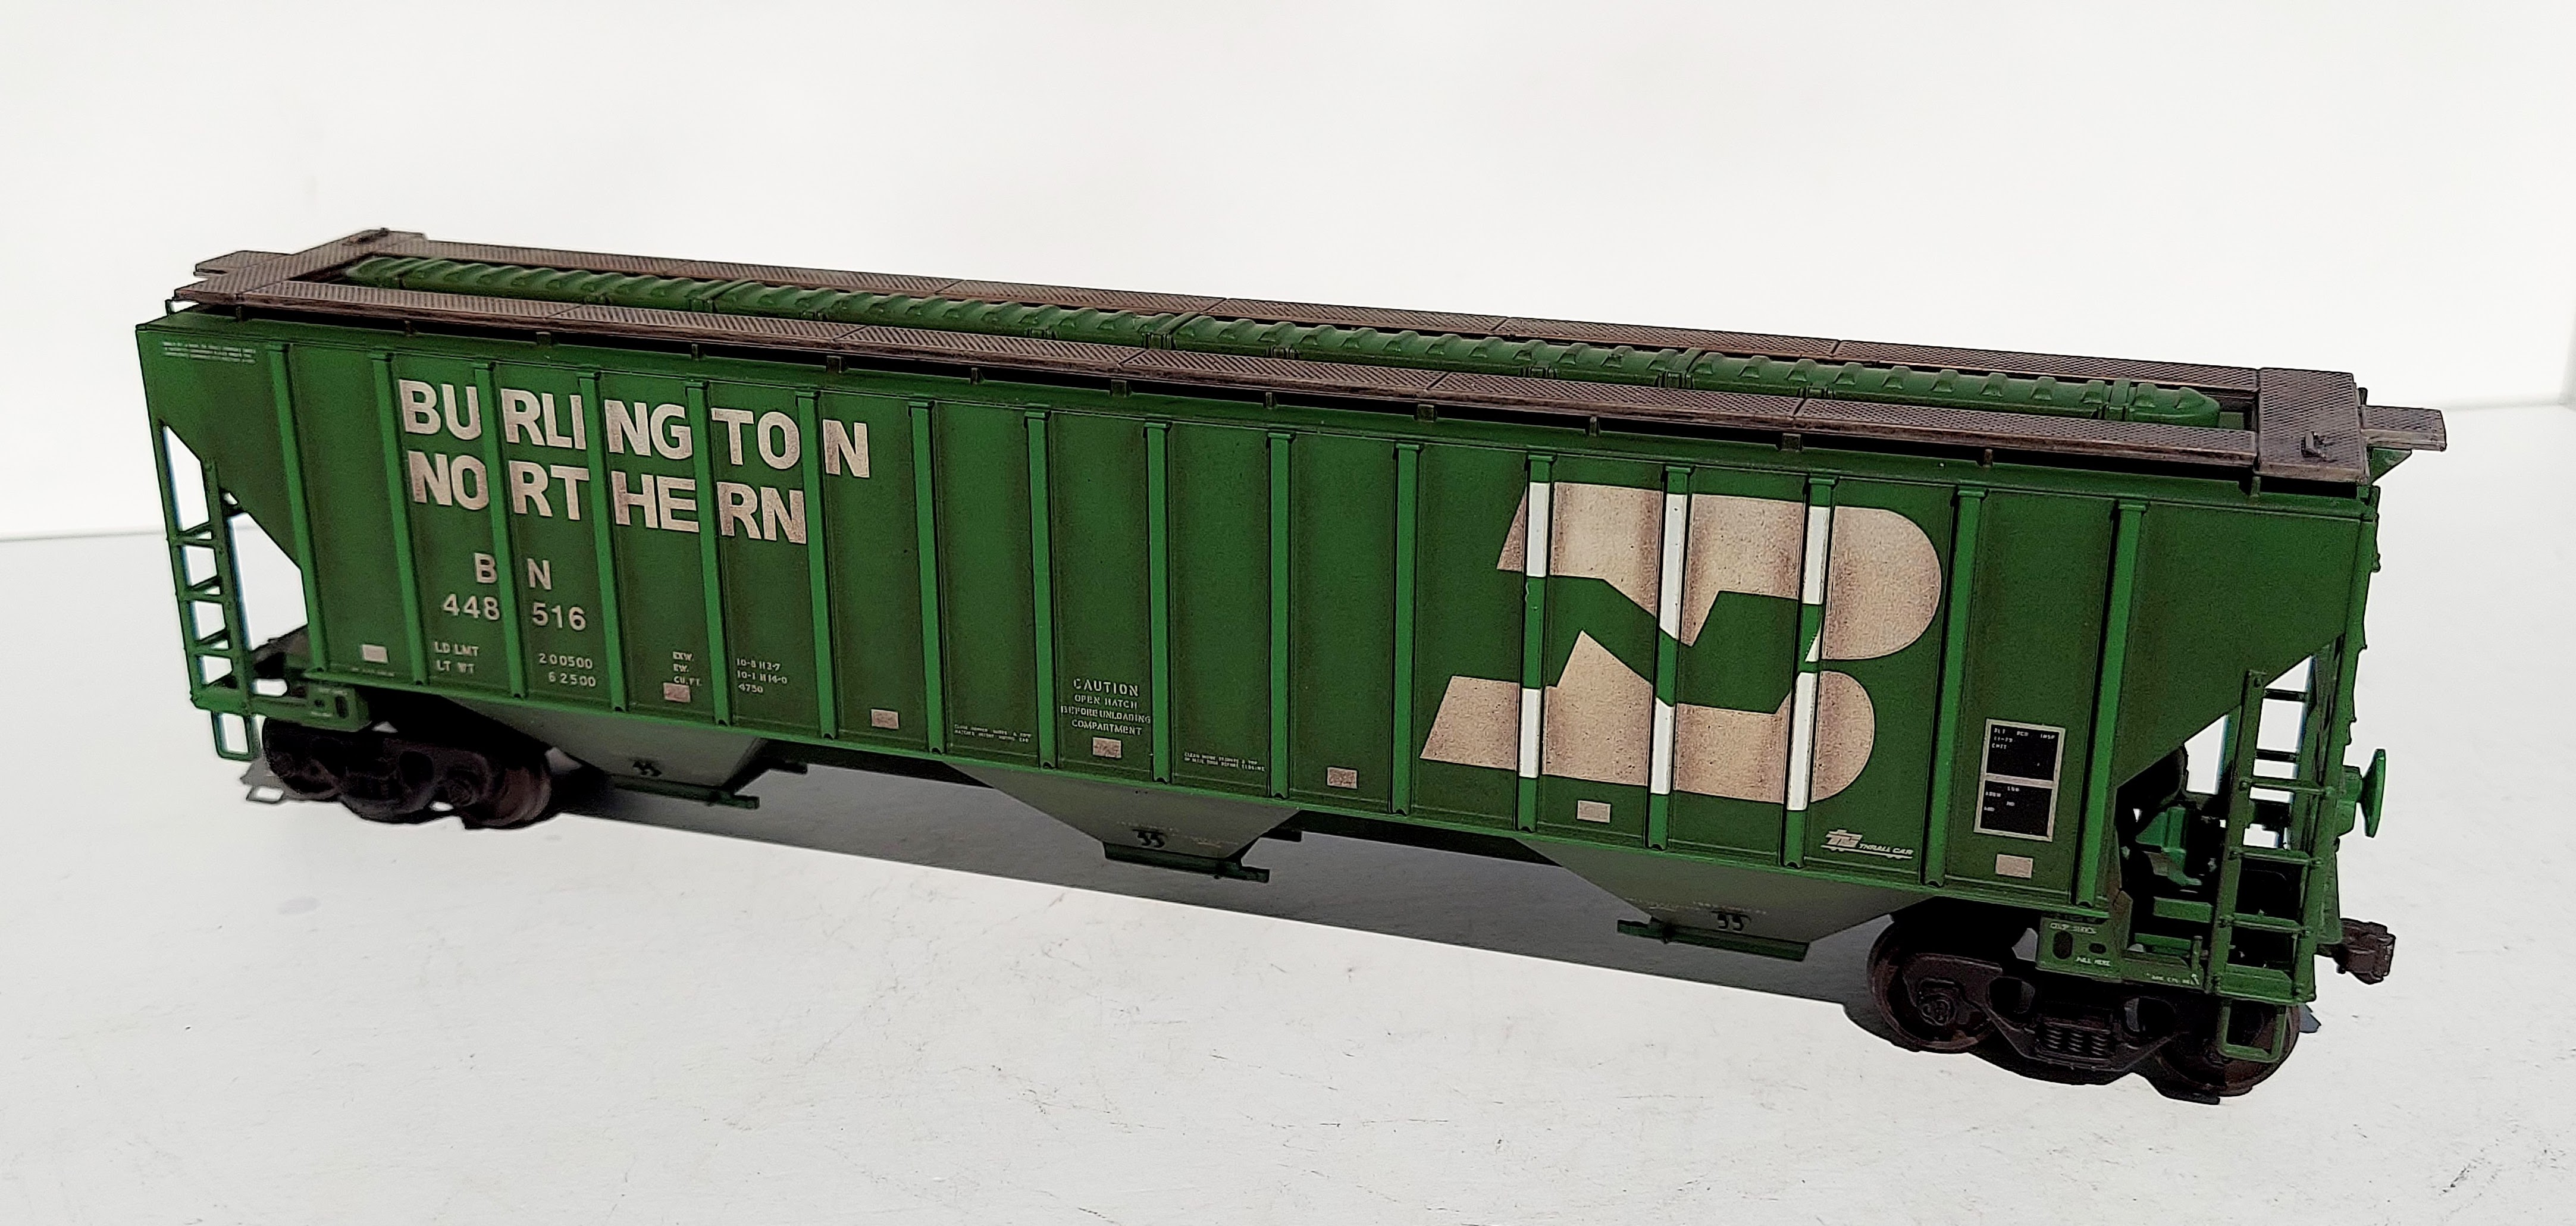
This represents my usual approach: powders and erasers. I use a pink eraser to clean the powders from areas that get rubbed clean, like the side stakes or ladder rungs, then control the amount and placement of the powders with a draftsman's cleaning pad (what we used to clean drawings back in the day before AutoCAD). Another before and after:
 https://pbase.com/mecrharris/image/171102502
https://pbase.com/mecrharris/image/171102503
Same process on a coal hopper:
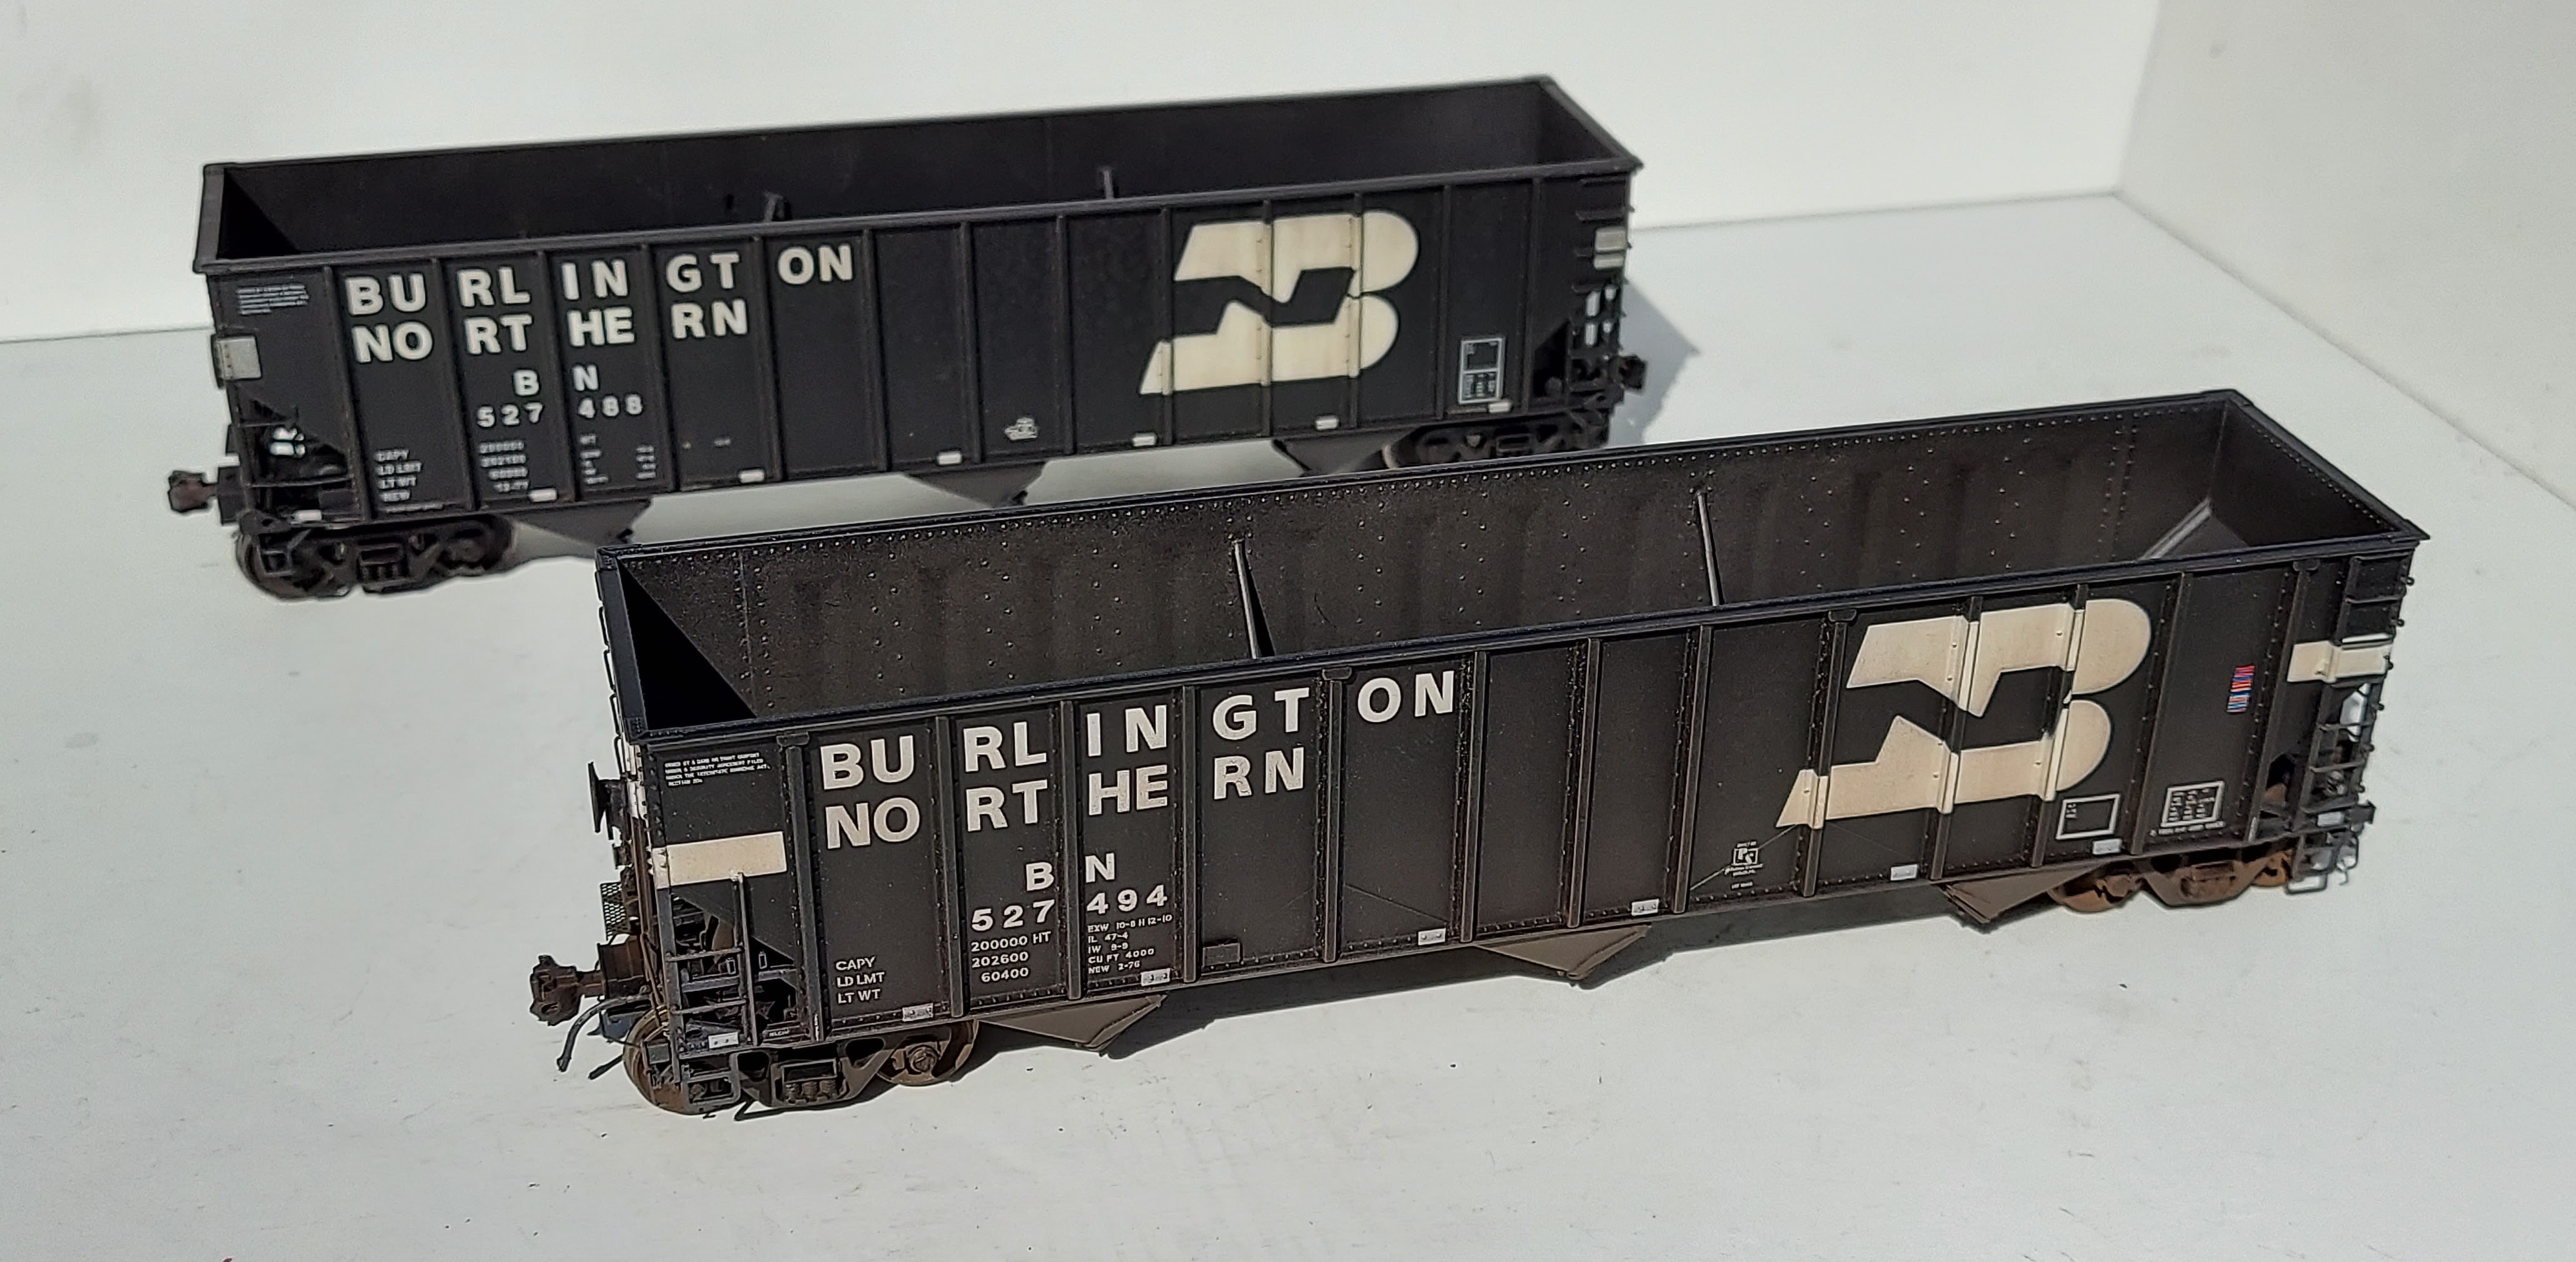
https://pbase.com/mecrharris/image/171194178
Yeah, I'm pretty much a one trick pony, but whatever works!
https://pbase.com/mecrharris/image/170687364
https://pbase.com/mecrharris/image/170668359
https://pbase.com/mecrharris/image/171457840
https://pbase.com/mecrharris/image/170663179
Usually I stick to weathering with powders, but I used some colored pencils to create the rust streaks and chalky white panels on this aluminum hopper. These cars weather strange where the aluminum bodies collect dirt and the steel components rust like crazy in later years. I was lucky enough to catch one on the RIP track at work several years ago so here's my take on it:
This represents my usual approach: powders and erasers. I use a pink eraser to clean the powders from areas that get rubbed clean, like the side stakes or ladder rungs, then control the amount and placement of the powders with a draftsman's cleaning pad (what we used to clean drawings back in the day before AutoCAD). Another before and after:
https://pbase.com/mecrharris/image/171102503
Same process on a coal hopper:
https://pbase.com/mecrharris/image/171194178
Yeah, I'm pretty much a one trick pony, but whatever works!
https://pbase.com/mecrharris/image/170687364
https://pbase.com/mecrharris/image/170668359
https://pbase.com/mecrharris/image/171457840
Last edited:
TLOC
Well-Known Member
Hey mr. One Trick pony, all those cars are superb. But those flats! I will send you my bulkhead flats anytime, that deck…just wow!I don't use oils very often, but sometimes nothing else will get the right effect for me. To create the worn wood effect I dabbed on white, raw umber and burnt umber artists oils straight from the tube without thinning. Then I used a soft brush to work the dabs along the grain of the wood to blend them and approximate the weathered wood look. I used a cotton swab to clean the oils off the "metal" parts of the car and limit the colors to the "wood" deck. Before and after with the factory painted deck in the background:
https://pbase.com/mecrharris/image/170663179
Usually I stick to weathering with powders, but I used some colored pencils to create the rust streaks and chalky white panels on this aluminum hopper. These cars weather strange where the aluminum bodies collect dirt and the steel components rust like crazy in later years. I was lucky enough to catch one on the RIP track at work several years ago so here's my take on it:
https://pbase.com/mecrharris/image/161312491
This represents my usual approach: powders and erasers. I use a pink eraser to clean the powders from areas that get rubbed clean, like the side stakes or ladder rungs, then control the amount and placement of the powders with a draftsman's cleaning pad (what we used to clean drawings back in the day before AutoCAD). Another before and after:
https://pbase.com/mecrharris/image/171102502
https://pbase.com/mecrharris/image/171102503
Same process on a coal hopper:
https://pbase.com/mecrharris/image/171194178
Yeah, I'm pretty much a one trick pony, but whatever works!
https://pbase.com/mecrharris/image/170687364
https://pbase.com/mecrharris/image/170668359
https://pbase.com/mecrharris/image/171457840
Thanks for sharing and explaining how you did it
AirbrushNo5
Well-Known Member
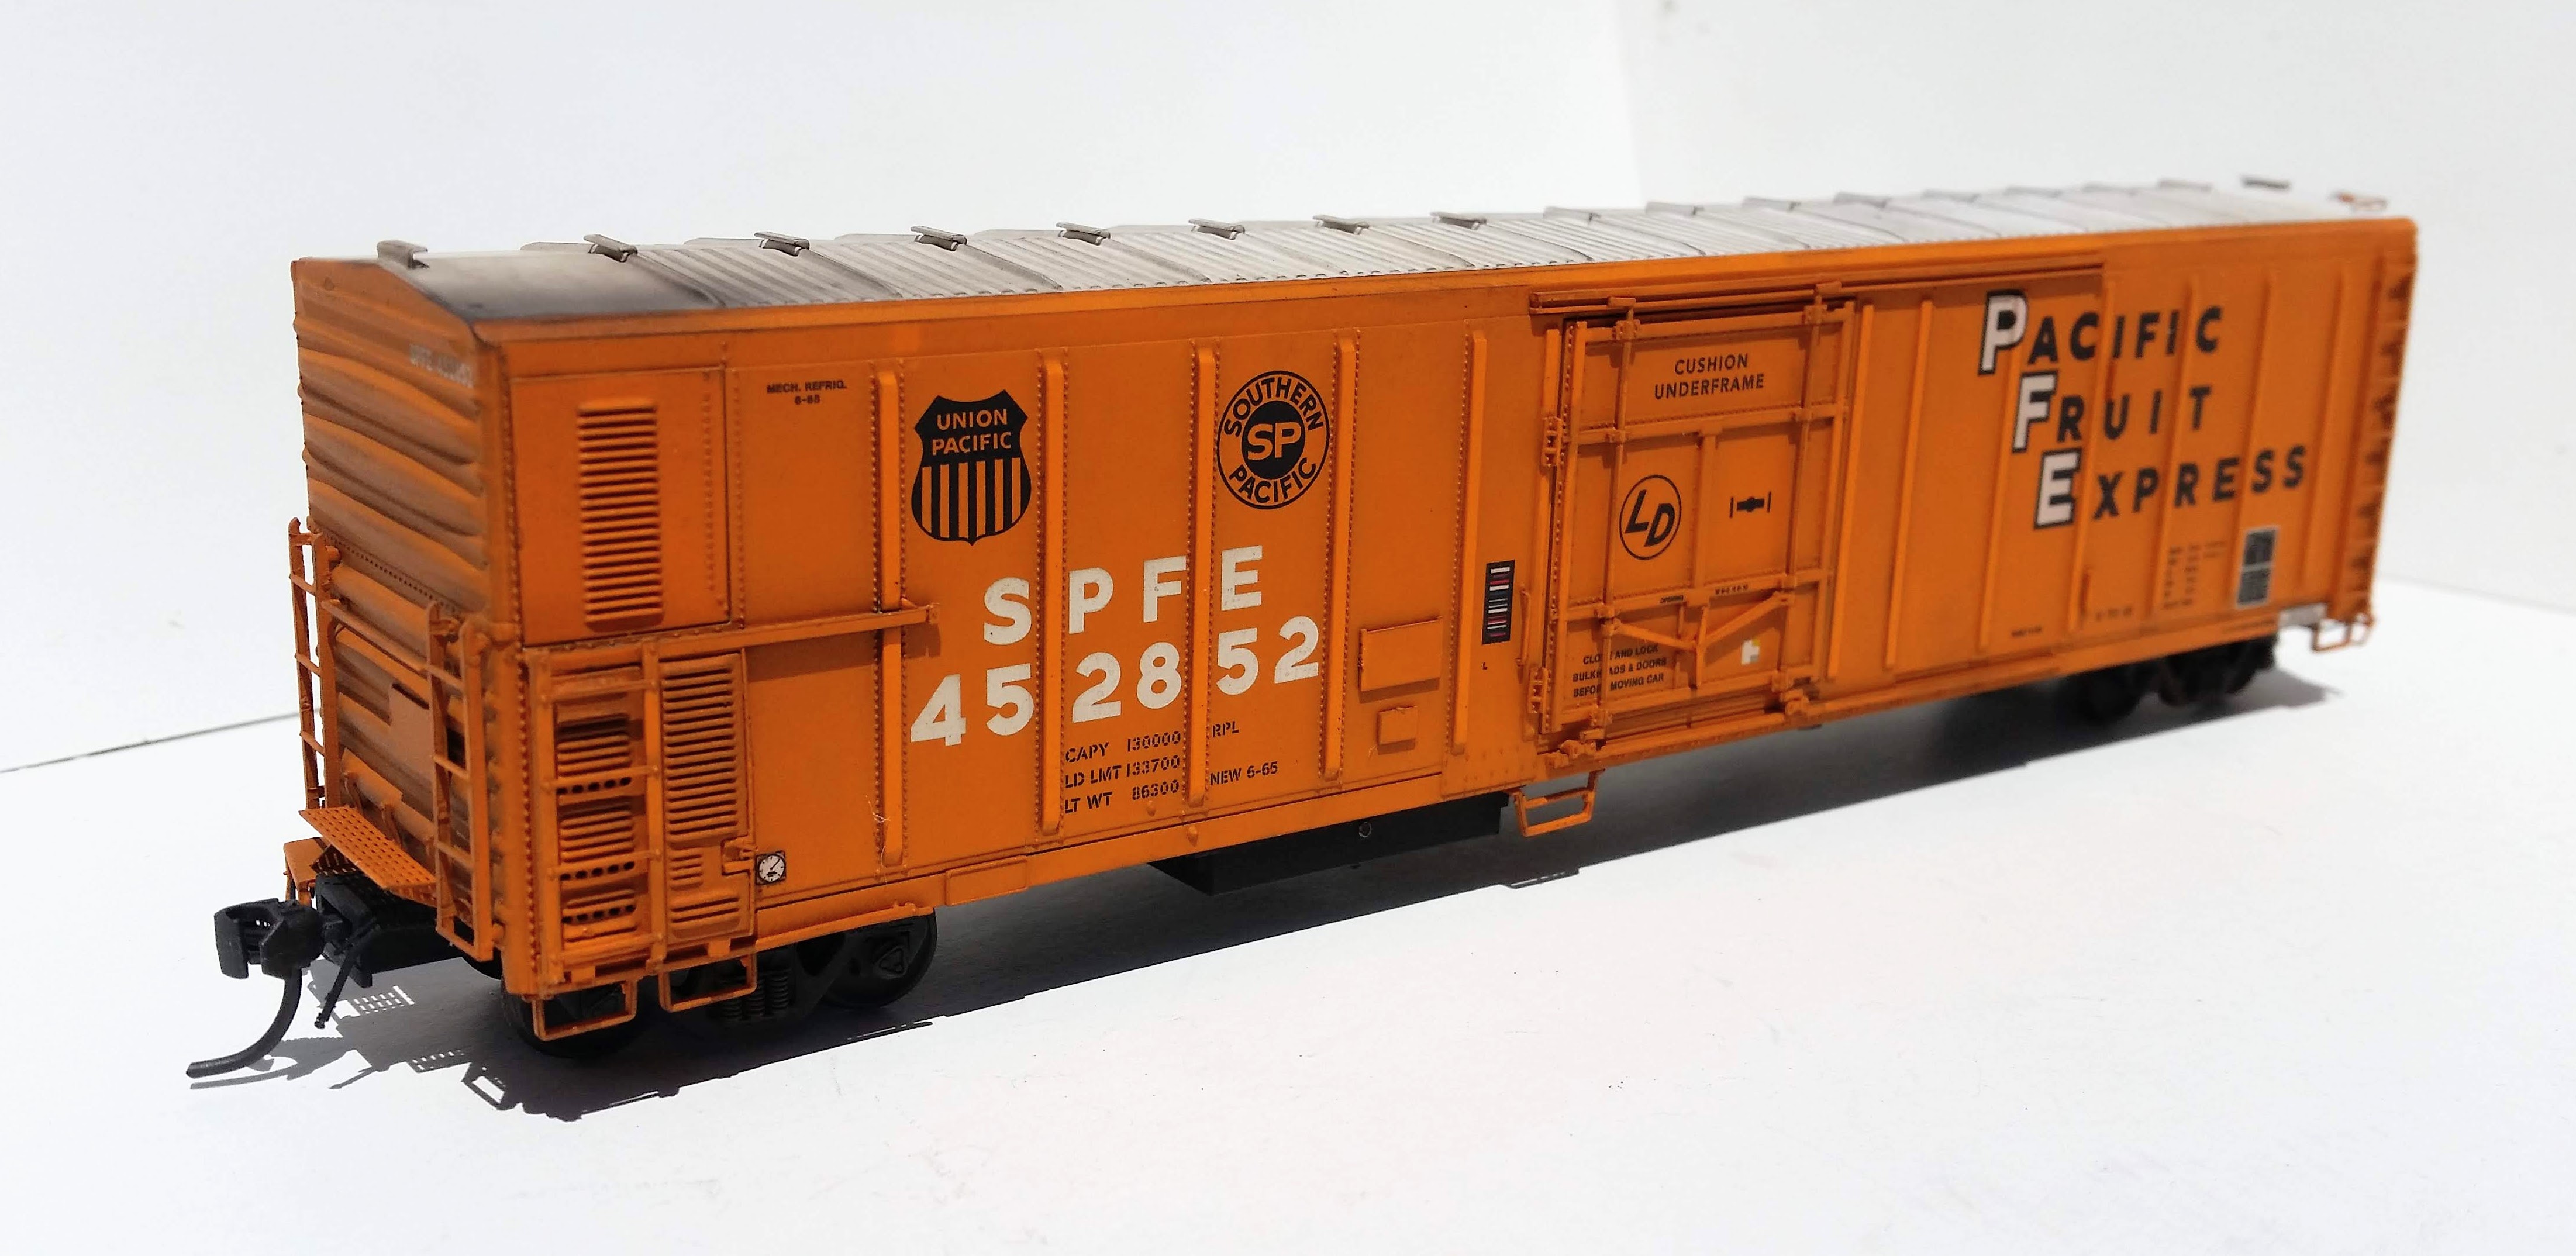
All nice but love the SPFE… subdued, understated weathering on this looks spectacular…!
TLOC
Well-Known Member
At the bench for weathering. There are 2 box cars, 3 covered hoppers and a gondola that didn’t sell, plus a semi that needs more cleaning up then weathering. I have tried to be organized at the bench by working with a bunch of cars to weather. It is not quite working out. I thought by using the same fading base Tamiya x-21 base on all the cars would be efficient. The initial application is but cleaning one after the base dries is tedious enough for 1 car let alone with 6.


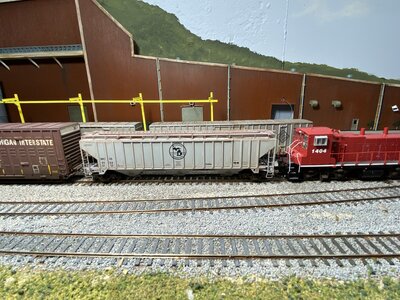
Using my Vallejo Air burnt umber on 6 cars gets old quickly after that 2nd car. So my solution, no more then 2 cars on the bench at the same time. The Michigan Interstate car is mostly done with the fading complete and many washes of the burnt umber applied. A few washes of a black should complete this car. The car when complete maybe the lightest weathering model I have done. The car was built in 1994 and it’s 2005 on the layout so there should not be a lot of rust spots or streaks but it has just started. Hopefully pictures tonight or Tuesday. I am finding the light weathering job to be as tough as the heavy weathering.
All the pictured cars have been done by hand brushing. All the cars above with the gondola being the exception are destined for my layout. The gondola if I add the safety stripes with be a keeper but gondolas with or without scrap loads are not selling online.
hopefully later!
TLOC
Well-Known Member
Hi again from the weathering desk not to be confused with the Weather Desk

This arrived via the USPS and was received in trade for a weathered pulp car. Gold Line Walther’s coil car and much nicer then I was expecting

The closest prototype photo I could come up with was shot in 2007 so it fits my era of 2005 easily enough. It’s been here a couple hours and it already has its 1st fade coat
This arrived via the USPS and was received in trade for a weathered pulp car. Gold Line Walther’s coil car and much nicer then I was expecting
The closest prototype photo I could come up with was shot in 2007 so it fits my era of 2005 easily enough. It’s been here a couple hours and it already has its 1st fade coat
BigGRacing
Aka. Gary Russell
How did you do the fade coat ?
TLOC
Well-Known Member
Gary, I use Tamiya X21 flat base to fade any color car. IMO it works pretty good. I put one coat on with a brush wait 2-3 hours and with a dry brush, brush it off. It dries to a chalky finish and since it has texture I brush it off but I am told you don’t have to. I have not experimented leaving it on and painting over it. Brushing it off works fine but it is tedious.How did you do the fade coat ?
One of the coil covers x-21 flat base painted on and drying
Mostly brushed off Forest Products car
Tamiya can be purchased anywhere I am told even my LHS but not at decent prices. I buy all my paints and most of my varnishes for matte and gloss at Scalehobbist.com. In USD.
Last edited:
BigGRacing
Aka. Gary Russell
Interesting, never seen this done before, I might move forward doing this eventually.
AirbrushNo5
Well-Known Member
I have been thinking about trying the Tamiya X21 flat base to mix things up…
TLOC
Well-Known Member
Interesting, never seen this done before, I might move forward doing this eventually.
I strongly recommend YOU TUBE video master BOOMERDIORAMA for his weathering techniques. Check the playlist on his page under weathering. He is great at explaining and demonstrating this fade using the Tamiya x-21 baseI have been thinking about trying the Tamiya X21 flat base to mix things up…
I am not a painting mixologist and I am terrible at matching colors. But Dansrailroad2011 is another very good but talkative weathering master on You Tube and young. He mixes a color similar to the car’s original color to make it seem faded. I have tried but can’t get the hang of it.
After a couple hours to dry, then to brush it off
This is after brushing off the dried x-21 base
BigGRacing
Aka. Gary Russell
First time ever seeing that done! Very interesting for sure.
TLOC
Well-Known Member
It does lighten the color, any color using the x-21 base from Tamiya.First time ever seeing that done! Very interesting for sure.
I was using 70% Isopropyl Alcohol for my fading but that was a process of many applications. Using the 91% or the 99% Isopropyl Alcohol caused the lettering to come off so 70% was the safest.
AirbrushNo5
Well-Known Member
I have been watching Boomer and Dan on YouTube for a while…
Dan was the inspiration for me starting weathering…
Tamiya Flat White heavily diluted with XF20A is a good fading starter on that’s best on Red Yellow and Orange cars…
I find it works to a lesser degree on Blue and Green…
As far as colour matching, I find that once the car has been faded, a homemade approximate is less critical..it can go lighter (again base colour dependant) mixed with White or Grey..
TLOC
Well-Known Member
A better picture to show the fade after the brush off
Thanks for sharing
I like this very much. It is subtle but definitely there. I like the streaks too.I have been watching Boomer and Dan on YouTube for a while…
Dan was the inspiration for me starting weathering…
Tamiya Flat White heavily diluted with XF20A is a good fading starter on that’s best on Red Yellow and Orange cars…
I find it works to a lesser degree on Blue and Green…
As far as colour matching, I find that once the car has been faded, a homemade approximate is less critical..it can go lighter (again base colour dependant) mixed with White or Grey..
View attachment 149663
Thanks for sharing
TLOC
Well-Known Member
Good afternoon. It’s hot and humid in Wisconsin and a good day for being at the painting bench. Some cars completed
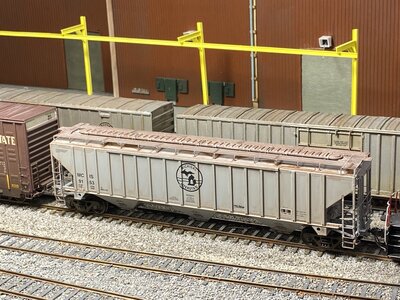
I am very happy with this one done with Vallejo Air hand brushed on as an aryclic wash. This is a Tangent car from HomeShopsLLC.


not sure about this one, another Tangent car from HomeShopLLC.


I really liked this one
 until I took the picture. I may go back and strip the weathering and re-weather it with Pan Pastels instead of Arcylics. I believe it is an Accurail car and this car when I decide if it’s done or not will have a few tags added.
CONSTRUCTIVE criticism please.
edit: on the ATSF covered hopper, I believe this is a bit better then the above picture. Those center panels bothered me even though they were close to the prototypes picture I used. A few cotton swabs , 91% Isopropyl Alcohol and the blending brush. Good enough for the fleet. It has been hit with VMS’s matte varnish

enjoy the day
I am very happy with this one done with Vallejo Air hand brushed on as an aryclic wash. This is a Tangent car from HomeShopsLLC.
not sure about this one, another Tangent car from HomeShopLLC.
I really liked this one
CONSTRUCTIVE criticism please.
edit: on the ATSF covered hopper, I believe this is a bit better then the above picture. Those center panels bothered me even though they were close to the prototypes picture I used. A few cotton swabs , 91% Isopropyl Alcohol and the blending brush. Good enough for the fleet. It has been hit with VMS’s matte varnish
enjoy the day
Attachments
Last edited:
TLOC
Well-Known Member
Almost 10PM and the weather is still 90% + humidity at 83f degrees feeling though like 93 per the Weatherchannel app.
I have been in and out of the trainroom since 9 this morning minus a quick but not cheap grocery run.
I started on these a week or so back, just fading!

next up for 1 of them was a second fading of the roof and the first body fade. I use Tamiya x-21 base thinned about 50/50 and HAND BRUSHED on.

When dry the chalkiness of the base paint should be brushed off. I did that and then applied another fade base to lighten the orange somemore


After a light spray on the roof of Tamiya Hull Red thinned 70% isopropyl Alcohol to 30% paint I let it dry. Then a touch of rare umber extra dark Pan Pastel brushed down the middle of the roof and blended. Then a layer of Burnt Sienna Cora Dark brushed on both sides of the middle and everything blended.
I will let it sit overnight to see if I still like it in the morning. I then will hit it with a spray of the VMS matte varnish and after that dries move to the sides of the car.
The other car will be done with oils
I have been in and out of the trainroom since 9 this morning minus a quick but not cheap grocery run.
I started on these a week or so back, just fading!
next up for 1 of them was a second fading of the roof and the first body fade. I use Tamiya x-21 base thinned about 50/50 and HAND BRUSHED on.
When dry the chalkiness of the base paint should be brushed off. I did that and then applied another fade base to lighten the orange somemore
After a light spray on the roof of Tamiya Hull Red thinned 70% isopropyl Alcohol to 30% paint I let it dry. Then a touch of rare umber extra dark Pan Pastel brushed down the middle of the roof and blended. Then a layer of Burnt Sienna Cora Dark brushed on both sides of the middle and everything blended.
I will let it sit overnight to see if I still like it in the morning. I then will hit it with a spray of the VMS matte varnish and after that dries move to the sides of the car.
The other car will be done with oils
