Greg@mnrr
Section Hand
I have been writing about using EZ Line to string utility poles on my CM&N layout. The process is simple, but easy to make some mistakes at first. Once you get into a rhythm the work goes quickly.

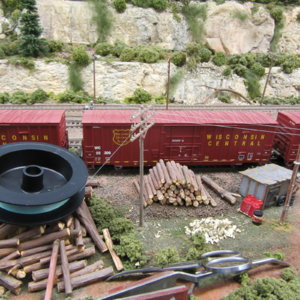
The EZ Line (Line) comes on spools and I use the weight of the spool to place some tension on the Line(s) until it is glued to an insulator. At the other end where I started I use a clamp to also hold the line in place. (The clamp is in the photo below the scissors). I'll string the Line(s) from pole to pole and start at the lower inside insulators. I'll string between two or three poles and then start gluing at the first pole using a touch of Instant AC. Work inside to top and then outside next to the pole lower to top insulators.
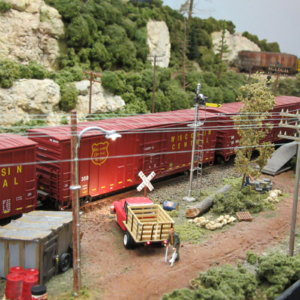
You don't have to use all the insulators. In the photo there's six lines without any telephone lines. On the mainline line I'll string four power and two telephone Lines(s).
I use a nail scissors to cut the Line(s) at the end of the run as close to the insulators as possible. The AC makes the Line(s) somewhat brittle and easy to make a clean cut. Some recommend using a canopy glue to secure the Line(s) to the isulators. I found that this glue doesn't dry fast enough.
The Line(s) will have some tension over roadways and railroad right of ways, but otherwise a slight bowing in the lines between poles is natural. I'll continue this process until I hit the end of the line of poles. I use black line for the telephone lines on the lower cross arms where I install the telephone lines.
I used Instant Super AC since it dries a matte finish and dries fairly rapidly.
I used Atlas, RIX and some cheap utility poles. Most utility poles are a light driftwood color will some preservative staining at the bottoms. The insulators I painted a Olive Green. I used transformers from Blair Line or Walthers. Not a true realist, I didn't care about neutral wires or which wires were hot, I just when for the effect. I know some hobbyists like Dick Elwell have done perfect transformer wiring and line drops to structures.

On the transformers I used Pastel Powder Rust to indicate rusting and Brown on the poles to add some color.
The poles need to be securely fastened to the layout since the EZ Line can stretch up to 500-700%. I sometimes forgot where there's lines and prove that the lines will stretch. I spaced the poles approximately 125 feet apart. Try to install the poles as straight as possible. Crooked poles look okay to the naked eye, but will look funny and unnatural in photographs.

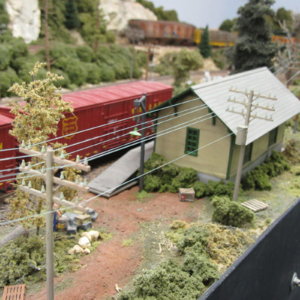
Here the Line(s) are disappearing to the eye. The semaphore signal is left over from when this spur was a main line and the terminal building active and is now used for storage. The easy grade in the background travels up to the Saxeville Interchange.
I'll take some more photographs and post them later of the other areas that I strung EZ Line and where the lines meet at one pole and then change direction.

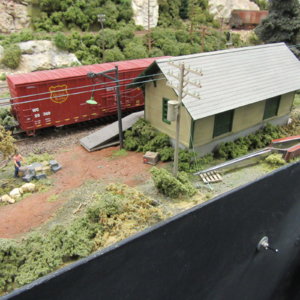
A another view of the clamp (lower right) holding the line with some tension.
I purchased the EZ Line from Berkshire Junction and maybe Walthers or Model Train Stuff. Each spool has one hundred feet of line.
Greg

The EZ Line (Line) comes on spools and I use the weight of the spool to place some tension on the Line(s) until it is glued to an insulator. At the other end where I started I use a clamp to also hold the line in place. (The clamp is in the photo below the scissors). I'll string the Line(s) from pole to pole and start at the lower inside insulators. I'll string between two or three poles and then start gluing at the first pole using a touch of Instant AC. Work inside to top and then outside next to the pole lower to top insulators.
You don't have to use all the insulators. In the photo there's six lines without any telephone lines. On the mainline line I'll string four power and two telephone Lines(s).
I use a nail scissors to cut the Line(s) at the end of the run as close to the insulators as possible. The AC makes the Line(s) somewhat brittle and easy to make a clean cut. Some recommend using a canopy glue to secure the Line(s) to the isulators. I found that this glue doesn't dry fast enough.
The Line(s) will have some tension over roadways and railroad right of ways, but otherwise a slight bowing in the lines between poles is natural. I'll continue this process until I hit the end of the line of poles. I use black line for the telephone lines on the lower cross arms where I install the telephone lines.
I used Instant Super AC since it dries a matte finish and dries fairly rapidly.
I used Atlas, RIX and some cheap utility poles. Most utility poles are a light driftwood color will some preservative staining at the bottoms. The insulators I painted a Olive Green. I used transformers from Blair Line or Walthers. Not a true realist, I didn't care about neutral wires or which wires were hot, I just when for the effect. I know some hobbyists like Dick Elwell have done perfect transformer wiring and line drops to structures.

On the transformers I used Pastel Powder Rust to indicate rusting and Brown on the poles to add some color.
The poles need to be securely fastened to the layout since the EZ Line can stretch up to 500-700%. I sometimes forgot where there's lines and prove that the lines will stretch. I spaced the poles approximately 125 feet apart. Try to install the poles as straight as possible. Crooked poles look okay to the naked eye, but will look funny and unnatural in photographs.

Here the Line(s) are disappearing to the eye. The semaphore signal is left over from when this spur was a main line and the terminal building active and is now used for storage. The easy grade in the background travels up to the Saxeville Interchange.
I'll take some more photographs and post them later of the other areas that I strung EZ Line and where the lines meet at one pole and then change direction.

A another view of the clamp (lower right) holding the line with some tension.
I purchased the EZ Line from Berkshire Junction and maybe Walthers or Model Train Stuff. Each spool has one hundred feet of line.
Greg

