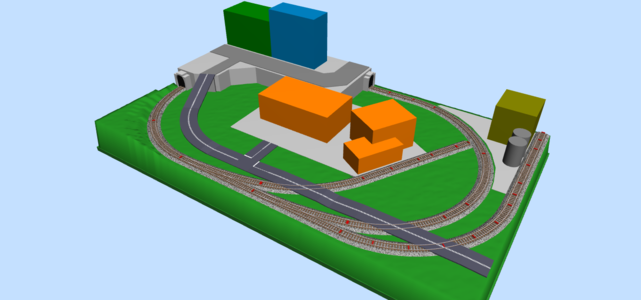
Trying out a micro layout (or close to one).


First coat of paint and a test fit for the toggle panel. Definitely needs to be cleaned up with some sandpaper again along with another coat of paint but it’s coming along:)

96D58D2E-38CB-4CC0-8B93-C8AC5C424B33.jpeg

10B58D17-8155-4338-845E-7DEC9B3AF7CD.jpeg
 
I used 2 of the 3 way spliters on my layout. No issues at all with that setup. I was about 6 foot from the dcc controller. No issues with my S-2 at all.
 
I have taken some time over the last couple days to put together the Kato turnout control circuits and give them a test run. I took the box from one of my recent online orders and mounted the toggles with switches facing inwards to give myself a way in which to easily solder the wires in place without physically holding the toggles themselves. I’ve only soldered a few times in my life so as I expected, the results weren’t the greatest but after a quick test, each kato turnout worked great! I’ll sacrifice the “tidyness” of the soldering job for functionality any day:)

5465AED4-6346-4747-A36C-188CB267AABC.jpeg
 
Last edited:
It’s finally starting to look like a layout!!! I have put the track in place and drilled holes through the foam board to allow the wires to run through. I’ve also removed the two bridges from the kato tracks and have painted them black as well. Once they are completed I will glue the track down and finalize the wiring.

907BDDEF-CE18-45DE-B478-BA98FBB2E8FB.jpeg
 
So….slight change of plans. After some deep thinking I decided that I won’t be utilizing the kato viaduct bridges on the layout. I’ve instead decided to have the road continue straight across the tracks as shown in the updated SCARM 3D rendering below.

revisedlayout1.png

On a different note, I attended the train show today and picked up some great stuff! I picked up Merchant’s row II and III kits as well as two used and slightly battered but assembled factory buildings. I decided I’d build the mattress factory complex with whatever buildings I could find that I liked. I still need to find a building for the bakery.

I also picked up some tunnel portals, a centerbeam flatcar, pipe load, semi trailer, and non-functional but awesome crossing gates.

I will be attending tomorrow as well because it just wouldn’t be right not doing so.

502071F5-2A53-4788-915E-AE07EC8D95D4.jpeg
 
Last edited:
Made another trip today to the train show. Was hoping to find the last building kit I would need for the layout but no such luck. I did manage to pickup a few more things I will need as construction progresses. These are the woodland scenics paving tape and the woodland scenics tidytrack weathering pens. I used these on my last layout and they were great! I also managed to pickup two more freight cars… not sure how that happened???

C98F2FA6-4FDB-4A7B-BB1A-CCA0EA7A42C7.jpeg
 
I’ve glued down the track with some liquid nails clear silicone. It should be done curing by the end of the day today. Once that’s done, I’ll finally be able to get the toggle switch panel assembled!

I received my Alco S2 the other day and uploaded a video on YouTube doing a test run with a couple gondolas.

 
The wiring has been completed! I tried to tidy it up as best as I could. I’ve spent the last few minutes watching the train make it’s short trip around the layout while listening to the beautiful sounds of the alco. Such a peaceful moment!

I had to position the prodigy express box slightly above the height of the outer frame to allow a hole to be drilled where I could feed the power supply wires through. Since I had to use 3.5” x .75” lumber instead of 1/2“ x 4”, it prevented me from being able to center the box as originally planned.
4D941994-973A-4800-AF11-6779509F834C.jpeg

D64C79F9-8087-4009-BFBC-BEC94AC9B3E2.jpeg

8F9BA8D6-5243-4FC8-81CC-10E2A0B83254.jpeg

4522A2FA-FDF0-4CBE-BE2A-5850C42672E2.jpeg

1DF39F16-009D-4B16-9171-6B045434776A.jpeg
 
Last edited:
I’ve begun to carve some of the leftover foam to create the raised city building portion of the layout. So far I have done a rough cut of the foundational pieces. Once I sand and smooth those down, I’ll build another identical layer on top of that, followed by a third layer which will cover the track/tunnel entirely. My plan is to be able to have the top layer removable so that I can reach inside the tunnel area in case any derailments occur. I’ll post more on that idea later.

07277086-2859-4FB0-B42C-E3DB31658824.jpeg
 
The tunnel construction is complete. Still needs to be smoothed out a bit and cleaned up. Once the caulking has fully cured, I’ll proceed with gluing the tunnel portals in place and creating the ramp for the roadway leading to the city buildings above.

I was planning on making the top layer of foam removable so I could access the trains if they derailed but unfortunately it wasn’t going to work so I decided to leave the back of the layout open instead to allow access.

The photos are prior to gluing down the foam so things aren’t lined up as best they could be but it’s turned out great!

DE3D1BB6-DD85-4D9E-BBAD-D13FB450F606.jpeg


C5A4E771-5BA4-4B11-8FB5-98F50057DB7E.jpeg


E522DBFC-0613-429C-BF41-48C3FF5F1FB4.jpeg


It’s been another productive day on the layout! I’ve installed the ramp connecting the upper and lower portions of the layout. After I use some scrap foam to fill in beneath the ramp, I’ll fill in the gaps and spaces with sculptamold. I’ve also created a small hill in the corner with some extra foam I had. I may or may not add another layer to this hill, as well as create an additional hill on the other side of the layout.

The technique used to create the ramp was found on stevestrains.com, my common reference source for this layout and the birthplace for its inspiration.

78C4F4AF-80A7-46FB-8B68-B4E9008BFAC1.jpeg

7714DD2D-4181-406A-9C35-2E85B643BAAD.jpeg
 
I’ve finished screwing down the ramp and I’ve applied a generous layer of Celluclay around it. I wanted actual Sculptamold but the store didn’t have it in stock. After some internet searches, I found that other model railroaders tried Celluclay. Most said it did the job and were happy with it so I figured I’d give it a shot.

42371EC3-2307-46CD-BB8E-78EBE8E96C12.jpeg


95560253-43E3-4952-B043-AEE41C1C1501.jpeg


After it dries, I’ll sand it down and prepare the surface for the next step. I plan to use chipboard to create the retaining walls along the raised edge and ramp. If you’ve been following this thread than you’ll know I have to thank Steve for this idea too!


Back
Top