Trying out a micro layout (or close to one).


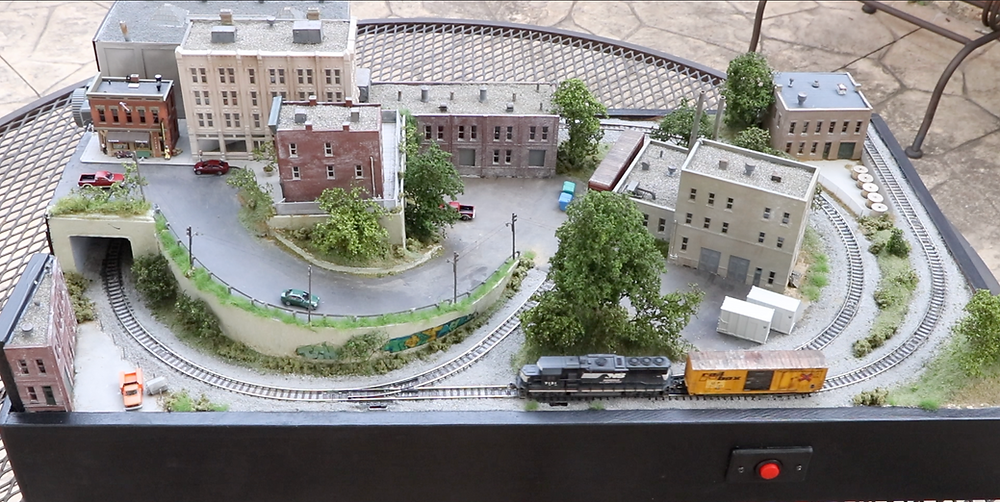
Haven’t had time until recently to work some more on the last few details for the layout, work has been crazy with the holiday season!

I have managed to get the utility poles painted and semi-weathered with the India Ink/IPA mixture. Originally I tried just to soak the poles in the mixture for a bit but it wasn’t giving the look I wanted so I lightly dabbed them with some diluted acrylic paint and let them dry. Next I’ll use some of my weathering powders to give them the final weathering they need.

I also started on the light posts and transformers using the metallic gray spray paint. I’ll most likely weather these as well the same way.

828AE957-28FC-4627-8CA6-DD182D8E3E70.jpeg
 
Last edited:
Boy oh boy!!! I’ve been trying to get around to those last few little details but life has decided otherwise. We are still swamped at work but on top of that, I’ve been awfully sick the last week. I planned on getting those utility poles in soon but it just hasn’t happened as of yet. Fear not (for those who are worried…probably the towns people…and maybe some of you), IT WILL HAPPEN! I will supply power to “Food Town” asap.

Anyways…I figured I’d just send out an update for anyone that’s followed all year round, that my little layout will continue:)
 
I finally got a chance to begin working on installing the light posts and some of the utility poles.

I ultimately decided to attach the light posts to the sidewalk of both my Merchant’s Row kits. I figured this would be the best location for them.

7E24370B-77DE-4670-846C-EFE692BC707C.jpeg


I also went ahead and placed 5 of the 8 utility poles on the layout. These 5 run along the main, across Mill St., and ultimately terminate at the bottling plant. The other 3 will most likely be placed on the elevated portion along Main St.

DBFD02EB-9B6F-4D31-B7D9-45B23C0F857C.jpeg


2B9D15B8-4847-461C-83B9-DC47B4A31E22.jpeg


After I install the other poles, I plan to add black string to simulate the electrical lines on the poles.
 
I finally got a chance to begin working on installing the light posts and some of the utility poles.

I ultimately decided to attach the light posts to the sidewalk of both my Merchant’s Row kits. I figured this would be the best location for them.

View attachment 158813

I also went ahead and placed 5 of the 8 utility poles on the layout. These 5 run along the main, across Mill St., and ultimately terminate at the bottling plant. The other 3 will most likely be placed on the elevated portion along Main St.

View attachment 158814

View attachment 158815

After I install the other poles, I plan to add black string to simulate the electrical lines on the poles.
If you know anyone who goes fishing, a light fishing line would look good.
 
I finally got a chance to begin working on installing the light posts and some of the utility poles.

I ultimately decided to attach the light posts to the sidewalk of both my Merchant’s Row kits. I figured this would be the best location for them.

View attachment 158813

I also went ahead and placed 5 of the 8 utility poles on the layout. These 5 run along the main, across Mill St., and ultimately terminate at the bottling plant. The other 3 will most likely be placed on the elevated portion along Main St.

View attachment 158814

View attachment 158815

After I install the other poles, I plan to add black string to simulate the electrical lines on the poles.
for some of my powerlines, I used black thread, lightly coated with elmers glue then hung to dry so the "wire" is straight, have to be careful installing, black is a good color

I purchased the commercial string is more like thin rubber bands for some of my powerlines, I actually hooked it a few times with shirt sleeves and streched but snapped back no damage.

The biggest problem with the lines is snagging them, no matter how careful...

Your layout is looking great!

Dave LASM
I was only planning on using some string I found in a sewing kit. It’s definitely out of scale for an N gauge layout though but it’s what I had on hand. The Elmers glue idea is interesting!

Do you think if I set the string on the poles and glued them in place while adding a little tension to keep them straight that would work?
Adding the tension is the hard part, esp. if you have several lines as I remember.

Looking at my old photos I now remember that the string that I coated with elmers "worked" but was difficult to make look right cause without glue it looked like string and with glue looked a bit more natural but still was a bugger to work with. I also had difficulty getting them to stick to the insulators, as I recall I used hobbytack then reinforced with CA glue:

a final view 004.JPG


(above) could not really get tension because of difficulty sticking string to insulators. This is regular cotton thread with the light glue coat.

The commercial one looked a lot better. I purchased white line then realized it looked to fake so ended up painting it all black. Black is a better color in my opinion:

Bringing logs.jpg.JPG


These (above) is the commercially purchased line which I painted black. Was a bugger gettin all the lines parallel

a final view 030.JPG

(above) also the commercial line with runners going to the different buildings.

Maybe a thin nylon black thread with the glue coating may work, however the commercially available one (can't recall the brand name) will be less of a headache in the long run.

By the way, the glue coating idea came from somewhere on the internet. Takes the fuzz down also makes it more straight.

Dave LASM
 
Maybe a thin nylon black thread with the glue coating may work, however the commercially available one (can't recall the brand name) will be less of a headache in the long run.
I’ll look into the commercially available one when I get a chance. It’ll be worth it in the long run to go with that but just out of curiosity, i’ll try the Elmer’s glue technique and see what I can make of it.
 
I’ve received a few good suggestions on what to do on the power lines. I’m still thinking it over as to how i’ll go about it but in the meantime, I decided to add a little more detail to the Merchant’s Row kits. The sidewalks and rooftops looked too perfect to me so I decided to use a bit of fine turf to simulate weeds growing in the cracks.

A0935D45-6675-4CCE-AFDA-501C2C7204DA.jpeg


D5CD1169-9D16-42A8-94D9-D700BE3182D1.jpeg


59F1CF17-2C38-4090-949A-E6AA7BBED686.jpeg


6D9357B4-FFDE-4982-BE91-B6E7207CBE59.jpeg


059D4253-80DE-4A37-8AD3-A2E47AF75FB0.jpeg


I still need to use a bit of “wet water” mixture and some diluted Elmer’s glue to seal it in before these details are considered complete.
 
The track plan is the same used from the 17" x 30" micro layout designed by Steve from stevestrains.com
Very interesting !


Back
Top