Troy's Still Untitled GN Cascade N-Scale line


troyphoto

Snarky Old Fart (in training)
Greetings and Salutations all.

I've been dropping my photos and updates into the Coffee Shop threads. I figure it's time to devote a thread, and just have a good time with my layout build in a semi-forgettable, not at all famous way.

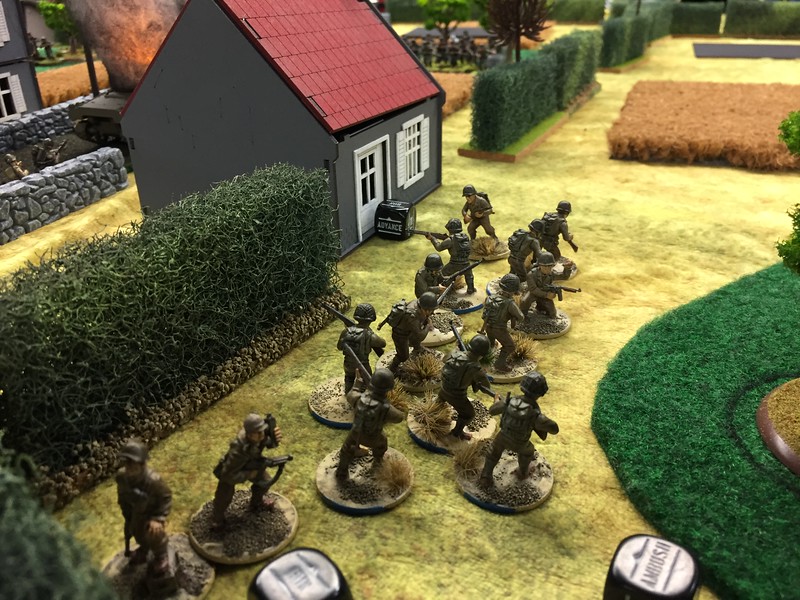
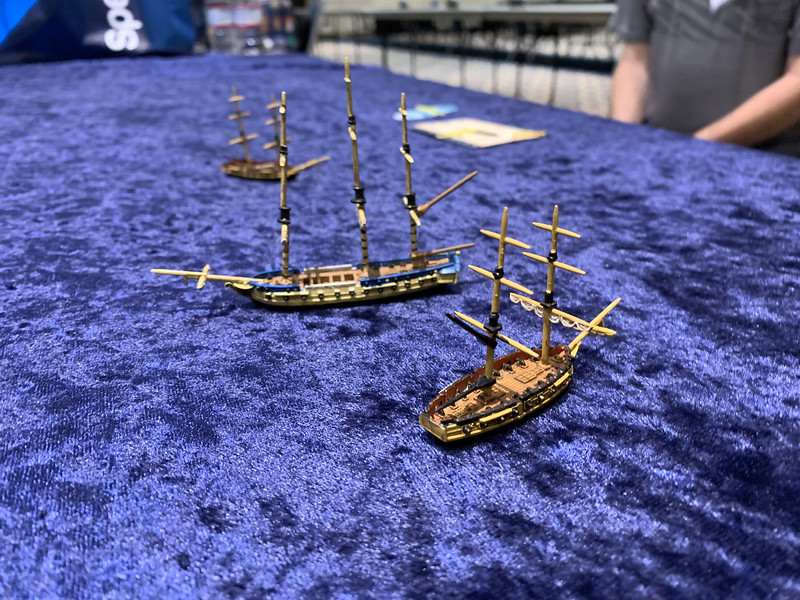
As I write this, we are in September of 2020. We've been on COVID-19 Lockdown for most of the summer. Up until Covid, I was a miniature wargamer. Fun photos here:

i-mWqSQCL-L.jpg


i-xfvtXXD-L.jpg


But, as Covid hit, and our states shut down, then tip-toed into reopening, I have a lost desire to play. We typically gather in game stores, the hangout of teens and young adults into collectible card games, D&D, and various miniature games. Some of these folks treat hygiene as "optional" on a good day. So my desire to hit the stores for the hours it takes to play a game is non-existent right now. It will probably be a good year (late 2021 before I give it a try.

Without the upcoming games, or the gathering of multiple friends for gaming (most of them are outside my bubble of who I feel safe enough to hang out within a pandemic. Nice folks, but their jobs and such expose them to virus risks I'm not willing to take.

What do I do to keep my hobby life going? I could paint about 20 armies in the next year. But, without the impetus of the next game day on the horizon, I've got zero desire to park at the painting desk and work on some of Wellington's finest lads to go chew on Napoleon's old guard.

So...... it's train time.

See the rest of the thread for some cross-posting from the Coffee Shop thread and some insights about looking back. More to come...
 
Screen Shot 2020-09-25 at 4.56.17 PM.png


What exactly is Troy's Still Untitled GN Cascade branch?
N-Scale
Freelance, based loosely on the Cascade Division of the Great Northern, covering Berne WA to Seattle WA. Sort of.
Layout is 10 ft x 13 ft
Time frame: transition era up to early 1960s (probably)

In the beginning:

There was an empty end to our basement. And in the empty void, benchwork began to appear.

Screen Shot 2020-09-25 at 4.56.45 PM.png


The blue tape on the floor is the proposed boundaries of the trackage rights negotiated with the CFO of the railroad. It's close to what the benchwork ended up as.

Screen Shot 2020-09-25 at 4.56.58 PM.png


I signed up for Model Railroader's Video Plus (highly recommended to those starting out). I watched David P build the benchwork for the Canadian Mountains they started featuring in 2018?? I tried to use a lot of what he showed as I built the Still Untitled benchwork.

One thing he recommended was Pony Clamps to hold the frame members at right angles. These red clamps I picked up at Mendards (Midwestern Big Box hardware/lumber/home improvement store) for about $7 USD each. They did help.

I also recommend TWO drills if you're using screws. Kept the pilot hole bit chucked into one drill, and the screwdriver bit in the second drill. Gave the battery drill even longer life since it wasn't doing double duty as pilot drill and screwdriver.

Screen Shot 2020-09-25 at 4.57.32 PM.png


Here's the first iteration of the benchwork. It stayed that way for about two weeks. After watching more vids, and looking at a lot of track plans, I started to draw out the mainline route on the foam. More on that in a later post....

Screen Shot 2020-09-25 at 4.57.56 PM.png


And this is the first industry/building for the layout.
An homage to my father in law, and my wife's bump-in-the-road home town.
Outside of Berne Indiana, Meshberger Bros Gravel company operated. They had a building much like this
Painted Orange.
That was the landmark wife (then girlfriend) gave me to find her house. Turn Right at the big orange building. Stay to the left at the Y. 2nd house after the curve.

And FIL... he and his brothers worked for the other side of the Meshburger Bros. operation. The road construction crew. I suspect I'll have several road construction scenes with the FIL and his bros leaning on some equipment.

Screen Shot 2020-09-25 at 4.58.29 PM.png
 
Catching up post (again)

Screen Shot 2020-09-26 at 6.10.19 AM.png


My original plan was for 2-inch foam on open benchwork, and then build up from there, using one-inch sheets and other techniques to gain height.

Problem. I don't have a truck to haul 4x8 ft sheets of 2-inch foam around. I can get 2x4 ft pieces in the car with the back seat down, and lucked out finding three such damaged and cut down panels at the local Menards. Since then... nothing in the 2" range. Lowes has the green 1-inch boards in 2x2 sections.

A month later, my Menards started carrying the pink brand of 1-inch "project panels" in 2x2 ft sections. I like those better for their density compared to the slightly more expensive green panels.

You'll note the jig saw in the photo above. I stole this idea from Gary Leone of NMRA/Model Railrader fame. Take a three-inch blade and grind the teeth down to a mostly sharp, smooth edge. That's your new foam cutting blade.

Screen Shot 2020-09-26 at 6.10.27 AM.png


It still leaves dust behind, but not in large quantities. And not the chunky bits like a toothed blade would.

I used a grinding stone in my Dremel rotary tool to make the blade into a foam blade.

Once I had some foam laid on the benchwork, I started drawing the curves I had sketched on the back of an envelope/napkin/whatever (math is not a skill I do well with). Since I'm a visual learner, I needed to make a yardstick-compass and get the curves in front of me in 1:1 orientation (as opposed to tiny on graph paper freehanded). That's when I discovered I needed more real estate to work with. But, I'm constrained by three walls and leaving room to get to the basement fridge.

Also, in the photo below, look in the back right corner. That's the main breaker box behind that access panel. The entire condo's service is there. So, when it comes to access, I've had to get creative.

Much wider ends to the dog-bone. Nipped into the back corners to facilitate a reach into the corners.

Screen Shot 2020-09-26 at 6.11.25 AM.png


Benchwork is 1x3 inch construction, with 2x2 legs. Each leg has a leveling foot since the laminate flooring is installed over wavy concrete.

Screen Shot 2020-09-26 at 6.12.01 AM.png


Left side and back section are both screwed into the basement walls to aid in leveling and stability. The entire right side is designed to be cut loose and slide out if we need to access the breaker panel for the condo (as in major electrical work. Minor work can be accomplished by reaching over.)

Wiring is 12guage for the main buss. I've got 18 gauge to make sub-sections off of that, and 22 gauge to run feeders off that.

I'm planning on using the method of Ron Marsh (Ron's Trains and Things vid on DCC wiring here). I'll post more when I get to that stage. For now, I've run the main buss so I don't have to pull wires from below any more than I need to.

Screen Shot 2020-09-26 at 6.12.27 AM.png


Once the wiring was in, and I realized I was going to have to go with 1 inch panels instead of 2 inch large sheets of foam, I decided to add a hard top to the open-grid. Enter 1/2 inch OSB (Oriented Strand Board or Waferboard). To this, I'll glue the panels using LocTite PL 300 (found in the caulk section of the store).

That's it for Benchwork. Next up, foam and layout woes.
 
Catching up... Whatever number this one is:

Screen Shot 2020-09-28 at 5.28.53 PM.png


Above, the benchwork with some foam roughed in. To the right end will be "Seattle" so I can have a waterfront. Plan is to include the short-lived Looff Pleasure Pier from the early 1900s in Seattle. Since I was a historical Docent on the OTHER Looff Pleasure Pier, which is still going in Santa Monica California, the "What if..." modeling will have a Santa Monica tilt. I see lots of scratch-building in that idea.

The area to the left will have the other end of the mainline loop, and within will either be a lumber industry, or an apple orchard. Both were viable industries in the transition era of Washington state.

Screen Shot 2020-09-28 at 5.29.28 PM.png


In the back LEFT corner of the layout, I plan to model the 2nd Cascade tunnel (the 8-mile long one). The climb to the tunnel will be a 3% grade because of the pesky electrical panel for the condo in the other back corner.

I know I'll need access to parts I can't reach from the ends, so I cut out this section. I wish it were larger. BUT, after I measured out my 19 to 20-inch radius curves for both the tunnel line (at +5 inches above grade) and the 2nd mainline "bypass" that uses a longer but shallower 2% grade at about +2.5 above grade - there just isn't room for those AND the return line going the other direction. Since one critical aspect of this design is a continuous loop for railfanning, I have to fit three lines into that space, with some separation between them.

Screen Shot 2020-09-28 at 5.30.10 PM.png


Quick tip on yardstick compasses, and what to do if your pivot point for the compass is off the table. Get a freestanding stick that you can lock in place. I'm a retired photographer, so I used a light stand.

Since the yardstick is double-sided, I painted each side. The brown side uses the hole outlined in yellow. The other side (painted white, uses the first pivot hole. That way I can have both big broad sweeping turns (22 inches) at the far end of the stick (I cut it down to 2 foot, not a yard), and smaller radii, like 18 inches. Since I've got three walls along the outside of the layout, I was constantly bumping the compass against a wall, and couldn't complete the curve drawing when trying to draw a 17" curve on the 22inch side. Move the pivot point closer to the center, and it fits.

I've since added another pivot hole, two-inches closer to the center of the stick (highlighted in light blue, and put the same color measurement to the right of the compass holes. Now I have three different Radii at the far end of the stick, with only having to move the pivot point in or out. Helps with those pesky walls I keep running into.

Screen Shot 2020-09-28 at 5.30.27 PM.png


I had forgotten to cut this piece out, for a downslope from the Pink section down to the green. This line will run under the curved downgrade from the tunnel. The return line to the Seattle end will be on the grade of the green foam, so I needed to get down another inch.

I'm using the Loctite PL 300 foam glue in the caulk tubes. It secures well and stays tacky a long time. This was cut loose the day after I set the pink foam and glued it down.

Screen Shot 2020-09-28 at 5.30.45 PM.png


Here are the Woodland Scenic risers tacked in place, but not glued. I'm playing with where I want to access the apple orchard/lumber company inside the loop. Perhaps where the metal yardstick is?

Right now, I'm leaning toward coming up the main downgrade (where I cut out that section), and curving up on a 4% grade since this is a short-run industry spur. The red line to the right, outside of the oval, will be the downgrade staging siding for shipments from the Orchard/timber industry. The 4% grade shouldn't be bad on the locos, since it'll be short trains operating point C to point D and back. The mainline runner can divert to the lower siding, add the shipment, and head for Seattle.
Screen Shot 2020-09-28 at 7.03.46 PM.png


Here's the approach of the industrial siding up to the orchard. I can add two 4% grade strips from WS, and add 2 inches to the inside of the loop. That should make a nice hilly area. Potentially add a taller section of hills to block line of sight deeper into the table, and make this into a scene on its own.

that's enough for this post. More to follow. I've actually got about half the other WS inclines glued in place now.
 
Last edited:
Not a catch-up post.

I got a post today. Or a box. From Midwest Model RR.

In it, the last few Turnouts I need for mainline, and a bridge kit I need to get the inclines and underpasses set for the orchard/lumberyard (still not sure which industry yet.)

If I can get the edits done on my latest novel, I should be able to tackle the bridge kit this weekend. I actually need it to finalize decisions on where to place the underpass and spur line. This kit gives me two spans of double or singletrack. So, I can either run both the mainline and spur under one double-span, or split them. I'll build, then we'll see.
Screen Shot 2020-09-30 at 7.16.15 PM.png
 
Bridge time!

Screen Shot 2020-10-09 at 2.47.30 PM.png

I assembled the first of three bridges I plan on getting from this kit. It supposedly has enough for two double-track bridges. But, I only wanted single-track bridges. So, the middle parts will make a third bridge - but won't be true to protype in the number of raised panels the plate girders shown on the side. I'll save that third span until I really need to build it. I may not need it.

Since this is N Scale, all I can say is - Fiddly Bitz! and lots of them.

Screen Shot 2020-10-09 at 2.47.48 PM.png


Unfortunately, I learned that using sprue cutters wasn't good for this project. The first delicate piece I cut was the bottom rail for the plate girder. And, I snapped it due the twisting the cutting torques the piece with. Didn't think it would do that, but. So, I switched to a sharp hobby knife to cut parts loose with.

Screen Shot 2020-10-09 at 2.48.18 PM.png


Did I mention how small the fiddly bits are? This is one of the rim pieces that surround the plates of the girder. One flat and one curved for each end. And they have an up and a down. Things the instructions didn't make very clear.

Screen Shot 2020-10-09 at 2.48.41 PM.png


One girder down. Just need to put some putty in those gaps. The next girder went together easier since I had my learning curve completed with the first one.

Screen Shot 2020-10-09 at 2.48.55 PM.png

This time I made sure to line up the bevels on the pieces... learning curve (and eyes that hadn't noticed such before)

Screen Shot 2020-10-09 at 2.49.42 PM.png


Completed span... just waiting on track.

Please note this is N Scale. Each span is only about 3.5 inches long. Trying to get my head around the scale is challenging since I'm just starting out. These will be useful in some of the fording streams or roads scenes, but not where I was hoping. Need to pay attention to the dimensions (when they're given. Not all vendors provide such.)
 
Last edited:
Wellp! Things are a changing here on the Stihl Untie & Teld railroad...

Actually, I'll probably name this the Misty Valley Cascade Branch, after a location in the books I write. But, back to the foamy bits.

Last night I almost completed goal #1 - gluing down all the foam risers/inclines. Ran out of 12 packs of soda, and other weighty bits and bobs to keep the risers down while the glue dried. So I hit the train room early and got the last two in place. Below are some progress shots and commentary.

Screen Shot 2020-10-13 at 8.16.42 AM.png

Above: Had to increase the flat area of the grade where the low road and the high road (tunnel route) meet. That's the pink section between the risers. I need to get in and see if I want a Wye or a generic turnout in that section. Do that when I start laying track.

Screen Shot 2020-10-13 at 8.17.05 AM.png

Above: This will be the misty valley end. The foam above has undergone some radical rearranging, so don't get used to seeing this scattershot cliff building.

Screen Shot 2020-10-13 at 8.17.31 AM.png

Above: SKY TIME! Picked up some 1/8th inch tempered hardboard (Lowes keeps it in the wallboard & trim section. Whatever?). Had the gent with the big saw rip each 4x8 board lengthwise into 2x8' sections. Painted them with the same blue we used in the kitchen and one of the baths. Once they were screwed up, I broke out the airbrush and used a rather thin white craft paint to pop in some clouds.

Screen Shot 2020-10-13 at 8.17.45 AM.png

Above: Full(ish) view of the boards in place. Since I *HATE* to drywall mud anything, I'll live with that one seam in the center of the pic. The electrical panel was the other headache. Even though it's an eyesore for pristine backdrop, I decided that keeping it easily accessible was the easiest way to defeat Murphy and his law's corollary... if you can't get to it, you'll need to work on it.

Screen Shot 2020-10-13 at 8.18.37 AM.png

Above, the backdrop drops as it makes the bend toward Seattle since the foam inclines aren't as high on the right peninsula of the layout. And, neither backdrop board is able to actually line up with the top of the Elect Panel access door. So I free-handed some sloping of the transition paint. I'll clean it up later. Maybe.

Screen Shot 2020-10-13 at 8.35.21 AM.png

Above: the cloud maker! Get a scrap of cardboard, and tear a rough half-cloud in it. Hold it between the backdrop and your airbrush. Practice a few times to find the right distance between cardboard and airbrush. Mine was airbrush out about three inches from the cardboard. Moving the cardboard in and out from the backdrop can make softer edges or harder edges.

Again, PRACTICE! before you go to town on your backdrop. Going in with a practiced technique is better than just winging it. And you can probably get a bottle of white craft paint for about a dollar. Practicing won't cost much at all.
 
Nice write up. I'm also a war gamer, but haven't played since Covid hit. I love the GN, but I don't think I could deal with N scale being so tiny. :)

A couple of thoughts:
  • Re: the two drills - I've used this trick for a long time, but it's even better if you get an impact driver for the screws. The first time you use one you will never go back to using a drill to drive screws.
  • Re: the foam blade for the saw - they actually sell blades that are just a knife edge. Like this one.
I love the gravel building painted orange, that should be an eye-catcher on the layout. The clouds look nice too.

Looking forward to following this thread.
Thanks for the feedback.

Covid made Tabletop wargaming a casualty, unfortunately, for many of us. Just cannot get motivated to paint those Napoleonic dudes when I won't get to use them until late 2021 at the earliest.

Thanks for the link to the knife blade for the jigsaw. For those who like to purchase the tools, and work on the layout, it's a timesaver.

I looked at a similar blade, then at my Dremel and grinding wheel, and a blade from a multipack that in effect cost about 50cents. Following HOExplorer Jim's advice of spend the money where it does the most good, I made my own blade. Fifteen minutes of grinding on a cheap blade and I have $ left for scenery. That's half a building kit, or the bridge I just purchased.
 
I looked at a similar blade, then at my Dremel and grinding wheel, and a blade from a multipack that in effect cost about 50cents. Following HOExplorer Jim's advice of spend the money where it does the most good, I made my own blade. Fifteen minutes of grinding on a cheap blade and I have $ left for scenery. That's half a building kit, or the bridge I just purchased.

I fully understand the "making your own tools" vibe, I do that also. I just thought I'd toss the blade out there because I knew I'd seen one before and I thought others might find it useful. I didn't even think about that style blade when I was cutting my foam, but it was all straight cuts so I just scored and snapped it.
 
Got some train room time in over the last few days. Only made one mistake (that I'm aware of). I'll tell you about it below. See if you can figure it out.

First, a helpful hint: When using a caulk gun, and trying to wiggle a bead of PL-300 onto those wiggly Woodland Scenics foam risers, I needed a third hand. So I made a jig. Kept it tight, using scrap foam, and T-nails/foam nails from WS into an area of my layout I haven't applied risers to yet. Be sure to leave a gap to get a finger in so you can pry up the thinner risers.

Screen Shot 2020-10-15 at 7.41.19 AM.png


Next... I needed to work on the tunnel area in the corner. All the other back scenery would be size-dependent on that tunnel/cliff face. So I started carving some foam for the outer extremes of the tunnel.

Here's handy tip I got from Model Railroader Video Plus. You know that NMRA Track gauge you've got in your tool box? Yep, it's also a profile for a Loco. You can use it to find the minimum viable opening for tunnels. In my case, I was going wider in the foam cutting and shrink the opening with scenic tunnel portals later. But, it still gave me the reference for where center was, and how tall the minimum hole had to be.

Screen Shot 2020-10-15 at 7.42.26 AM.png


Hot wire cutter and we have tunnel openings!

Screen Shot 2020-10-15 at 7.42.47 AM.png


Once I had both ends roughed in, I added some arched supports. There is a hole in the deck in the back corner for up from behind access. Then add some cross bracing. And glue it to the deck and backboard with PL-300.

Screen Shot 2020-10-15 at 7.43.13 AM.png


The next night, I came back and started working down both sides to make the rough outline of the cliff face the tracks will hug. Inspired by Jim (HOexplorer) and his cliffs, I'm planning grand rock vistas with some trees, and perhaps a mountain goat. Definitely going to have a "Jim" climbing the cliff somewhere.

Screen Shot 2020-10-15 at 7.43.25 AM.png

In the foreground of the above image, you can see the cut-through and underpass for access to Misty Valley. I'll cover that in a later post. The bridge is the Atlas steel girder bridge, that came with the GN logo decal already applied.

Did you figure out what I messed up? There is probably more than one thing. But I realized the morning after I roughed in the tunnel cliff, that I should have used the plaster cloth on the risers, then laid the track through the tunnel FIRST. I believe I've got enough room to get in and do that now. Fortunately, PL300 can be prized up without major damage if I need to remove the tunnel framework. I don't believe I'll need to, though.

Here's a wide shot, just to round out the post.
Screen Shot 2020-10-15 at 7.43.39 AM.png
 
Minor updates:

Jim/HOexplorer sold me his secret stash of N Scale trees. Only took me an hour to unpack, sort and stick them into spare bits of foam. I estimate about 600 trees total.

Screen Shot 2020-10-16 at 8.24.05 PM.png


And I started applying plaster cloth to the risers tonight. That's a fiddly process as I tried to keep the top of the risers without wrinkles and minimal overlap. Probably have a few spots to sand later.

Screen Shot 2020-10-16 at 11.00.00 PM.png
 
An eventful Sunday in the train room!

Evidently, layouts break a bone, and one needs to wrap them in plaster bandages. I purchased an 8-pack of such on 'Zon, and working my way through roll #4 as of quitting time today. Below is a BEFORE pic:

Screen Shot 2020-10-18 at 6.57.07 PM.png


Decided I was going to close off the pass behind Mount Raven (looks like a bird's head). I need to find a good castle/fortified manor house for on top of Mount Raven. But back to the tunnel. Unlike last time, this tunnel isn't locked in yet. I roughed in the pieces, and know I've got some fiddling to do with them after the plaster cloth dries, and I get the track installed through the pass. Plan is to make this tunnel top removable. It's not a long tunnel, but still... trying to get my fingers in a tiny N-scale tunnel portal won't be a good fit.

Screen Shot 2020-10-18 at 6.57.43 PM.png


Next up: TA DA! the end of the work session. Three and a half rolls of plaster cloth into the project. I suspect I'll have to purchase another 12 to 16 rolls to finish.

Screen Shot 2020-10-18 at 6.58.34 PM.png


Mount Raven, sans the tunnel and the castle.

Screen Shot 2020-10-18 at 6.58.50 PM.png


Back
Top