Signaling a complex junction


ctclibby

Well-Known Member
Hi All,
What would the prototype do for signaling the layout clip below. I do not have a Delta/Wye near me so I can not go and watch. Delta Jct in Everett, Wa. does not have 2 main tracks, so 2 light signals are used for that location - well, at least I do not remember 2 main tracks.

Assume that we have an Eastbound on Main1 @ West Jct headed for South Jct. All switches are aligned correctly. I think that the Main1 signal @ West Jct should display:

Home ( top ) - yellow as we are diverging from Main 1
Route1 ( middle ) - yellow as we are diverging from Main 2
Route2 ( bottom) - green as switch is aligned for the movement and the next blocks are clear.

If ima not even close, don't be afraid to comment and get me sorted out!
Note that this gets really complicated if all the intermediate junction switches need to be signaled. I suspect that signaling the control point ( actually multiple control points ) as a whole is the way to go? That is versus having a movement run up to a switch not aligned for the route and have the hogger stop where they are supposed to.
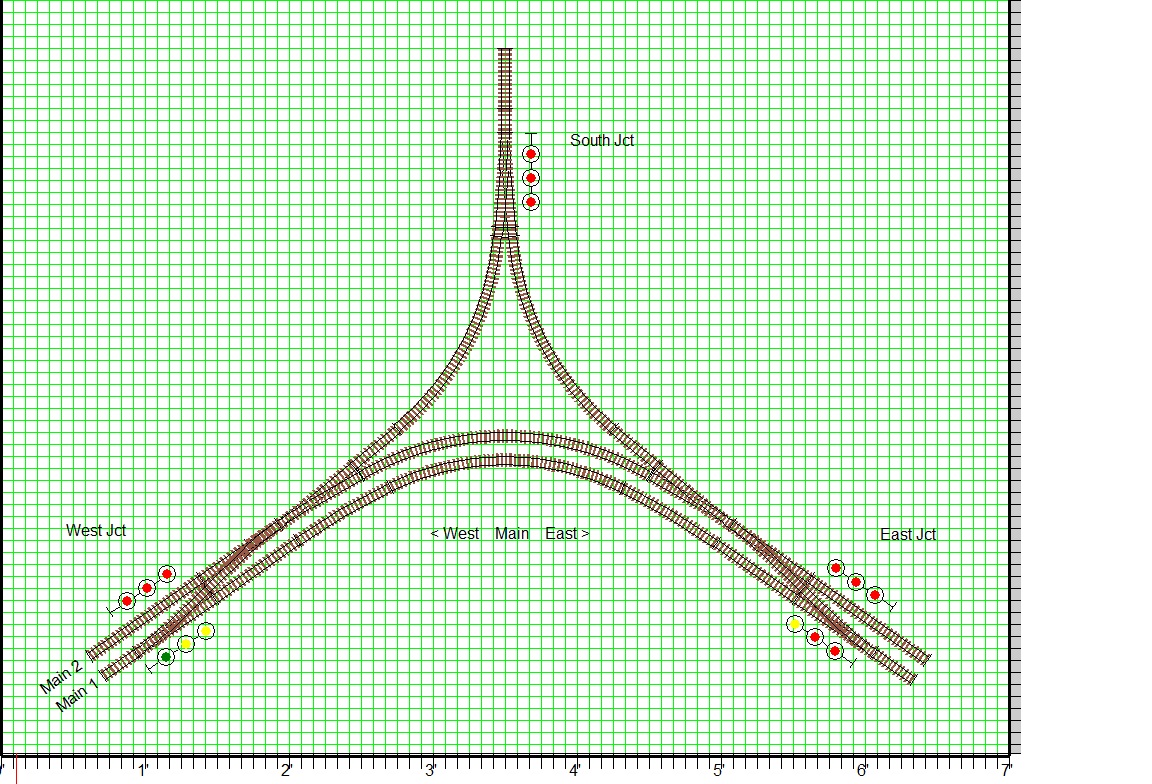
WyeDelta.jpg

Thanks for the brain work!
Later
 
This may help, this is from a publication called "Signalling your Model Railway" and is 12 pages long, it is a PDF document so thought you may find it on the Web, here are some of the high points (I cut and pasted to make this one page)

signalling notes.png


Looks like it came out pretty clear. Send me a PM and I can send you the entire PDF to your personal email.


Dave LASM
 
Thanks Dave although not quite what I was looking for. I have normal block signaling along with sidings down and understand what is needed to make'm work correctly. Just this Junction is a fly in the works and YA, I did it to myself when I decided that I wanted a Delta/Wye junction:oops:
 
Assume that we have an Eastbound on Main1 @ West Jct headed for South Jct. All switches are aligned correctly. I think that the Main1 signal @ West Jct should display:

Home ( top ) - yellow as we are diverging from Main 1
Route1 ( middle ) - yellow as we are diverging from Main 2
Route2 ( bottom) - green as switch is aligned for the movement and the next blocks are clear.
I think that would certainly work. It would just have a page in the timetable describing that indication.

What I don't understand is the high yellow at the east junction, as the next turnout on that main is thrown against that route. Unless there is another red facing signal right before the turnout of the other leg of the wye that is not shown.

The only way I can see two trains moving through here simultaniously is if main one is straight through. Then another train could be on main two. or moving on/off of south junction to main 2 in either direction. Any time main 1 interacts with south junction it blocks all other routes.
 
The 'high yellow' is/was a mistake as I didn't change it back to red before posting. Also, thinking about the junction I decided that i want trains to be able to 'move up' to any red aspect. Sure, using the route I described above and if that lower signal were red, the movement will block both main1 and main2. That throws a wrench in the works which I think could be needed. Have to keep dispatch busy keeping things straight .... right?

Also, how st00pid could i be? i think the 3rd signal head threw me or ima getting old. Take apart the problem and deal with each individual part to get it down to the logic for each part. Now reassemble and drop duplicated stuff. Will post what I come up with. Sorry to make your brains hurt!
 
Assume that we have an Eastbound on Main1 @ West Jct headed for South Jct. All switches are aligned correctly. I think that the Main1 signal @ West Jct should display:

Home ( top ) - yellow as we are diverging from Main 1
Route1 ( middle ) - yellow as we are diverging from Main 2
Route2 ( bottom) - green as switch is aligned for the movement and the next blocks are clear.

One note - while you can make up your own system of signal logic and indications, having a different head for each route is NOT how prototype signals works. That signal indication/logic you presented is not close to anything real.

Generally, you have "route" and "speed" signalling.

"Route" signalling would basically give you "straight ahead" or "diverging" (through turnouts) indications. The crew has to know that the speed restriction is through diverging routes.

"Speed" signalling will give specific speed restrictions in the signal indication, based on the speed restriction through turnouts. e,g, "Slow [15mph] Clear" vs "Medium [30mph] Clear" for diverging routes.

High green is the standard "Clear" signal, which you'd get on any route that goes straight and not through any diverging routes of turnouts. If you go through any diverging route, you'll get a diverging/slow/medium/etc. type of indication. That signal at the south leg of the wye would probably give the exact same indication in either route, since both routes are symmetrical and through diverging routes of turnouts.

Unless you make up your own system, which you can, but then you have to tell anyone who runs on your layout how your unique system works.
 
Last edited:
The prototype would probably have a separate interlocking/control point at each leg of the wye... but you could just interlock the whole complex. It makes for some long blocks on the main tracks inside the interlocking and any approaching train has to hold out of the entire complex.

Three separate control points would require signals at eight more locations, but each CP on its own is smaller and not as complex. The entire thing as one CP makes for some more complex routing logic.
 
Last edited:
This may help, this is from a publication called "Signalling your Model Railway" and is 12 pages long, it is a PDF document so thought you may find it on the Web, here are some of the high points (I cut and pasted to make this one page)

Looks like it came out pretty clear. Send me a PM and I can send you the entire PDF to your personal email.


Dave LASM
Some of the language use in that document suggests a British/European author and european and north american signal systems are not necessarily the same.
 
One note - while you can make up your own system of signal logic and indications, having a different head for each route is NOT how prototype signals works. That signal indication/logic you presented is not close to anything real.

Generally, you have "route" and "speed" signalling.

"Route" signalling would basically give you "straight ahead" or "diverging" (through turnouts) indications. The crew has to know that the speed restriction is through diverging routes.

"Speed" signalling will give specific speed restrictions in the signal indication, based on the speed restriction through turnouts. e,g, "Slow [15mph] Clear" vs "Medium [30mph] Clear" for diverging routes.

High green is the standard "Clear" signal, which you'd get on any route that goes straight and not through any diverging routes of turnouts. If you go through any diverging route, you'll get a diverging/slow/medium/etc. type of indication. That signal at the south leg of the wye would probably give the exact same indication in either route, since both routes are symmetrical and through diverging routes of turnouts.

Unless you make up your own system, which you can, but then you have to tell anyone who runs on your layout how your unique system works.
Thanks Chris
So, from what you said I would need route signals at each junction of the Wye point end, protection signals frog end which makes sense.

How would the crossover before the Wye be handled? Instead of having a signal set before the Xover and one at the Wye would it be feasible to have these aspects on a single mast or bridge? Probably not what 1:1 would do although I don't remember seeing another signal within one ( or two ) switch lengths. As MRR's, we compress stuff quite a bit which causes trouble in some cases. Yes, I know that any operator on my layout ( if that ever happens ) would need to go to signal skool. I want to keep it simple and also somewhat prototypical. Your suggestions are appreciated!
 
It's not that complicated of a control point or interlocking. First off you need a set of signal rules from your favorite rule book so you have consistency on what the names, aspects and indications of the signals are (name = what the signal is called, aspect = what lights are displayed, indication=what it means).

Then you have to decide what speeds are appropriate over which switches when lined reverse.

This also assumes at all the tracks are part of block signal system.

Any time there is a switch lined against a route the signal would be red. Any time the next signal is red, the best any signal will display is an approach.

Assume South Jct has the same speed on either route. Using UCOR 1968 rules or UP GCOR rules:
Any route with a switch lined against it : Stop - red over red over red
Any route with the next block occupied : Stop - red over red over red
Any signal where the opposing signal on the route displays a signal better than Stop : Stop - red over red over red
Any route with the next signal at stop and crossovers lined normal : Approach - Yellow over red over red
Any route with the crossovers lined reverse (crossover speed above 10 mph) and the next signal at stop: Diverging approach - Red over red over yellow.
Any route with the crossovers lined reverse (crossover speed 10 mph): Low - Red over red over lunar.
Any route with the crossovers lined normal : Clear - green over red over red.
Any route with the crossovers lined reverse (crossover speed above 10 mph): Diverging clear - Red over red over green.
Any route with the crossovers lined reverse (crossover speed 10 mph): Low - Red over red over lunar.

You could also signal the whole thing with 2 head signals too.

If you use speed signaling, the aspects would be the same, the names and indications for the "diverging" signals would be changed to "Medium". Diverging clear would be Medium clear. Some rule books use "slow" instead of "low".
 
Last edited:
Determine what the "set" of switches are that will be protected/interlocked as a unit, and then put a signal at every entrance into that interlocking.

Option 1: The entire wye and both crossovers, and all related switches is handled as one giant interlocking as previously presented.

Option 2: Three smaller interlockings - one protecting only the "south" wye switch, and one each on the east and west sides, protecting the crossover + wye switch on that side as a unit. (Depending on your radii and distances, this might be a little cramped together.) This might looks (roughly) something like this:

wye junction.png


Blue lines would be the boundaries of the interlocking/control point. Note some of the signals inside the wye don't line up perfectly with the boundaries as drawn due to the cramped space on the drawing, but in real life the signal and block boundary locations should line up. You might need/want to use a bridge structure to mount the signals coming off the wye into CP2 in particular. I just represented the new signals with 2 heads, but you'd want to verify what signal rules/indications you're using and determine whether any/all of the signals should be 2 or 3 head.

Generally it's standard practice to location a signal to the right of a track that it controls; exceptions can be made, but it should be CLEAR which track a signal belongs to. (Like your existing signals at "west jct" and "east jct" to the left of the track is fine, because there isn't another track to the left of the signal. It's clear which track the signal belongs to. If there was any sort of third track to the left there, you'd need/want to put the signals on a bridge structure so that it's not ambiguous which track the signal applies to, and probably also for the physical spacing between tracks.) The original signal at "south jct" should probably be moved to the other side of the track unless there's a good clearance reason to have it on that side.


Once you determine what your interlocking/control point boundaries are (either option 1 or 2 above) you can from each signalled entrance determine every possible route through the control point.

e.g. For a train on Main 1 approach at "West Jct":

Option 1: there are 4 possible routes through the entire complex.
- straight through
- diverging crossing over from Main 1 to Main 2 at the west crossover, and straight on Main 2 at the east crossover
- diverging crossing over from Main 1 to Main 2 at the west, and diverging back to Main 1 at the east crossover. Bit of a silly move, but a possible route.
- diverging from Main 1 to the wye

Option 2: there are 3 possible routes just through "CP1".
- straight through
- diverging crossing over to Main 2
- diverging crossing to the wye

In Option 2, you'll hit new signals for CP2, so the control point for CP1 only needs to worry about the crossover and the one wye switch in its logic. In Option 1, both crossovers and all three wye switches are in play in the same control point.

Next find the signal rules/indications for the railroad you're modeling (or at least the one you want to take the signal practices from as a guide/inspiration) and you can start to determine which indications should be used in which situation.

It can be helpful to make a sort of table to track what all the routes and possibilities are.

e.g for the EB signal for Main 1 at "West jct"...

Crossover position (normal/reverse)
Wye switch position (normal/reverse)
Block(s) occupancy (and which block(s) will it route through)
The indication of the next signal (Stop, Clear, etc.)

and work out the indication for this signal.

E.g.
Crossover is normal (straight)
Wye is n/a (because we won't take that route in this case due to crossover position)
The interlocked and following (the one between CP1 and CP2) blocks are both unoccupied
The entrance signal to CP2 is Stop

Then show an "Approach" (Proceed prepared to Stop at Next signal) indication.

If the EB signal at CP2 is Approach or Clear, then our signal would be able to display "Clear".

If we're routed over to Main 2 through the crossover, then you're looking at something like a "Diverging Approach" or "Diverging Clear" (or a "Slow Approach" etc. if you're using a "speed signalling" set of rules - this will still look very similar) depending on whether the signal at CP2 is Stop or Clear.
 
Last edited:
Dave and Chris: Thanks for your input! Have worked through both junctions ( I have two somewhat like I displayed above although bigger ). Putting pix here is another matter as it gets too small to see anything. I will be home in a couple of weeks and have better technology to throw at this. Working from my laptop without a printer/scanner cripples ya for doing this sort of stuff. As far as I can figure out, Xtrack won't allow me to center what I want to view cuz one side is at the edge of the room. Go figure.

I have decided to use three 3 head signals for routing ( Ya, not prototypical ) the Wye entrance, then 2 and 1 head inside the Wye. Most of if not all of these signals will be up on bridges and centered over the appropriate track segment. The railroads owner has OkieDokie'd this change and modification from ...um... normal as it seems that they understood what I was trying to do ;). Note to self, figure out a way to caste these bridges in stone as they are sleeve grabbers with stuff sticking up.

I use 4 aspects ( red, yellow, flashing yellow and green ), 5 if you count 'dark'. Indications have pretty much standard names as I am trying to limit what guest op's would need to learn. Speed is yet to be determined as I have some switches that are #8's and could be deemed 'high speed' which could warrant a green vs a more restricting speed; more testing with my bigboy's to determine that. I think that I can use #9 or #10 where the current #8's are, time will tell after the main lines are more or less finalized.

I have lunar aspect capability and probably will use it for going into dark territory instead of an un-bonded siding or such.

More later!
 
Flashing yellow really isn't needed at the interlocking, especially with all the routes on curves. Flashing yellow is a first step speed reduction, flashing yellow gets a train from "high speed" to "limited speed", that is from 70 or higher down to 40 mph, then the next signal is approach, reduce speed to 30 mph and prepare to stop at the next signal.

The flashing yellows would most likely be one or two signals away from the interlocking and slow a higher speed train down for a stop or diverging route at the interlocking.
 
Hi Todd

I will stick my oar in now.

I think your initial thoughts are not too far from the mark. I am assuming that the mains are all bi-directional (you could lose two of the masts if they are not), rather than right-hand or left-hand running double tracks.

The use of three head signals can be justified in several ways:-

  1. You have a prototype that uses speed signalling and you need three heads to show the speed through the junction (CROR for example).
  2. You have a prototype that has route signalling and need to show that some diverging routes are slow speed routes (to the wye) while others need medium speed (crossing on to the other main line).
  3. There is another interlocking nearby and your signals need to show distant aspects (diverging approach diverging for example) which require triple head aspects.
Getting this right can be a bit of a minefield, but if you start with a prototype signalling system and know what is beyond the junction you will set some parameters to work to.

There will be no point in signalling all three of the junctions separately unless generally speaking the legs of the wye are long enough to hold a whole train (typically two miles on the prototype, 120' in H0! Can be reduced a bit due to modellers licence). You don't want to create the un-prototypical forest of signals look when signals are too close together.

The way to decide whether you need three heads or not is to work through every scenario, and if the lower head is always red you never need it!
 
Thanks Suzie for your input

Well, I did a work up with the 3 head signals and so far I just don't like the way it plays. So, Ima back to 2 head. From one entry point in the Wye, the other two Wye switches are about 5ft 1:1 distance so there is *some* room between the junction signal masts. Only spots that are 'mast busy' are the crossovers before the actual Wye in which the hogger will see two masts ( 4 heads ); one for the crossover, the other for the junction switch. The crossovers on the Main are #8, one straight, one curved which means it is about 3ft 1:1 from the entry of the crossover to the 1st Wye switch. The flashing yellow aspect will come into play when the route is Main to Main and following another movement.

Even though reach-in is less than 24in, I will probably not use signal bridges as stuff sticks up to far and could be problematic.
 
You can mix and match 3-head and 2-head masts, you just have the number of heads needed to show the aspect. Especially when some masts will offer fewer routes you will need fewer heads.

A dozen masts is a lot, and you will not fit a very long train in to 5' in H0.

Which signal system will you be using?
 
Not trying to 'fit a long train' in the Wye. Sidings and yard ladder lengths limit my length to about 21Ft.

As to signal system - have been working on my own design. Been fun so far.
 
Wow, I took CROR some years back and my head is spinning like Linda Blair and a bowl of pea soup.
I’m leaning towards the railway treating the entire piece as an interlocking?
In that case half the signals would be redundant, but as I say it’s been years.
My signals are much simpler, green is main, red is diverging. Strictly for my op purposes and not proto I know. 😀
 
Flashing yellow really isn't needed at the interlocking, especially with all the routes on curves. Flashing yellow is a first step speed reduction, flashing yellow gets a train from "high speed" to "limited speed", that is from 70 or higher down to 40 mph, then the next signal is approach, reduce speed to 30 mph and prepare to stop at the next signal.

The flashing yellows would most likely be one or two signals away from the interlocking and slow a higher speed train down for a stop or diverging route at the interlocking.

Depends on the specific signal rules, and where the flashing light is.

Canadian speed signal indications used Red over Yellow (or Red over Red over Yellow) as "Restricting", so "Slow Approach" (or "Slow to Stop" as it would be called in the current rulebook) is Red over Flashing Yellow (or Red over Red over F Yellow). This would definitely be a possible/common indication at the interlocking, especially in the "three separate control point" scheme for signaling the junction.. Red over Yellow over Red would be "Medium [30MPH] to Stop" (or "Medium Approach" in older language), Red over Flashing Yellow over Red is "Limited [45MPH] to Stop" (or "Limited Approach"). A high Flashing Yellow (FY or FY/R or FY/R/R) is "Advance Clear to Stop" (Advance Approach) and would be two signals out from a Stop signal, exactly as you described above.

These are in the Canadian CROR. Other rulebooks/signal charts may not line up exactly or have the same indications.

My general logic "rules" for signal indications:

- All of the heads on the signal mast are read together as a unit
- If the whole thing is Red, it's stop (with some caveats/exceptions)
- If anything is not red, the red(s) are effectively placeholders
- [the non-red light] higher is "better" than lower (less restrictive)
- green is "better" than yellow is "better" than lunar (if it exists in the signal rules) is "better" than red (less restrictive)
- flashing is "better" than solid colour (less restrictive)


But you really want to grab the chart of signal indications from whatever RR or rulebook you're using as a source/inspiration (if you're not inventing your own).

The advantage of following a real prototype is that anyone who has a passing familiarity can sort of figure things out, and you can still make it simple as basically any straight route would be "Clear" (G over R) or "Approach" (Y over R) and any route that diverges through any turnout would be "Diverging/Slow Clear" (R over G) or "Diverging/Slow Approach" (R over Y or FY - check chosen signal rules). This is about as simple as you can get, and it's also prototype.
 
Last edited:


Back
Top