Shelf layouts


chessie_system3

Well-Known Member
So with the possibility of me losing space due to moving into an apartment. Shelf layouts....are they only limited to a switching only type of layout? I'd rather not be confined to a switching layout if at all possible. Any insight into this?
 
Sorry for leaving the scale out. I'll be modeling in ho scale. I know it'll most likely come down to space available. I would greatly love to not just do a switching only layout like a timesaver or something along those lines. A point to point maybe? Or I can go ahead and maybe run a mining layout space permitting.
 
Two things. One, you could model more in N scale. Two, remember real railroads go point to point and not round and round. Have fun!
 
I know I could get more in n scale space wise. Its just that I have so much ho scale stuff that i would much rather put to use.
 
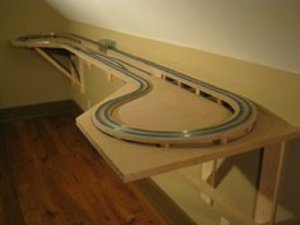
People talk about shelf layouts but I googled "what is a shelf layout", you can find a lot of stuff there and images, here are a couple ho scale that are not point to points, although most of them shown are:

shelf layout.jpg
 
People talk about shelf layouts but I googled "what is a shelf layout", you can find a lot of stuff there and images, here are a couple ho scale that are not point to points, although most of them shown are:

View attachment 48539
I did a google search as well. Found some interesting things such as the photo you have posted here. Not much in a way of any switching mostly round and round. Which doesn't bother me. All of my previous layouts have been round and round and I enjoyed them.
 
See right now all I really have to go off of is model railroader how to build small model railroads winter 2014. Most of what they offer is primarily switching layouts in shelf form. Or modules.
 
When I was renting and new it was temporary I built this layout around an entire room. I hung the plywood from nylon thread from the ceiling so I wouldn't have brackets in the walls. That turned out really good because when I dismantled it it just took a dab of spackle where the screw went in, they were spaced about 8 or 10 feet apart.

A lot of guys wanted me to put those shelf brackets in the walls but I fear there would have been big marks. Anyway, the way I did it I could have 30" radius curves and a really long run.

This type of layout is not for everyone but it gave me a lot to do and when I moved I was able to salvage the track and some of the corner sections.

Here is the thread: http://www.modelrailroadforums.com/forum/showthread.php?32076-Need-track-advice&highlight=
 
I remember growing up my uncle had an O scale that ran around the tops of the windows and doors.It was 12" deep 18 in some places accept the corners deeper there. It started just circling the family room but soon grew to run through the kitchen and dining room. He cut tunnels through the drywall, everything was background scenery accept for a tree or or bushand in the wider spots hefmodel a truck. I remember he had several bridges in the scene as well. Once his layout was most of the house he put a staging area in a closet and ran two trains at the same time. Don't limit yourself, wish I had pictures but at 10 I didn't have money for film or a camera lol.
 
I would basically say look at the space and circumstances you have. If you're renting, you may not be able to screw brackets into the studs. It will also depend on how long you expect to stay, how much budget you have, etc. One thing I would not do is just take some guy's word for what to do or how to do it!
 
I would basically say look at the space and circumstances you have. If you're renting, you may not be able to screw brackets into the studs. It will also depend on how long you expect to stay, how much budget you have, etc. One thing I would not do is just take some guy's word for what to do or how to do it!
Yeah I hear you on this. I'm just wondering what is possible. I'm trying not to just have an industry switching layout. Its just not me.
 
Back in 1988, Malcolm Furlow did a 3 part series in Model Railroader building a layout called the Carbondale Central. It's in a book called "6 HO Railroads You Can Build."
He designed it for apartment dwellers and others that can not put holes in the walls. It's a layout designed for a corner space. How he did the benchwork was interesting. He basically made freestanding wall studs to which the benchwork was attached. He took 2x4's just a couple of inches shorter than the floor to ceiling height. He put a small square of wood on the top of the 2x4 to act as a pad for the ceiling. He installed a T-nut and bolt into the bottom of the 2x4, then set in on another small square of wood on the floor. Adjusting the bolt outwards in the T-nut wedged the 2x4 tightly between the floor and ceiling. The bench top was attached to another 2x4 running parallel to the floor and supported by a 2x4 running diagonally between the "wall stud" and the bench top support. The backdrop was then attached to the wall studs. If you do something similar, I would suggest finding out where the ceiling joists are and placing your false studs directly underneath them. Otherwise you will be trying to wedge between the floor and drywall, and that might not work out so well.:eek:
Is it the edition printed in 93?
 
I question the need for a full stud unless your opposed to a table you could just extend bracing up from there to support the backdrop. But if you want that extend from the wall benchwork that's a brilliant idea. If you can't get a joist above where you need increase your footprint .... a 4x4 square of 1/2" oak should do the trick assuming they aren't using 1/4" ceiling board.
 
I would just go for a shelf supported on legs. Any backdrop could be secured to the base frame. No loss of layout depth that way.


Back
Top