Running Bear's November 2020 Coffee Shop


Status
Not open for further replies.
Afternoon All,

Started out with chores then went and got a haircut and beard trim. Nothing done in the train room today or tomorrow (lawn camp).

Terry- Hope you didn't get any in your house.

Troy- It looks like you're making good progress.

Jerry- That will be a nice scene.

Joe- Nice progress and everything is straight! Nice rail oics.

Willie- Nice scenes.

I hope everyone has a good night.
 
Good Afternoon all. Very gray and overcast, with a light mist falling.
Just finished running the BLI SD40-2 that was sent off for repair.
Backstory: Loco 8113 (the repaired loco) was MU'd with 8043. Both are Broadway Limited SD40-2's. They had been teamed together for a month. Then out of the blue 8113 quit. After removing from MU it just sat there. Changed CV8 to 8 and lights and sound worked but would only run in reverse. Oddly in forward the rev sounds worked though the loco wasn't moving. Made arrangements with BLI to check and replace decoder.
So 9 weeks later 8113 returned:
Replaced motor
Replaced worm gear and drive shaft
Replaced chassis
Replace both trucks
Replaced decoder
Cleaned pick-up plates and well sets
Installed latest software version.
All this per BLI plus lubrication and 30 minute test run.
It runs great, but in my humble opinion doesn't pull as good as it did, but that could be my imagination. I will say BLI does go all out to fix or repair their products.
 
Last edited:
Toot: I've used resistors to continue to use 12 volt incandescent lamps in Proto locos and also stepped up the lamp voltage to 14 volts and haven't experienced any lamp failures.

Greg
That's interesting, I was going from what I remembered reading on the instruction sheet. The one I've got is still as original. Have tried to sell it for $50 at Buy & Sells, but I don't think many know what CNW is and are not interested in 4 axle Locos. They also all wan't DCC/Sound dirt cheap.
 
I wanted to serve but couldn't due to hearing impairment that I was born with. I wanted to be in either the NAVY or MARINES but was not able to do so. As mentioned a while back on a previous June coffee shop. My grandfathers both served. GR served in the ARMY WWII, Korea, Vietnam. Countless medals etc. He died at 101 yrs old this past spring. His 8 brothers all served and came back as well and served in Navy & Marines. My other grandfather GB served in the NAVY as one of the submariners. He served and came back from WWII. My dad served as a Merchant Mariner for supply ships during Nam. My youngest nephew just left last month to serve in the Marines. So a lot of military history in my family. I personally believe 10% isn't enough. I would like to see that at least 20% across the board with all companies/expenditures. My opinion.
No wonder you knew all that 11 hour stuff. All 8 made it back that's good. That's some military family James.
 
Replace both trucks

All this per BLI plus lubrication and 30 minute test run.
It runs great, but in my humble opinion doesn't pull as good as it did, but that could be my imagination. I will say BLI does go all out to fix or repair their products.
The new trucks will have a coating on the wheels that will wear down, and traction will improve. You can also try weighing the one you still have, and the one they sent back to you, and see if the new one is lighter.
 
Good morning all.

Mega espresso double shot, Flo.

I need it with my track laying woes.

Last night I did get some track down. Watched a bunch of vids over the last several days, and tried to do it right. But, I seem to have so many curves in the parts I want to scenic that I really don't have any easy parts to get my mojo developed in.

Some of my joints aren't bad. (They're not great, but not bad):
Screen Shot 2020-11-14 at 6.54.21 AM.png


I figured out that I need a much thinner solder spool. Using a pigtail of it from a roll I picked up in the plumbing section of the hardware is putting down too much at once. Now I'm melting some on the (already tinned) tip of the iron before touching the iron to the fluxed joint. Photo above shows even that may be too much.

Here's some progress on the upper and middle levels that isn't too bad. I'm doing the turnouts better than regular track, since I'm assembling them off board (soldering the rail joints) THEN adding them to the layout.

Screen Shot 2020-11-14 at 6.54.32 AM.png


Then comes my problem child...
This one I ran the caulk BEFORE I put the rail joiners on the pieces I was joining. That made everything messy. And it's got a transition to seperate an S curve - so the previous section had a bend one way, and the new piece of flex track bent the other way. Mating those two, even with the 6-inches of straight right at the start of the new section was a pain.

Screen Shot 2020-11-14 at 6.55.10 AM.png


Ended up with about a foot not glued down due to all the fussing. I cut the offending section out this morning. Tossing that badly soldered and aligned joint into the trash helped brighten my mood. I'll work on cutting and fitting a piece to the void later today...

Here's a turnout I did much better on. Still have a small gap in one rail. There's always one! One to drive me nuts.

Hints or tips are welcome. Happy to hear your method for not going mad while laying teeny tiny n scale track

Screen Shot 2020-11-14 at 6.54.55 AM.png
 
Good morning y'all. 37°, with frost, and sunlight to melt the frost. ☺

Went grocery shopping with the wife yesterday morning. Got there before it got crowded :), and only spent $80 for the week :).

The track is in on the new section. Just a matter of soldering a few more wire drops, and hooking up the feeders to the buss. Then clear the table and move on to the next crossover installations. Maybe some scenery by Thanksgiving? Also have to install a phase break, (insulated joiners), before I can put my booster on line. Still waiting on a circuit interrupter and reset switch to finish that install.

B&O Streamliner in NW Ohio date and photographer unknown.jpg

Date and Photographer Unknown, Photo of a B&O Streamliner taken in Northwest Ohio. Probably the 1940 version of the Capitol Limited by the size of the train.
B&O Station Philadelphia.jpg

The B&O Passenger station in Philadelphia at 24th and Chestnut. Photo was dated as 1910, but... Also no photographer noted.
 
Morning all,
Great to see everyone's progress with the model railroads, just had a quick catch up. Another couple of images, I think it was @Sirfoldalot who said he liked to see the architecture of Britain's railway stations, so you may enjoy this batch. A small station, today with low passenger numbers, it is served by a one or two coach train every two-hours, was was originally on a main line when built back in the 1860s. The station at Goxhill is a passing loop (although very very rare anything passes something else here now) with a manual signal box, level crossing.

20120803-DSC_0548.jpg


20120803-DSC_0538.jpg


20120803-DSC_0537.jpg


20120803-DSC_0551.jpg


Rich
 
Good Morning All. Cloudy and 67° this fine morning. The chance of rain this morning hasn't materialized yet, and the overnight stuff stayed north in Oklahoma. Expecting 83° for a high later today with significant south winds. Tonight they shift from the north for a low tomorrow morning of 46°. Variable weather for the next ten days. Took advantage of the wind-free day yesterday to rake some leaves for the compost pile. There will be more as only about 2/3 of them have fallen. Today's wind might take care of that. Garden prep for the spring is coming along nicely. I added 2" of aged wood chips, a layer of wood ashes and 3" of grass clippings to the surface before incorporating it all into the soil. It will loosen my heavy black clay soil so that it is more workable this spring for planting.

A couple of sausage, egg and cheese biscuits should do it for me this morning Francine.

Thanks as always for the likes, reactions and comments regarding the layout progress yesterday; Guy, Sherrel, Joe, Phil, Chad, Garry, Curt, Hughie, Tom, Jerry.

It was a very slow progress day out in the train shed yesterday. I mostly ran trains while waiting for paint and glue to dry. Painted some additional detail parts for Wayne Feeds. I cleaned and sorted some junk that had accumulated on the workbench, however almost none of it got removed! Over in the railroad maintenance yard, I started adding ground cover, ground foam and fine ballast for gravel. In the paint booth, I painted a large handful of ties with some rattle-can black paint, to use as eventual detailing in the yard. Decided that I need to acquire some type of jib crane to add to that scene.
Work yesterday didn't warrant any pictures, so I'll post some of my most popular consumer small businesses, bars and speakeasies.
My smallest bar is Archie's Place. It's in the middle of a Downtown Deco kit called Addams Ave. Part I. This is a Hydrocal kit.
IMG_5008.JPG

Another is the Green Door Lounge. It's a laser-cut wood kit from Blair Lines.
IMG_5010.JPG

Murphy's Bar is next in the parade. It's a DPM kit known as Skippy's Chicken & Ribs.
IMG_5011.JPG

I still lack an interior and when I get to finishing this part of the layout, there will be an outdoor beer garden overlooking both the train tracks and a small stream.
Over on the main drag in Vernon, is Saulenas Tavern. Another laser-cut wood kit, this one from Bar Mills.
IMG_5012.JPG

Down the road from Saulenas is Second Class Saloon. This is a Grandt Line plastic structure.
IMG_5013.JPG

I have a few more, but I need to take some better pictures than I have right now. To be continued.

Troy - With very few exceptions, I rarely solder joiners/track. Since I attach feeders every six feet or less and to at least one lead off every switch, it isn't necessary for me. I am very lousy at soldering anyway. I attach the joiners very tightly and fortunately I don't get much if any at all layout expansion/contraction. To fill unexpected gaps between rails (I am not perfect), I use some type of Evergreen Styrene, which can be cut and fit into the gap. While I whittle down a piece of I-beam, there are some other shapes that will work. Once I paint the track, you can't tell that it's there. Of course this is much easier in HO scale than N. Filling the gaps with solder or putty could work as well.

Today is National Pickle Day, so pucker up!
Everybody have a great day and stay safe.
 
Morning! A very calm, fairly warm morning at 6:30am; 23°F with 0% chance of precipitation. The winds arn't supposed to act up today, either. It looks like a nice day to go check out the lake, and get some fresh air during this social-distancing period. - I'm hearing the cold is making it's way down from the arctic, and bringing some snow with it. The real winter should be upon us this week.

The wife made me finish putting up the Christmas lights yesterday, after the annual argument that it is still too early. She wins that fight every year!
Here's a crappy photo of the homestead all lite up last night:
Light_2020.jpg

As soon as I turned those lights on, other neighbors took note, and turned on their lights. - Actually, I'm glad they are on; it brings my wife joy!

On the railroad side of things, here is a photo of a center-beam flat that I took this past autumn:
CntrBm_GNRR7386_09-07-2020.jpg

I archive whole sets of photos of different rail cars. It's kind of a secondary hobby.

Troy - It appears you have a little bit of learning and practicing to do in the soldering business. I find that an electric soldering pen of no greater than 25watt seems easiest for me to handle in hobby work. The solder I use is .75mm. - I'm not at a stage where I solder track together, yet. I do intend to solder sections of it in the future, though, and have given it some thought. There is a picture in my head of just touching the bottom of the fluxed rail joint with the solder pen to warm it up, followed by a touch of the thin solder. I'm not an expert, though.
I suppose the only reason I would want to solder track, is to assure continuity over it's length. It just seems like that added function to acquire peace of mind.

Willie - I like all the bars and saloons. Is that a Ni-Cad battery you are using for the Murphy's Bar exhaust fan?

Rich - Thank you for the interesting photos of British railroads.

Umping Uimmy! I've been on this computer for 2hrs already this morning; I'd better get out of here. Have a good one!
 
Good Morning Coffee Shoppers......Hope this Saturday finds every body well!
A couple of raisin muffins and an oj please Flo....
There are several brands
Alan, I'll have to check that stuff out. Somebody mentioned JB Weld. I have used that on the Ambroid Navy Helium tank car build. I needed something to fill a couple of small seams. I've also used 2 part epoxy to do minor filling, I guess what I'm saying is that I just hadn't come across the need to research any further on a "filler". Yet! I do have some Tamiya paint but the one Tamiya product I really like is the extra thin cement w/brush in cap. That makes gluing seams a breeze.

Boris...Nice looking track work you got there! Did you use any kind of a guide, or just "eye ball it?"
Great pics you always post.....


Walt...Thanks! That is my first try at a Campbells' kit. If I remember correctly, it took me about 2 1/2 months to build. Was quite fun.

Willie...Yes, that storms main part got here about 5 last night. Some side ways rain, side ways snow, some pretty decent winds, but I don't believe they got very close to the 70 mph gusts the weather gal talked about. Did have a power outage, it didn't last but maybe a minute. Am so glad too see the moisture......🌧🌧
The Long Bell....I do feel very lucky that I live in an area there is a lot of different kinds of railroading history.
Quincy Oil... Thank You! I had bought that kit around 10 years in anticipation of a layout......
Vacuum....wow, I could only imagine the look on your mom's face as the felt cloth was headed for the throat of the vacuum.....

I remember back in the olden days of yore, we would place some baking soda in a void, then add some CA to it.
That had too have an interesting texture when it set up!

Curt... Thank You! You can see I had changed the scene once before with the track work & the patch of white on the left of the warehouse. That's were I cut out the foam the thickness of the plywood that the warehouse is setting on. I had to go that deep to get the loading dock down to box car door height. To keep the building stable on the plywood, I inserted styrene post thru the plywood at strategic places inside the building. You can easily pull the building off, but stays put when setting there.

Rich... Nice Pictures...always interesting to see how other country's have their rail works.

Willie...really like the Green Door Lounge!

Thanks all for the like & comments........I saved this photo from work, I'm always looking for different loads, and these flat car loads are on my wish list.
(Ideas for gon's too)
WW2 Tanks.jpg


EVERY ONE HAVE A GREAT DAY!
 
Good Morning to all RR Fans! Starting the day off at 46 degrees with 70 expected later. Tomorrow is forecast at 83 and then 88 on Monday (YAY) !

FLO - A cuppa Jo to start - then one of MEL's great garbage omelets, ok throw the sink in as well!
a pile of sausage patties, couple pieces of sourdough toast and a coke to wash it down with, please. I got me a ton of stuff to do today and need the fuel!

Yesterday I went with my neighbor over to an old nursery where he is working and had stored a Sears 10 inch table saw. It is the same model as the one I have except it is several years younger and has a much better motor. Since the bearing on the one I have sounds terrible, we are going to swap them out since the newer one is a giveaway from a deceased person and was donated to the church. Long story somewhat made shorter - we had to "unload" a storage shed just to get access to the saw - then had to remove doors to get it out of the room. This would have been much easier if the building had not settled and jammed the doors so they would not open - well one door anyway. Then we had to construct a ramp in order to load the thing in my truck - that took the wind out of a couple 78 year old guys I'm telling you. I find it hard to believe that I used to do things like this by myself years ago.
When we got back - I backed the truck up as close to the garage door as I could, threw a tarp over the saw, secured the tarp with a rope, and left it until today.
Today's mission is to unload the saw - try it out to see if I want to keep it and if I do - load up mine and take it down to the church around back where the "workshop" is and unload it there for them to use. I just hope that the two of us have enough ump left to do all that; I am quite sore and stiff after yesterday's operation.

Great photos and stories this morning from all!
 
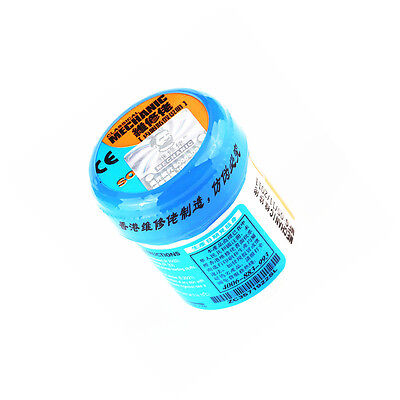
TROY - I use this for tiny, small work such as your rail joiners.
Just a little on the end of a toothpick dipped in it and applied to where you want to solder - then touch the hot iron to the rail.
Presto - the solder melts and flows into the joiner - no blobs!


I notice that this one is out of stock, but there's others- I just like this one!
 
Status
Not open for further replies.


Back
Top