PRR T1 4-4-4-4 BLI MINIMUM TURNOUT RADII


Articulated locos should have less problems than locos with a number of big drive wheel all in a row.

Go to the peco website and get some FULL SIZE paper templates of their turnouts, then use them in your track planning.
I laid down some brown paper (like they use to protect floors during home/office-construction) and drew pencil lines and used those switch patterns to lay out my layout. It was fun doing it that way.
Full Size Paper Templates
Hi thanks for the post, I was aware that articulated locos are designed to negotiate tighter curves, but I remember reading a post that the T1 made by BLT does not really work as well as a regular articulated loco because of reasons now that escapes me. The take home message was Byer beware when using the loco on tighter curves.


As for the template's I did download some from the Peco site but the problem I had was The majority of points I am using have been inherited from an old layout that I dismantled

My initial plan was to rebuild using a lot of the same rolling stock carried over from my old layout. My previous layout was based on Australian railways, the locos used are a lot smaller locos than American locos. So the transfer should have been quite simple. I pre-designed a layout to fit the available space and everything was going to plan, But I'm sure you can appreciate that this is a hobby that is only limited buy your imagination, there are endless possibilities. (My mind began to wonder) it has now become an idea that is constantly evolving.


Since my last post I went out to the shed and removed all my curves and converted them to 24" as a result I uncovered a number of points that should suffice as I now know they are Peco #5 curves. Monumental job though. I think this will better in the long run.


Yes, mix the dry ingredients well, then spread them as best you can. It will be lumpy. I used a small glass baby food jar to roll it out smooth, and I forget what else I did to try to make it look 'lived in'.

Then, I sprayed it with 70% alcohol in small patches so the alcohol wouldn't evaporate too soon before I applied a spray of the light glue mixture. Note that the glue solution also has two drops of liquid dish detergent to help break surface tension wherever it is applied. Important. The isopropyl alcohol does a good job at first doing that, but it doesn't penetrate as far as the glue will because it dries so quickly.

I always, but ALWAYS, draw a scale diagramme first when planning a layout. This initially confirms the concept. Then, I go to the cleared space and lay out the edges of all the benches with 3/4" cheap masking take. Next, start at a measured spot, per the plan, and commence using the same tape to mark out all the curves and tangents. Use a length of lath to fashion a trammel with a small hole every inch and an end-pin for a swivel point for the curves. When it comes to points, USE A REAL TEMPLATE!!!!!!!!!! Beiland suggests this, and it is about as vital as could be. People fool themselves when it comes to figuring where a point is going to go, how long it is if it's commercial, and how much the diverging route actually diverges. If you bugger this up, your entire track system will suffer, and so will your enjoyment.


Thank's for the tips I will definitely try your idea with the plaster when I get to that stage.

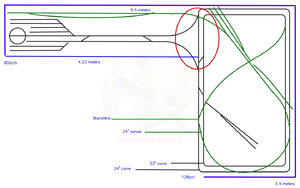
When I started planning my layout I took a similar approach. I first made a rough drawing using a basic drawing app. The layout is an L shape design. So I had limited space to design loops. To get the optimum running space I measured the width of the main running area found the centre and used a trammel that I pre-measured and cut and simply drew my curves. I layed my track by simply following the lines. It worked fine until I came to the conclusion that the layout was too restrictive. I originally wanted everything to be within easy reach but it's not going to be possible if I wanted to diversify what I run.


As mentioned above I have since redesigned all my curves to 24". it was a bit of work but I managed to finish the job today. Turned out ok. As for the points. I managed to pull most of them when I was pulling up track so I can rethink how I 0properly plan them out.

I must admit, I'm so glad I sent a post. All the advice I have received has helped me rethink and better plan the rest of my layout. can't thank you all enough.
 
Hi thanks for the post, I was aware that articulated locos are designed to negotiate tighter curves, but I remember reading a post that the T1 made by BLT does not really work as well as a regular articulated loco because of reasons now that escapes me. The take home message was Byer beware when using the loco on tighter curves.
Not familiar with that loco, so I can't say. Perhaps not articulated in the same manner,...may google it?

As for the template's I did download some from the Peco site but the problem I had was The majority of points I am using have been inherited from an old layout that I dismantled
Not sure I understand your posting here? Are you saying that some of your older turnouts were 'settrack' rather than 'streamline' Peco ones? The set track ones were definitely tighter radi ones.

I also had trouble using that #4, #5, etc designations for describing Peco turnouts. I use the Peco language,...small, medium, large. Do you realize that the Peco turnouts are different than many others in that the diverging route of the turnout is a constant curve rather than straightening out at the end?

Double curves ! Here I use the same term that Peco uses, 'double curve' rather than just 'curved' turnout. To me it better describes this style turnout. The 'set track' double curves are a lot tighter radi than the streamline one. The streamline one is a fairly large combo of 30" & 60" radi. At first I thought these would be useless for my relatively small. tight layout, BUT I have found them to be REALLY USEFUL in blending curves (often referred to as easements, etc).

I have also discovered another thing i like about using Peco switches. Because of their geometry I have been able to come back to my originally layout plans and replace some of my 'small Pecos' with 'medium size',...that effectively gives me a larger radius diverging route,...better for steam locomotives.
 
Not familiar with that loco, so I can't say. Perhaps not articulated in the same manner,...may google it?


Not sure I understand your posting here? Are you saying that some of your older turnouts were 'settrack' rather than 'streamline' Peco ones? The set track ones were definitely tighter radi ones.

I also had trouble using that #4, #5, etc designations for describing Peco turnouts. I use the Peco language,...small, medium, large. Do you realize that the Peco turnouts are different than many others in that the diverging route of the turnout is a constant curve rather than straightening out at the end?

Double curves ! Here I use the same term that Peco uses, 'double curve' rather than just 'curved' turnout. To me it better describes this style turnout. The 'set track' double curves are a lot tighter radi than the streamline one. The streamline one is a fairly large combo of 30" & 60" radi. At first I thought these would be useless for my relatively small. tight layout, BUT I have found them to be REALLY USEFUL in blending curves (often referred to as easements, etc).

I have also discovered another thing i like about using Peco switches. Because of their geometry I have been able to come back to my originally layout plans and replace some of my 'small Pecos' with 'medium size',...that effectively gives me a larger radius diverging route,...better for steam locomotives.

"Not sure I understand your posting here? Are you saying that some of your older turnouts were 'settrack' rather than 'streamline' Peco ones? The set track ones were definitely tighter radi ones."

Thanks for the message, the points I salvaged where a mixed bag of different points not sure if they were streamlined or not because they are over 10 years old. I cleaned them and have them operating well enough just not sure of all the sizes most of them are medium I believe. Not sure if they are set track ?
 
The T1 is not an articulated locomotive. It has two sets of drivers in a rigid frame. It does not pivot or swivel. The two center driver sets are blind, with no flanges, but it is still a very long wheelbase.
 
Yes, the T1 Trust is attempting to build a real 1:1 scale version of the T1, but the idea, I believe, is to improve it where it makes sense to do so for the sake of efficiency and durability. They already have several components, and are getting donations in dribs and drabs. I am optimistic, but realistic, and don't expect it will run within the next 10-15 years...if at all.
The T1 is not an articulated locomotive. It has two sets of drivers in a rigid frame. It does not pivot or swivel. The two center driver sets are blind, with no flanges, but it is still a very long wheelbase.

Correct, just like the prototype. I have run my T1 on tight curves down to 22", if I recall, and didn't have a problem. Where it might be a problem is on turnouts where the two inner blind driver sets bridge turnout rails of opposite phase. Happened to me. I had to mangle W/S #7 turnouts badly for that reason, and also to widen both routes so that the turnout's twin radii came somewhat closer to the stated claims by Walthers. My solution to the shorting was to use a Dremel cut-off disk and to sever the diverging frog rail about 6 mm outboard of the small plastic insulator. That was a permanent fix.

It really is a very long locomotive with that massive tender, as I attempted to humourously point out in the following photo:

index.php
 
Last edited:
The T1 is not an articulated locomotive. It has two sets of drivers in a rigid frame. It does not pivot or swivel. The two center driver sets are blind, with no flanges, but it is still a very long wheelbase.


I had a closer look at the loco through images and I see what you mean. I never noticed that, i'm constantly learning something! Can I ask what is the purpose of this given that it would make more sense to me having both wheel bases articulate?
 
I had a closer look at the loco through images and I see what you mean. I never noticed that, i'm constantly learning something! Can I ask what is the purpose of this given that it would make more sense to me having both wheel bases articulate?
By doing this, they could use smaller cylinders and lighter main rods, making it easier on the track. Also, they were hoping for faster acceleration from two sets of smaller equipment. I'm pretty sure the acceleration thing didn't work like they wanted, and the engine would spin the front drivers very easily. The would grind off the metal on the rails. So, while there was less pounding from the rotating weight, there was more rail head wear.
 
The typical main line curve in the Pennsy prototype, where passenger trains were routinely doing 80+ MPH, would come to 8 foot radius in the HO world. Articulated long-framed steamers were designed both for power (four cylinders vs. two, and a firebox big enough to park an F-350 inside), and for tighter curves that might be found in the mountains, such as in the Canadian Rockies were curve radii are in the order of 300 feet or so. Even more, most yards have pretty tight curves in them, and the articulated long steamers had to negotiate them as well. Our BLI Duplex, the T1 is in keeping with the prototype, and requires long curve radii because otherwise they'd be track straighteners. :p

The Union Pacific had their 9000 series 4-12-2 rigid frame, three cylinder, steamers. They also have to have blind drivers in the case of the BLI version.

index.php


The brass hybrid BLI Q2:

index.php


Q2 at speed, in winter:

index.php
 
Last edited:
Yes, the T1 Trust is attempting to build a real 1:1 scale version of the T1, but the idea, I believe, is to improve it where it makes sense to do so for the sake of efficiency and durability. They already have several components, and are getting donations in dribs and drabs. I am optimistic, but realistic, and don't expect it will run within the next 10-15 years...if at all.


Correct, just like the prototype. I have run my T1 on tight curves down to 22", if I recall, and didn't have a problem. Where it might be a problem is on turnouts where the two inner blind driver sets bridge turnout rails of opposite phase. Happened to me. I had to mangle W/S #7 turnout s badly for that reason, and also to widen both routes so that the turnout's twin radii came somewhat closer to the stated claims by Walthers. My solution to the shorting was to use a Dremel cut-off disk and to sever the diverging frog rail about 6 mm outboard of the small plastic insulator. That was a permanent fix.

It really is a very long locomotive with that massive tender, as I attempted to humourously point out in the following photo:

index.php

Your photos are really something! I can't wait for my T1 to arrive. I have uploaded a photo of a frogpoint indicating what I think you mean about altering the length of the outboard diverging frograil? I hope i'm not being to forward, but I have also included a rough copy of my layout design and marked in red where I feel I may run into problems with the T1. I have included measurements of curves and bench space as well. I was hoping to get your opinion or some pointers to consider if you see anything wrong with the overall design and where I may run into issues? All the points connecting the mainline are both large and medium Peco points.The area in green is upper level.
 

Attachments

  • TurnoutDiagram.jpg
    TurnoutDiagram.jpg
    181.4 KB · Views: 115
  • Layout.jpg
    Layout.jpg
    399.7 KB · Views: 103
I'm glad you posted those images.

First one: the problem will be on the opposite rail, somewhere very close to the 'incision', or gap. That diagramme makes the divergence very exaggerated for, say, a #5. On my #6 Pecos, the divergence is much less, and that is why the there might be a problem there if the metal tires bridge the two frog rails AFTER the gaps...going right in the diagramme. But I didn't find the problem in straight turnouts, only the curved #7's I purchased from Walthers/Shinohara. These are turnouts where BOTH routes curve, but in the same direction. A 'wye' turnout has both routes curved, but they split up and diverge from each other.

If you find a non-curved Peco causes a short for any locomotive of any type/manufacturer, a quick and effective solution is to paint both frog rails with clear nail polish for about 5 mm starting at the insulators and working out toward the two frog rail ends.

Your second diagramme shows that you have at least two critical areas where you will have shorts caused by phase/polarity conflict. You have what amounts to a 'turning wye' where you have the red circle. By themselves, as you have them configured, neither of those two parallel tails is a problem. But, as soon as you cross over at either diagonal to the left of the circle, crossing over to the other parallel tail, you will get a short somewhere because you MUST change direction, at which you MUST either wire differently or use a 'reverser' or DPDT toggle to reverse the polarity/phase.
 
I really appriciate the time and effort you have invested to helping me out, it is very much appreciated. As i'm sure have guessed but I am no engineer (haha) but I do enjoy the learning experience and working things out, learning from others and a bit of trial and error.

I have updated the diagram to show you how it has been wired. It is DC (analogue) operated. Yes there is some fiddling with direction when locos cross points but at the same time it makes for a more interesting experience. Happy to have your input.
 

Attachments

  • Layout.jpg
    Layout.jpg
    505 KB · Views: 104
Peco Turnouts
I think you will find these discussions very interesting,... https://model-railroad-hobbyist.com/node/31296

I can't find the peco web page I wanted to show this radi figures, so I will just post this copy of a posting here. Take notice of the different radi listed for each size turnout,..


For Code 100 rail
Set track radius #2 (ST240-ST242) 438mm (17 1/4") Insulfrog only. 22 1/2 degrees

Streamline Turnouts
Short radius (SL91/SLE91-SL92/SLE92) 610mm (24") 12 degrees
Medium radius SL95/SLE95-SL96/SLE96 914mm (36") 12 degrees
Long radius (SL88/SLE88-SL89/SLE89 1584mm (60") 12 degrees


Back
Top