N
You are using an out of date browser. It may not display this or other websites correctly.
You should upgrade or use an alternative browser.
You should upgrade or use an alternative browser.
N
NP2626
Guest
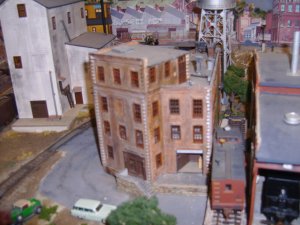
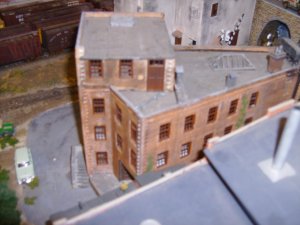
The above building is a pure Curren Kitmingle. It was simply entitled a "Wedge Shaped Factory" and was described in Art's book "Kitbashing HO Model Railroad Structures". Mine is made from two Model Power Burlington Mills kits. Other manufacturers who made this kit where Pola, calling it a Store Front Appartment, AHM and IHC made it as Joe's Barber Shop.
When I got Art's Book shortly after I started my layout, Two building just looked the part of what I wanted to have on my layout, one was this one and the other, which I am in the process of buying two kits for as we speak, is the Gambol, Waite & Hope Company, made from AHM or Tyco Freight Houses. Walthers still makes two of these structures under their Train Line Series of structures, one is a brick building and the other is Board and batton, like Curren's original.
My wedge shaped factory is used as the headquarters for my Northern Pacific Butte Shortline division. At the time I built it I wasn't sure where I was going to place it. However, I knew because of it's wedge shaped foot print, I should be able to place it near my roundhouse which was going to have a very unusual foot print. I didn't quite have all the appurtenances for the roof that Art had in his junk box; Water tank, N scale tank car. However, I was able to find things to make the roof interesting. It was a fun project! I added lights to one floor of the building figuring that this building would be pretty much vacant after 5:00 Pm until morning. Since I was unsure how this building was to be placed on the layout at the time I built it, I finished all four side of the building.
At the far right on the roof is a Pigeon Coop. Obviously someone pretty high up the food chain was able to have his hobby at work!
Last edited by a moderator:
N
NP2626
Guest
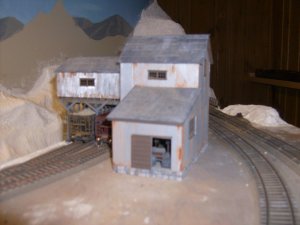
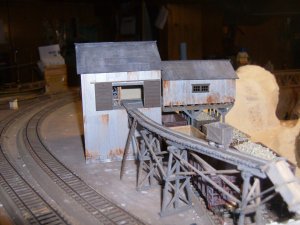
This is my Deepole Mining complex, again another Copper Mine. There are other structure at this location which have been removed, so I could better show the mine structures and more structures will be added some day. This structure uses Evergreen Scale Models Corrugated Sheet Metal siding. The building wasn't designed with plans, it was simply built, as I had an idea of what I wanted. Drawings are helpful if you feel the need and a drawing is fun to produce. Many of my structures are built on pieces of ceiling tile as this gives a good foundation. As you can see I find weathering structures as fun and to me, as necessary as weathering my freight cars. The tipple simply buts up against the mine building and the trestle coming of the back side in photo # 2 is where the tailings are removed from the ore and dumped on the ground polluting the river which flows by. Remember, I model 1953, so pollution was not on anyone's radar yet. In photo # 1, through the door on the lower level is some of the winch equipment for raising and lowering the elevator going down into the mine shaft.
Last edited by a moderator:
N
NP2626
Guest
View attachment 61531 View attachment 61532
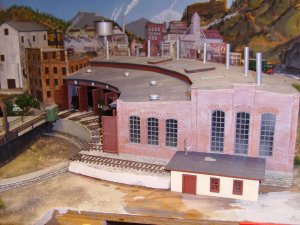
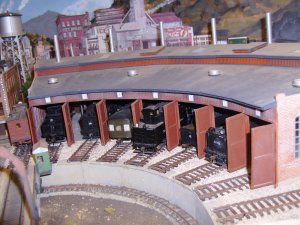
This is my 7 stall roundhouse. It sits adjacent to my Bowser Turn Table. It is made from a two Heljan three stall Roundhouse kits that where given to me by a friend from the only model railroad club I have been a member of. Obviously, he did not like the kit. I shortened the length of the round house stalls and it's total length is shown in photo # 1, ending at the edge of the photo. Like I said previously, I like to build my structures on ceiling tiles and this structure is no different. The stalls are numbered, going to the right. So, in actuality there are nine tracks on the Roundhouse foundation piece, one to the left, seven stalls and one on the right. The reason I shortened my Roundhouse was I did not have room for it at it's full length. I did all my calculations, given how close to the turntable I needed to make the building. Got the radials all figured out, using the diameter of the turntable and drew my lines on the ceiling tile. When I was happy with the layout, a laid track and stripped ties off the stall tracks where they would be within the building and held the rails in place with spikes and CA on the Round House floor, then I painted the floor with Aged Concrete. At every stall juncture there needed to be a framework supporting the roof of the building. I drew up a wooden support frame drawing and built the frames similar to how model airplanes are built over their plans. This assured that I would get six frames that where close to identical. I used gussets to help strengthen the frames. Then I drilled holes in the Roundhouse floor to drop the frames into and glued them in place one at a time, using a square to make sure they where square to the floor and blocks to raise them to their proper heights. before I glued the walls in place I added thinned white Acrylic paint that flowed into the spaces between the bricks to look like the cement used to bond the bricks in place, did a little weathering to the walls and then glued the side and back wall pieces in place. I also glued the headers above the doors in place. All of this structure assured that what had been built so far was strong. Each stall had three pieces making up it's roof. Before I placed the roof pieces I drilled holes for the brass tubing chimneys that would funnel locomotives smoke out of the round house. You can see that two of the roof pieces have hatches in them, this is where I installed lights for the interior and the hatches are removable allowing bulb replacement. There are also sky lights above the stalls. Making the stall doors was somewhat tedious, there are 14 of them. They do not open and close. The glass for the windows had a coat of dull coat sprayed on them, making them look dirty. The little shop/office building along side the round house in photo # 2 is where all the connections to the round house track wiring is done. If you could see the building up close, you would see that from the angle it can be viewed from, all walls that can be seen have their brick face oriented to be seen, meaning some have the bricks to the outside and some have the bricks to the inside. There are work benches, machine tools and other details along the walls and open spaces between locomotives. I used some Vollmar? brick sheet to cover the foundation of the building.
This is my 7 stall roundhouse. It sits adjacent to my Bowser Turn Table. It is made from a two Heljan three stall Roundhouse kits that where given to me by a friend from the only model railroad club I have been a member of. Obviously, he did not like the kit. I shortened the length of the round house stalls and it's total length is shown in photo # 1, ending at the edge of the photo. Like I said previously, I like to build my structures on ceiling tiles and this structure is no different. The stalls are numbered, going to the right. So, in actuality there are nine tracks on the Roundhouse foundation piece, one to the left, seven stalls and one on the right. The reason I shortened my Roundhouse was I did not have room for it at it's full length. I did all my calculations, given how close to the turntable I needed to make the building. Got the radials all figured out, using the diameter of the turntable and drew my lines on the ceiling tile. When I was happy with the layout, a laid track and stripped ties off the stall tracks where they would be within the building and held the rails in place with spikes and CA on the Round House floor, then I painted the floor with Aged Concrete. At every stall juncture there needed to be a framework supporting the roof of the building. I drew up a wooden support frame drawing and built the frames similar to how model airplanes are built over their plans. This assured that I would get six frames that where close to identical. I used gussets to help strengthen the frames. Then I drilled holes in the Roundhouse floor to drop the frames into and glued them in place one at a time, using a square to make sure they where square to the floor and blocks to raise them to their proper heights. before I glued the walls in place I added thinned white Acrylic paint that flowed into the spaces between the bricks to look like the cement used to bond the bricks in place, did a little weathering to the walls and then glued the side and back wall pieces in place. I also glued the headers above the doors in place. All of this structure assured that what had been built so far was strong. Each stall had three pieces making up it's roof. Before I placed the roof pieces I drilled holes for the brass tubing chimneys that would funnel locomotives smoke out of the round house. You can see that two of the roof pieces have hatches in them, this is where I installed lights for the interior and the hatches are removable allowing bulb replacement. There are also sky lights above the stalls. Making the stall doors was somewhat tedious, there are 14 of them. They do not open and close. The glass for the windows had a coat of dull coat sprayed on them, making them look dirty. The little shop/office building along side the round house in photo # 2 is where all the connections to the round house track wiring is done. If you could see the building up close, you would see that from the angle it can be viewed from, all walls that can be seen have their brick face oriented to be seen, meaning some have the bricks to the outside and some have the bricks to the inside. There are work benches, machine tools and other details along the walls and open spaces between locomotives. I used some Vollmar? brick sheet to cover the foundation of the building.
Attachments
Last edited by a moderator:
Excellent, MARK!
Nice photos and narritive of the build. Really like the shorting of the stalls. Most of the roundhouses/ engine houses that were around during my youth usually had the tenders sitting half way to the outside. I suspect that a warmer climate contributed to that fact.
I am slightly confused as to how a "three stall" project balooned to seven stalls?
Did you plant some magic beans underneath it?
N
NP2626
Guest
Sherrel, I had to think about your question which left you confused. I must have used two kits. I really don't know, as all I got from my friend was a bunch of wall material.
N
NP2626
Guest
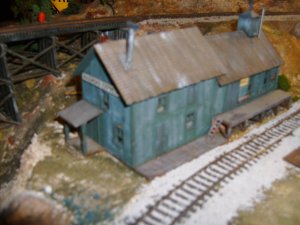
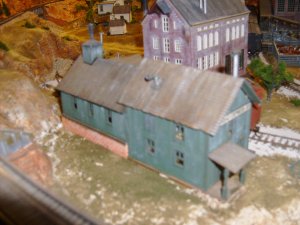
This is another kit bash from Art Currens book, done pretty much how Art described. It uses two kits to make. One is the Farm House that was designed by Revell back in the late 50s, early 60s and was also kitted by Heljan/Con Cor and the other, again was the AHM School House. I have found both of these kits available on Ebay at fairly attractive prices. This time, only the School House was raised up on a piece of ceiling tile and the riser covered with a Volmer? brick sheet. The farm house was built on a piece of 1/8th inch thick hardboard and the cieling tile under the School House glued atop the hardboard. I built everything pretty much te way Art Curren suggested, excepting I did not use the school house's belfry, as I thought it looked out of place on a freight house. This would be an easy kit bash to give confidence to someone wanting to get into Kit Bashing.
N
NP2626
Guest
I over estimated my ratio of how many Scratch and Kit Bashed buildings I have on my layout a while back. While it isn't as much as 50%, it is a significant number.
MARK- - My apologies to you ... I am embarrased! I misread your build of the roundhouse. I overlooked the word "two" and thought that you only started with a single 3 stall kit. Oh the pain!
You are quite good with adapting kits as to what you need .. good work!
You are quite good with adapting kits as to what you need .. good work!
N
NP2626
Guest
No problem! I actually changed what I said, after I saw that I had confused you, to make more sense. Like I said, all I received from my friend was a box of walls and thankfully it was enough to build my round house.
Last edited by a moderator:
N
NP2626
Guest
Thank you very much, very kind of you!
N
NP2626
Guest
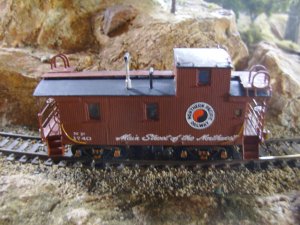
Here is a photo of my new American Model Builder's Laser Kit, 1700 Series N.P. caboose just completed. These are wonderful kits! For more on this kit, see my thread entitled Enjoyable Summer in general Discussions, also.
The Northern Pacific Railway Historical Association's annual Convention is in Duluth Minnesota this year on September 13th through the 16th. I have been a member of the NPRHA for many years and this is the first time I plan to attend the convention. Anyone else going?
Last edited by a moderator:
Always liked those "shorty" cabs! Nice work - looks good.
Doubt that I will make the convention - just a little far for me!
Doubt that I will make the convention - just a little far for me!
View attachment 58823
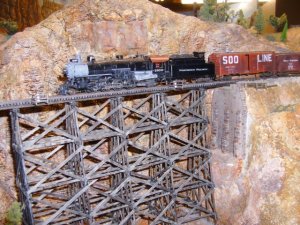
In this photo, the Woodland Scenics plaster impregnated cloth has been applied. With Sculpt-a-mold, I have attached one rock casting in the face of the hill above the trestle and some if not all the rock work has been completed. My rock work is made from Sculpt-a-mold, I love this product and have used many bags of the stuff on my layout. In essence, how I use it, is pretty easy; but somewhat time consuming to do. How I do it is to apply a batch of Sculpt-a-mold to a small area, maybe 8 inches by 8 inches. Once the place being sculpted is applied, I then take a putty knife; or, a table knife and carve strata and grooves in it. Generally in a patch as big as I've described the strata pretty much all goes in one direction. When I say carve, the Sculpt-a-mold is still wet and mold-able so maybe it's mold as opposed to carved. I actually find that as the Sculpt-a-mold starts to dry-out it becomes better for doing this detailing; however, once I have applied it, I am constantly working it. I would suggest using this process on small out-crops first, before tackling a large area such as what I am showing. I mold cracks, crevices, gobs and strata. The strata is made with a chopping motion and like I said, all of it going in mostly one direction. Between the 8 X 8 patches I've described, slight changes in the direction the strata is oriented adds interest and looks realistic. Like I said, the best way to attempt this process is to do it to a small out-crop; or, rock face. Take your time, take a breath and step back and look at what you've done. Do it a few times and eventually it will come to you.
Don't remember why I came upon this subject thread, BUT I did find your construction project of this trestle bridge VERY interesting. So I just had to bookmark it.
Brian
Do you find that you have derailments in the staging area with any regularity??Staging Yard Control Panel:
View attachment 58840
Essentially the purpose of this panel is to control the seven storage tracks here in staging. Again, you can see some of the turnout toggles here in this case, If the toggle is pointing into the storage track, the power is ON. If it is pointing away, the power is OFF. Here you can see, as previously mentioned, the room above the trains is wholly inadequate! If a derailment occurs in the staging yard, all trains in front of the derailed train must be driven out of staging, to gain access. I have to be overly cautious when entering or leaving staging. Where I to do over, I would have staging on drawer slides so I could pull it out to work on; or, just have staging out in the open.
Bachmann Northern 4-8-4
I've only gotten about half way thru this subject thread and must go off onto another effort at this point. I will return.
But a quick question first.
Do you or anyone else visiting here own one of those Bachmann 4-8-4 locos they came out with loaded with DCC,....item #50804 ??
I have several that I have yet to unpack, and just wondered about their running capabilities??
Brian


N
NP2626
Guest
Do you find that you have derailments in the staging area with any regularity??
Not regularly; but, when they happened, because of the lack of room, derailed cars where difficult to re-rail!
N
NP2626
Guest
I think you would be better served to ask this question in your own thread.
I've only gotten about half way thru this subject thread and must go off onto another effort at this point. I will return.
But a quick question first.
Do you or anyone else visiting here own one of those Bachmann 4-8-4 locos they came out with loaded with DCC,....item #50804 ??
I have several that I have yet to unpack, and just wondered about their running capabilities??
Brian


N

