
You are using an out of date browser. It may not display this or other websites correctly.
You should upgrade or use an alternative browser.
You should upgrade or use an alternative browser.
LED flexible lighting strips to illumnate a layout?
- Thread starter videobruce
- Start date
videobruce
Tower Operator
My bench supply only went up to 13 vdc which was no problem.
How about a dropping resistor across or in series??
How about a dropping resistor across or in series??
videobruce
Tower Operator
5050 strip
I ordered a 5050 version of these strips. I finally arrived.
I failed to notice the one I ordered was only a 30LED/meter. This strip was $18 delivered which I though was a good buy. The 3528 was $14 delivered. The 3528 strips I had are 60LED's/meter.
Anyway, here are the tests I did between the two types.
Differences from the 3528;
1. Wider strip,
2. Four conductor bus as opposed to two conductor (4 solder connections between each section),
3. Tri-color SMD's with separate red, green & blue LED's within,
4. Individual resistors (150 ohm) for each SMD instead of one per "3 pack".
You now have the option to run all three or any combination with additional circuitry, one of those optional controllers or something of your design by simply using different resistors or some type of rheostat design to vary the resistance (voltage) to each color to change the color temperature.
I retested current and then tested light output using a light meter set to a Lux scale measured three feet from each strip laying on the floor (easier to do it that way). I made numerous tests. (Due to the 3 amp limitation of my bench supply, I couldn't test voltage greater than 15.5 for the 5050 strip.)
5050 voltage & current:
12.0v - 1.6A - 35 lux
13.8v - 2.5A - 47 lux
15.5v - 3.2A - 55 lux
3528 voltage & current;
12.0v - 1.0A - 31 lux
13.8v - 1.5A - 44 lux
15.5v - 2.0A - 53 lux
18.0v - 2.8A - 65 lux
I would not recommend running much above 13.8 volts. I only tried 18 volts to see what the difference was. I measured temperatures over 100 degrees after less than 10 minutes.
videobruce
Tower Operator
finished product
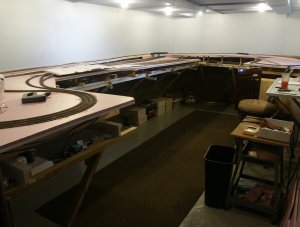
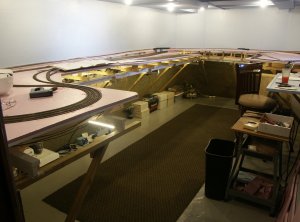
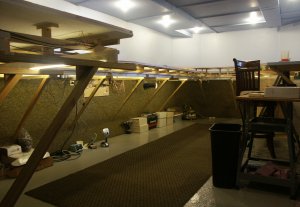
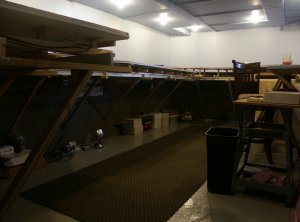
Though disappointed with my 'goof', I wound up using the 3825 strips the entire perimeter of the layout (with about four feet left over which I cut) and using the 5050 strip along the long portion. I also decided to switch the strips separately so I can have just the 3825's (smaller) strips lit as a ambiance lighting filling in below the table, not to work on, but only for show. Then switching in the parallel 5050 if I need to work for additional lighting.
I drilled holes through the 'L girders to route the strips without cutting and soldering jumpers between each. I (unfortunately) used a old tube of silicone caulk to provide additional holding power since there is no way that adhesive strip would hold on painted wood. It might do for glass, Plexiglas or polished steel, but not pine that was only primed. That was a mistake since the caulk apparently was past it's useful state in the tube. It seems to be holding, but I already found a few spots that have separated with the last strip I positioned. The caulk already started to set-up.
Below are pics of with and without the strips. The pics were taken in full manual mode so you can compare the light levels. What looks like a 'green/yellow' tint under the table is probably mostly from the reflection of the green carpet and the camera. There isn't that cast in person. Also, those boxes won't be there after the scenery is mostly done and the cabling will be pulled back and coiled or tied off.
Attachments
Last edited by a moderator:
John P
Active Member
I am trespassing in this thread, as the lighting system I'm playing with involves individual LEDs on sections of metal extrusion, not strips. But anyway, last night I put in a couple more bars and it looks like this. As I recall it, the color rendition is fairly accurate in the picture; I think it looks pretty good (and there was a witness present, who agreed).
http://tmrc.mit.edu/progress/reports/2012/11/IMG_2914.JPG
http://tmrc.mit.edu/progress/reports/2012/11/IMG_2915.JPG
These are 4 1W warm white LEDs per bar, placed about 2ft apart on 3/4 x 3/4 aluminum U-channel, each section 8" long. They get fairly hot, but not so you shout "ouch" when you touch them! The two bars I put in last night are wired in series and they're driven by a constant-current supply running off a 30V input.
Charles Smiley
cspmovies
Bruce, the best way to make dimming is using pulse width control - not pure DC.
That takes electronics of course. Plus a long line of those things would radiate harmonics up into the AM radio 530-1700 Khz. range. So no baseball games next summer.
That takes electronics of course. Plus a long line of those things would radiate harmonics up into the AM radio 530-1700 Khz. range. So no baseball games next summer.
videobruce
Tower Operator
John P;
Why would you think you are "trespassing"??
I did see those shots elsewhere. How about some links for whatever these are?
The ceiling lights are only CF spirals on a dimmer control (except the two over my work bench on the extreme right). They only dim down around 1/2 their full output. The lighting is ok, but I might have to come up with some shields for the three along the length of the main portion due to position of ones head to keep the light out of your eyes.
Last edited by a moderator:
John P
Active Member
I'm using LEDs for lighting, but not the flexible strips that are mentioned in this thread's title. But it actually seems close enough that I won't feel guilty.
I'm not sure about "those shots". They're on the Progress page at the Tech Model Railroad Club of MIT in Cambridge, Massachusetts:
http://tmrc.mit.edu/progress/
Someone has been a speedy thief if they're available anywhere else, because I made the pictures myself and put them on the site on Wednesday night. That's the only place they've ever been shown.
If by "links for whatever these are" you mean what the components are and how they're used, see the Progress page for Aug 15 for a clear picture of what the LEDs look like and how they're mounted. I bought the LEDs from a Chinese supplier via an eBay listing like this one:
http://www.ebay.com/itm/1W-High-Pow...997?pt=LH_DefaultDomain_0&hash=item53f03f2275
The constant-current driver is like this (though rated for 8 LEDs rather than 6):
http://www.ebay.com/itm/High-Power-...665?pt=LH_DefaultDomain_0&hash=item58957a2b21
Shortliner2001
Member
My mate Chris is showing his new Florida layout at Warley, UK next weekend, and he has used LED strips - to see the effect , look here http://www.rmweb.co.uk/community/in...lorida-city-tri-rail-fec-and-csx/page__st__50 post #66
videobruce
Tower Operator
John P;
I couldn't remember where I saw that before. It was your previous post. You need one of these "drivers" for each device??
Not to get OT, but I can't see how anyone can make those bends in the linkage for those servos. I haven't gotten that far yet, but surely not looking forward to it.
I couldn't remember where I saw that before. It was your previous post. You need one of these "drivers" for each device??
Not to get OT, but I can't see how anyone can make those bends in the linkage for those servos. I haven't gotten that far yet, but surely not looking forward to it.
Last edited by a moderator:
John P
Active Member
The drivers produce constant current through any number of diodes in series, up to some maximum (6 or 8). You need a power supply that's at least as high as the voltage for all those LEDs, so it might be as high as 30V. But since the driver costs $4 or so, it makes sense to maximize the number of LEDs it operates.
As for bending wire, pliers, a small vise, and some drill bits to bend the curves around are what I use.
As for bending wire, pliers, a small vise, and some drill bits to bend the curves around are what I use.
videobruce
Tower Operator
Interesting about using a drill bit. But, the photo showed two distinct bends, not a loop;
http://tmrc.mit.edu/progress/reports/2012/07/IMG_2501.JPG
http://tmrc.mit.edu/progress/reports/2012/07/IMG_2501.JPG
videobruce
Tower Operator
I started to work under the layout doing wiring and these surely beat the temporary lighting that I was trying to use.
videobruce
Tower Operator
Matches the expensive house it is in.
The problem with LED replacement lamps (other than cost) is most the illumination projects out from the top, some from the sides, but little projects downward.
The problem with LED replacement lamps (other than cost) is most the illumination projects out from the top, some from the sides, but little projects downward.
I think the Hue bulbs do a good job of projecting light in all directions.
Pricing: http://store.apple.com/us/search?find=hue
$200 for three bulbs and a controller, or $60 for one bulb. WADABAGAN!
If I crapped money I might change out all the bulbs in my house and create some really nice scripting and interfaces for controlling them. As it is, they'll need to be about half that for me to even get started.
videobruce
Tower Operator
Things took a turn south
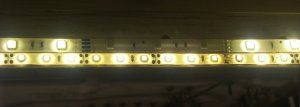
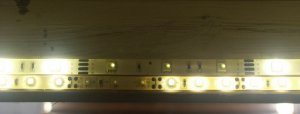
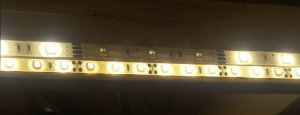
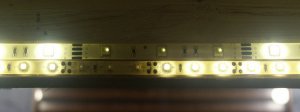
Resurrecting a older thread, returning from a three year hiatus, I have found seven '3 packs' have died. They are scattered around 1/3 to 1/2 the length of the strips which cover most of the layout. Most are the 5050's.
Taking a closer look some are not completely out. Each of these surface mount LED's appear to have three individual elements. You can see this in three of these attachments.
Worse, half of these appeared to have died in the past 2 days (around 4 hours of on time) after sitting for three years I'm wondering if 12v is too high .
These can't really be serviced, surely I have no intention of removing the strips or even trying to cut out the 'bad' sections unless a greater number of these die out. Typical Chinese QC.
Attachments
Disappointing news
Hi videobruce:
WOW, a number of them died?
I was just starting to read thru your subject thread here (just finished page 1), and it appeared that you were doing a very through investigation of the LED strip-light subject.
Since your first posting was back in 2012 I thought I would jump to the last page and see when you had last posted,...only to find out this disappointing news.
I was sold on the idea of using LED strip-lighting on my new double-deck layout within its own shed, but now I have to re-evaluate that option??
Is there anything you have learned over the past 5 years that would change your mind about LED lighting, and/or sources for LED's ??
On another forum that I was just beging to read about LED's I saw this link to an overview of them. I thought the explaintion was well done (better than some US companies), but then I took notice it was a Chinese company's web presence?
https://www.saving-star.com/smd-led-comparison
Last edited by a moderator:
Hawkesburytrain
Well-Known Member
Hi Beiland,
I'm using LED strips and was told to stay away from the ones on Ebay sold from China. They are very dim and do burn out.
I'm using LED strips and was told to stay away from the ones on Ebay sold from China. They are very dim and do burn out.
