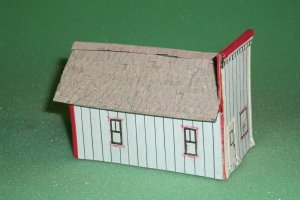
Juneco CN Cartierville station


The station is looking very good! I only have 13 Campbell building to build, and this Juneco structure has inspired me to start on them. The construction looks very similar to the Campbell's, and should go well. First though I have to find a place to store them until they are finished. I have 2 other Campbell structures that I built more than 25 years ago. They have inhabited the top of my layout for almost 10 years, but have gotten damaged, and I need to repair those as well.

This is the first 'seriously old-school' craftsman kit that I have built. (unless you count my sawmill) any other craftsman kits have been the laser-cut variety and require a lot less work. I'm thinking of starting Juneco's 250 ton icehouse kit soon, after I've completed a few smaller projects as well as the station.


That is one fantastic build, more than I ever tried. I was surprised when I saw the shingles as I copied an idea from somewhere to make my own.
Your shingles are very nice and even. Something that I didn't manage to do on the station (it adds to the rustic look though!)
 
Glen, they can be roughed up a bit. 100_0361.jpg
 
Glen,

The station is looking very good! I only have 13 Campbell building to build, and this Juneco structure has inspired me to start on them. The construction looks very similar to the Campbell's, and should go well. First though I have to find a place to store them until they are finished. I have 2 other Campbell structures that I built more than 25 years ago. They have inhabited the top of my layout for almost 10 years, but have gotten damaged, and I need to repair those as well.

Glen, not hijacking your excellent thread but I wanted to pass on a tip to Carey and yourself for storing buildings until they are ready for placement on the railroad. I wash out those clear plastic containers that different food items come in like pastry and cookies. The ones that have the cover hinged to them. They come in several sizes. Depending on the size of the structure I've gotten 2 or 3 smaller buildings into 1 container. In some cases the building might be taller than will fit and it is possible to lay it on its side so the cover will close. At the moment I have 8 or so stored that way. The containers can be stacked on top of each other on a shelf and being clear I can see what is in each one without rumaging through them and opening them up to have a look like you would in another kind of box, etc. When I get a chance later on I'll take and post a pic of a few. For really large items look into the disposable aluminum oven roasting pans that come with a snap on clear plastic cover. Once in a while it actually pays to go grocery shopping with the wife! :)
 
I finally finished shingling the roof last night.
004_zpsc137b66d.jpg

I'd add shingles to one section, wait for the glue to dry, then trim the ends and start on the next section. by recycling the trimmed shingle strips I just managed to have enough shingles to do the roof.
005_zps89b7379a.jpg

I added the caps to the peaks and valleys of the roof and the patch for the chimney. Next is the painting. Normally I'd use acrylic but since the shingles are held on by white glue, I'm going to airbrush the roof using enamels. The water based paint might loosen the glue.
 
Sorry it's taken so long to post an update. I got sidetracked on projects for other modelers and I couldn't get back to the model until now. I have colored the roof:
021_zpsfe3216c3.jpg


The instructions say to paint the roof black. I suppose back in it's original location of Quebec they would have used black asphalt shingles or something like it. My station is western so wood shingles make more sense. I painted the roof with Poly-S Railroad Tie Brown and then with testors Model master light tan to give it some variation.
 
Thanks Carey, I'm thinking of weathering the roof just a bit more with some grays.

In the meantime I added the chimney and started to build the street side platform
027_zps39ba5df0.jpg

As it turns out because I shortened the trackside platform I had enough material to build this one. I flipped the plan the trackside platform and re-used it to build the frame for the street side.
028_zpse867b0a9.jpg

I decked and stained it to match the other.
029_zps432e52cf.jpg

As I mentioned before I had a small screw-up on the front wall. there is a slight gap between the floor and wall but the new deck will hide it (with the help of some castings)
030_zpsa07bec93.jpg

Here the station is pretty much finished, with the exception of station name boards and the castings that ame with the kit. Speaking of castings:
031_zpsce236791.jpg

I was impressed with the number of details included, crates, barrels, luggage and 15 people. I sprayed them with primer and will paint them in my spare time.
 
Okay I'm calling this project finished, except for the castings. I drybrushed creamacoat mudstone onto the roof to 'grey' it a bit. The station is on the layout where it will go, but not in it's final position.

001_zpsa0b6ffe4.jpg
[/URL]
The area it is going in has to be raised about 1/4". and the roadbed by the track has to be cut to the tie edges for the platform to be in the proper place.
002_zps476cf2c8.jpg
[/URL]
Last thing I did was to add new station boards. The original 'Cartierville' is a couple 1000 miles for where this station would be.
003_zps986d1f34.jpg
[/URL]
 
Outstanding job Glen. Weathering the roof brought out the shingle detail better. Going to look great with the people and platform clutter in place.
 
Alright. I know I said the project was finished but I've had some spare time in the last couple weeks and managed to do the scenery around the station.
001_zpsf3236b15.jpg

I first cut the roadbed up the ties and installed a 1/4" piece of hardboard to bring the station and water tower up to track level. I painted the surface and masked off where all the buildings would go.
002_zps354967b3.jpg

it took a couple days but I painted all the figured and details included in the kit. I have to admit I was a bit stumped for clothing colors in the fifties but then I remembered the last Indiana Jone Movie was set in 1954. watching the city/university/train station scenes gave me the approximate clothing colors (If it's good enough for Spielburg....)
002_zps354967b3.jpg

After that it was jut a matter of installing scenery. Woodland scenics dark brown ballast (fine grade) for the raod and parking lots, WS static grass almost everywhere else. I also used WS bushes and trees.
003_zps2df6642d.jpg

I like how the fine ballast can be used as gravel. I used almost all the figures included in the kit in the scene.
004_zpsf5cde3aa.jpg

006_zpsc1f4a441.jpg

On the station platform the local Mountie is talking with the station master while a young lady searches her purse for her ticket.
007_zps2234ffe8.jpg

The trailer is from Interaction Hobbies (it's a laser cut kit)
008_zps6c0bc3cf.jpg

The WS ticket office as the CNR agent and wire service.
009_zpse6de2f63.jpg

We'll be getting the CN station master and updated vehicle soon, The CPR truck is making them look bad
011_zpsde142961.jpg

Overhead view. You can see the Kanamodel lineside buildings I built earlier this year, as well as a lot of figures, details ect.
012_zps1ab989ab.jpg

The cargo end. the crates all came in the kit. I added small paper shipping labels


Back
Top