
You are using an out of date browser. It may not display this or other websites correctly.
You should upgrade or use an alternative browser.
You should upgrade or use an alternative browser.
I could be rich...
- Thread starter JazzDad
- Start date
Alcomotive
Grandson of an ALCO Builder
All I can say is WOW!
JazzDad
Gandy Dancer
I would love to have some of those buildings for my city scene.
Maybe I can build some for you, at a discount? Let's say only $50,000?
I had a model building kit called "Skyline" when I was a kid. I had the biggest version of the kit, and I was able to make a skyscraper taller than me. You can get them on Ebay, I think they are HO scale. Here's a smaller version of the kit I had. I think I had two of these kits, to make bigger buildings:

I suppose you could get a 3-D printer and make your own building construction parts.
American Skyline Plastic Construction Set #92 Nearly Complete, Excellent Vintage | eBay
The pieces are clean, bright, and in excellent condition. The booklet has a few marks; it has seven sets of flags (missing nine sets). The set count is complete except for the eight C-3 parts that are missing.
www.ebay.com
I suppose you could get a 3-D printer and make your own building construction parts.
Last edited:
I wanted to get a 3-D printer to make parts, like monopoly game board tokens and hotels. And you can make small parts of RR cars easily. The basic 3D printers are not expensive, but they only print in one color, and only use plastic, but the bigger problem is how to get the machine to know the exact dimensions of what you are trying to copy. For that you would need a 3D scanner or some way to accurately measure the item...
I bought this on ebay (seller was in Georgia) a couple of months ago for a Lionel Diesel Box Cab 520. I suspect it may have been made with a 3D printer:
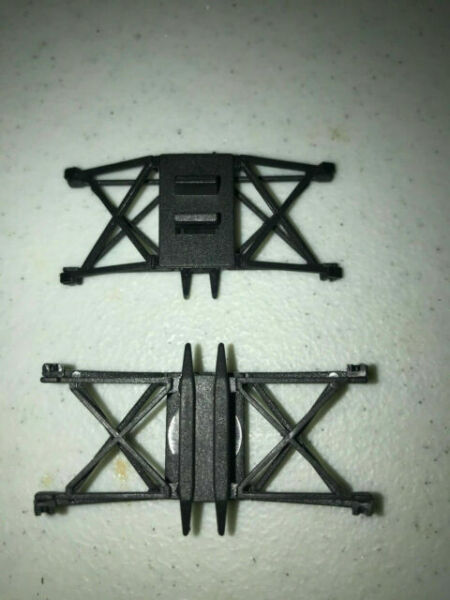
Set of 2 Lionel 520-35 Small Plastic Pantographs for sale online | eBay
Find many great new & used options and get the best deals for Set of 2 Lionel 520-35 Small Plastic Pantographs at the best online prices at eBay! Free shipping for many products!
www.ebay.com
kjd
Go make something!
My first professional model making job was at an architectural model shop. Depending on the level of detail, you won't get too far unless you can work for about $5/hr. There is probably only a couple hundred in materials and machine time but thousands in labor. I once built one of the tall buildings in downtown Seattle in 1/8" = 1ft or 1/96 scale. It was a simple massing model, basically just the shape and painted. It took me a couple days to finish and paint it and that, while big, was about as simple as they get. The lighted acrylic models take much longer, maybe 2 orders of magnitude.Maybe I can build some for you, at a discount? Let's say only $50,000?
I've also worked a fair amount with 3D printed parts and none come off the printer ready to use. If it is a small detailed part, there is always sanding involved. They are getting better but any defect is magnified by the scale. A feature that is .010" on the part is just under an inch in HO scale.
I had a model building kit called "Skyline" when I was a kid. I had the biggest version of the kit...
I had some version of this one. This looks like the right box, but there was no motor. Then again, we got it used from a friend of my mom after her son outgrew it, and it was obvious some of the pieces were gone. I had fun with what was left. The "panel" pieces were thin plastic, most were cracked or broken. So I usually just played around and built the girder framework for buildings.
It does seem to be about right for HO, and I recall the catalog even showing it with HO trains.
Gotta love the building on the left, for when you want your car parked right outside your office, LOL. Never mind how slow and dangerous that is, we're doing it because we can!
Last edited:
I've also worked a fair amount with 3D printed parts and none come off the printer ready to use. If it is a small detailed part, there is always sanding involved. They are getting better but any defect is magnified by the scale. A feature that is .010" on the part is just under an inch in HO scale.
That's why I still don't have one. When they first came out, they looked like the model parts were made out of beachballs. Then it got to softball size, and the golf ball. Today it's more like large ball bearings. It gets closer all the time, and some day I'll likely take the plunge.
There are ones that can do what I want now, and even do it in metal. But those are out of my price range by a lot!
twforeman
Certified Great Northern Nut
The resin printers are starting to get cheap - they are a lot better than the filament ones for small detail work.
But they are smelly and messy and a hassle if you don't use them all the time. I have a filament printer that I don't use enough, but I will probably end up with a resin printer in a little while. The key will be to find something that I can print and sell.")
But they are smelly and messy and a hassle if you don't use them all the time. I have a filament printer that I don't use enough, but I will probably end up with a resin printer in a little while. The key will be to find something that I can print and sell.
The key will be to find something that I can print and sell.
Right? And something that you can print and sell in a reasonable quantity, and that will pay for the cost of the resin and the printer and repairs and the electricity it uses and... Gee, back to why I don't have one yet. By the time I consider them affordable and worthwhile, so will everyone else, so there will be so much competition it will be tough to deal with.
I've also worked a fair amount with 3D printed parts and none come off the printer ready to use. If it is a small detailed part, there is always sanding involved. They are getting better but any defect is magnified by the scale. A feature that is .010" on the part is just under an inch in HO scale.
How did you get the dimensions of the part into the printer? To print a cube would be easy, just program in N" x N" x N" but for say, a monopoly token, like the tophat, the shoe or car, or a red hotel, how do you get the machine to understand the 3-D outline? Unless you can place the item in the printer, and have the machine duplicate it, sort of like a xerox copier? But what if you don't have the original part? The samples I see on the ads for these printers seem to be non-utilitarian, unless one appreciates weird "artwork".
Last edited:
How did you get the dimensions of the part into the printer?
The term 3D PRINTER sums up what they do really well. They're like you're regular printer, but they add layer after layer after layer.
To get the part into the printer, you have to provide a 3D print file. Don't know enough about 3D CAD to create your own? No problem! There is a vast network of printable designs online. Both free designs as well as ones for sale. The best known place to get them free is "Thingaverse".
Here's a random sample:
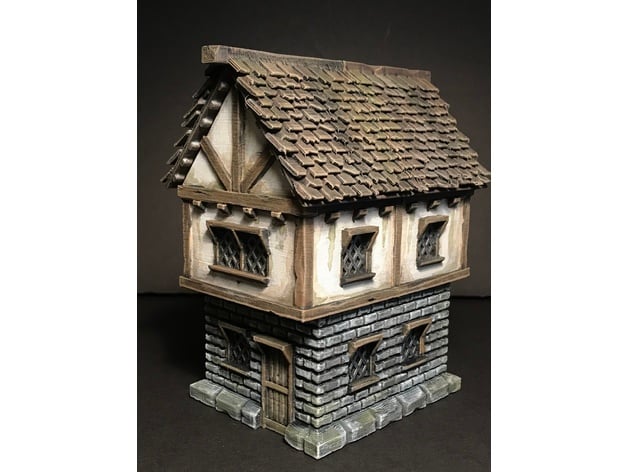
Village Terrain-Cottage by LeoMinorIndustries
Cottage terrain for fantasy villages or historic wargames. Designed to be printed without supports and looks great with 28MM figures
 www.thingiverse.com
That's a little cottage style thing, likely intended to be used by gamers for their tabletop game.
Searching "railroad" brings up lots of matches.
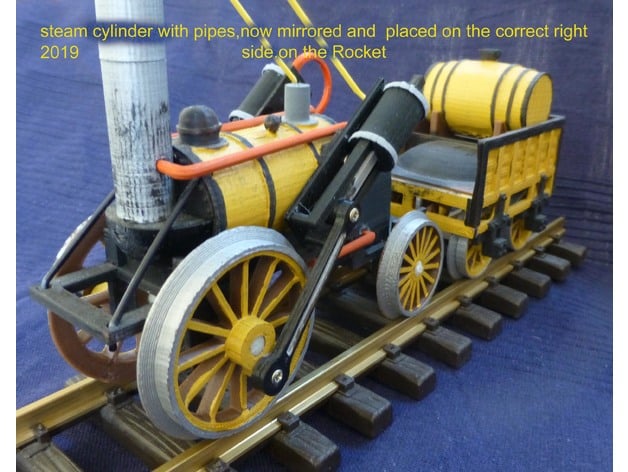
Stephenson Rocket, apparently printed to G scale.
 www.thingiverse.com
Stephenson Rocket, apparently printed to G scale.
Stephenson Rocket 1:32 train by UTJTrain
This is a building kit of the locomotive Rocket from 1829. It is a model that you rarely see on the model railway. would be nice to have one in my garden railroad. Which I now have. www.utj.se I have printed it on the Replicator 2X ABS. I do not believe you need a model railway to print this...
www.thingiverse.com
And what looks to be the ultimate project, both in terms of time and complexity. Expense too I suppose.
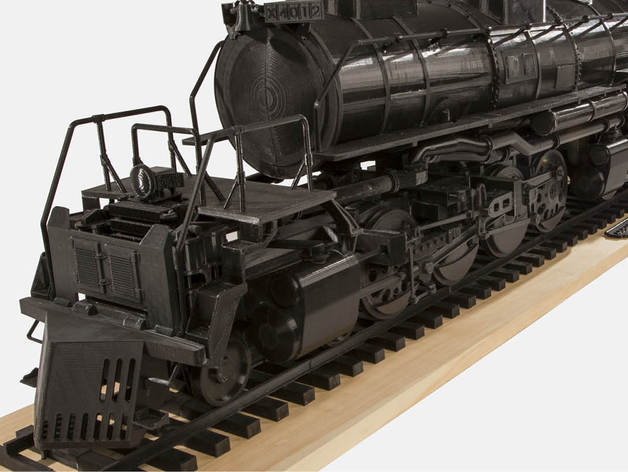
A GIGANTIC Union Pacific Big Boy.
 www.thingiverse.com
A GIGANTIC Union Pacific Big Boy.
Summary
This is a HUGE model of the 4-8-8-4 Big Boy, an American steam locomotive used by Union Pacific Railroad from 1941 into the 1960s. A special project commissioned by MakerBot to test limits of 3D printing, it was created and assembled by Paul Fischer.
Fischer spent between 700 and 800 hours drafting and another 1,000 hours 3D printing the locomotive on a MakerBot Replicator 2 Desktop 3D Printer.
The finished engine is six feet long.
Not a project for the faint of heart or short of time!
Instructions
Follow the "'Big Boy' Assembly' instructions in the PDF under the Files section. Sanding to fit pieces together will be required. The amount of sanding will depend on how many shells you use in MakerWare. Parts were designed without tolerances. Sanding to fit will be required. Pieces will likely need to be replated in MakerWare before printing.
4-8-8-4 Big Boy Locomotive by MakerBot
This is a HUGE model of the 4-8-8-4 Big Boy, an American steam locomotive used by Union Pacific Railroad from 1941 into the 1960s. A special project commissioned by MakerBot to test limits of 3D printing, it was created and assembled by Paul Fischer. Fischer spent between 700 and 800 hours...
www.thingiverse.com
kjd
Go make something!
How did you get the dimensions of the part into the printer? To print a cube would be easy, just program in N" x N" x N" but for say, a monopoly token, like the tophat, the shoe or car, or a red hotel, how do you get the machine to understand the 3-D outline? Unless you can place the item in the printer, and have the machine duplicate it, sort of like a xerox copier? But what if you don't have the original part? The samples I see on the ads for these printers seem to be non-utilitarian, unless one appreciates weird "artwork".
Somebody else has drawn most of the parts I've dealt with. They are done in a 3D drafting program like Fusion 360, Rhino, Inventor, Solid Works, etc. I've been making 2D CAD drawings of a hopper car and slowly converting them to 3D with the idea parts of it will be printed and other parts scratchbuilt. So far, I've only had the troughs printed. Building a model in 3D is also helpful if it's a complicated thing with dimensions on one part dependent on other parts.
Even scanning the original is an imperfect process that mostly provides the basics for redrawing it. The sum up, parts for the printer need to be done in 3D CAD and exported in a format the printer will understand. There is another step where the printer software slices the item into the layers it will print but that is mostly software processing. I hope that helps.
Even scanning the original is an imperfect process that mostly provides the basics for redrawing it. The sum up, parts for the printer need to be done in 3D CAD and exported in a format the printer will understand. There is another step where the printer software slices the item into the layers it will print but that is mostly software processing. I hope that helps.
Don''t know why I can't put 2 and 2 together, I do have a degree in Mathematics! Yes, just design the schematic in your CAD program, then feed it to the printer. I have seen people working at CAD programs, although never got into it. I did write a 3-D (3D in perspective) Rubic's Cube program and solving algorithm for a forgotten brand of computer and then worked on it with my Amiga, until Microsoft came along and crushed everything but business apps for the next ten years until they announced their own virtual reality and multimedia "breakthroughs"!
I was thinking that Pantograph (in Post #6) would be difficult to render in a CAD program, but then again, it consists of groups of similar parts, so it would be a lot of copy-n-paste shortcuts, that would cut down immensely on the time involved.
