Dave's Layout v. 4.0


Over the weekend I rigged up a wooden dowel and some copper tubing to make some remote switch selectors. I have been thinking about this for quite some time and it turned out much easier than I thought, I think I will putting in several of these to minimize my reaching over the layout all the time

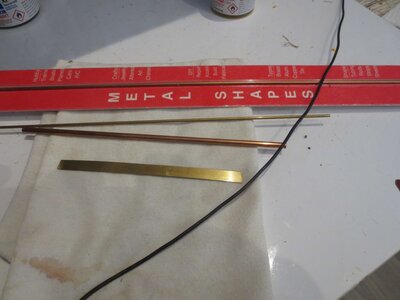
I started out with 3/16 OD tubing which I inserted in drilled holes.

materials used.jpg

I drilled the hole offset a bit from the control arm. Then inserted the tubing to act as a bushing

bushing installed.jpg

This is how it looks under the bench, the inner narrow tubing got bent down here last, first I made the bends on top so the lever would work to move the selector:

under the bench.jpg


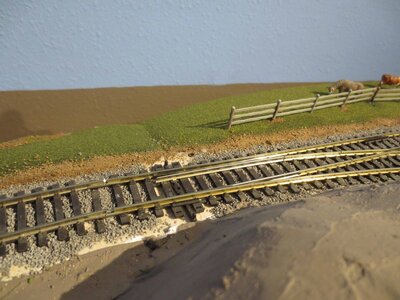
as I move the dowel rod, the whole lever turns and moves the turnout selector. Works slick. These are peco switches.

mainline.jpg


This is how it looks on the fascia side:

control by fascia.jpg


So, I pull or push the dowel to select the turnout position. I will put a couple stops on the dowel and paint the end prettier, this is the layout underside mind you but I still want it looking a bit tidier.

Thanks, for looking, Dave LASM
 
Guy, that one is behind a hill so doesn't show at all. On another one I painted the brass black but left the little stub stick up about 5 scale feet and painted the top red.

I do not think I will be going to a lot of bother to make it look like a real switch stand since these are places that are hard to reach also hard to see. Still a work in progress...

I plan on glueing some kraft paper (on to the 1 x 4's) on the underside of the layout to cover up all those wires, some of them want to droop down and bug me when I can see them.

Dave LASM
 
I accomplished an unexpected task this weekend - cleaned up under a section of the benchwork:

under bench before.jpg


Believe it or not, this is totally organized, just doesn't look it maybe, however in a half hour was able to really clean it up:

under bench after.jpg


This is the frist draft backdrop kraft paper, I went around with caulk adhesive then stapled the kraft paper to cover everything up,

Also dressed up the switch stand mechanism a little, put little nail stops in my dowel so I don't wreck anything...

switchstand closeup.jpg


It looks a lot better after the dress up job:

fascia with turnout control.jpg


Also, got a shot of the scene at the gas pump

MS at loading dock, tractor.jpg


THANKS for looking...

Dave LASM
 
Time to update the layout thread... half the new backdrop went up last weekend, also a murder of crows showed up on one of the little shacks:

crows 2.jpg


There are several of these small buildings on my layout, used as living quarters by newcomers looking for work at the sawmill or quarry,

The SW-1 is taking a load of freight. This 2 minute video gives a look around the whole layout, following the small switcher as it travels the main line:

The only sound here is the clickety of the wheels and an occasional squeak of the axels.


THANKS for looking! Dave LASM
 
I seem to have trouble noticing specifics on a moving video, so I need to watch them a few times.
Is this an open plains layout, or is the plan to model-up lots of trees? I'm not familiar with landscapes out East.

In any event, it's a great layout, and evolving! Well done!
 
I seem to have trouble noticing specifics on a moving video, so I need to watch them a few times.
Is this an open plains layout, or is the plan to model-up lots of trees? I'm not familiar with landscapes out East.

In any event, it's a great layout, and evolving! Well done!
Thanks Guy, this is a layout under construction. There are a few more trees to go on, also there will be a logging area where they are cutting up trees in the woods and skidding them to a landing. The layout is 48"+ high so trees in the foreground are a problem for obstructing my reach, there will not be a lot of them except the patch where logging will be going on.

Part of the landscape where I am modelling was burned over in 1894 and my era is 1900 to 1939, and photos show lots of fields, pastures, with some patches of trees missed by the typical hopscotch method a lot of fires behave. The south end, by Wyoming, was untouched by the devastating fires.

There are also some more buildings to come. I like to play with my train while I am building the layout!!

Dave LASM
 
I seem to have trouble noticing specifics on a moving video, so I need to watch them a few times.
Is this an open plains layout, or is the plan to model-up lots of trees? I'm not familiar with landscapes out East.

In any event, it's a great layout, and evolving! Well done!
I ran across this photo of the countryside where my layout is modeled, this scene taken somewhere 1890-1905 I believe, based on the signal used and truss rod box cars:

groningen.jpg


You can see a patch of trees off to the left and a few on the right. We live about a half mile from where this pic was taken.

Also, a couple shots from my layout

windy day.jpg


This guy is following the one with the sack

traveller.jpg


The blurry bldg in the foreground is a model of the foreground pump house in the original photo

THANKS for looking, Dave LASM
 
I finished this little Jordan 1925 ford truck kit last night, wife wants it brand new on the layout, no weathering. We will see how long that lasts,

truck 1.jpg


herre I just started on the kit, glueing a couple things at a time and letting them dry overnight

truck 2.jpg


just about ready to do the final assembly

truck 3 resize.jpg


on the layout in next to the quarry mill

next to the quarry.jpg


infront of the Groningen depot

in front of depot.jpg


made an old time edition as well:

b w resize.jpg


its a new old truck

Thanks for looking, Dave LASM
 
I have been putting together this little building lately, this tool house is going near the quarry buildings

bldg kit.jpg


Came with some really nice castings. First I had to make the base, 2 x 4 lumber

bldg prog 1.jpg


I used the templates to make cardboard forms for the studs and building

bldg prog 2.jpg


above, I am glueing a bunch of the cardboard together before adding the studs and rafters

bldg prog 2a.jpg


I get as much done as possible, then spray the interior a dull white. The floor/base will be stained

bldg prog 3.jpg


Still much to do, but moving right along with this

Dave LASM
 
I finished this little Jordan 1925 ford truck kit last night, wife wants it brand new on the layout, no weathering. We will see how long that lasts,

View attachment 184742

herre I just started on the kit, glueing a couple things at a time and letting them dry overnight

View attachment 184743

just about ready to do the final assembly

View attachment 184744

on the layout in next to the quarry mill

View attachment 184745

infront of the Groningen depot

View attachment 184746

made an old time edition as well:

View attachment 184747

its a new old truck

Thanks for looking, Dave LASM
That black and white shot looks like an old postcard👍
 
I have been putting together this little building lately, this tool house is going near the quarry buildings

View attachment 185675

Came with some really nice castings. First I had to make the base, 2 x 4 lumber

View attachment 185676

I used the templates to make cardboard forms for the studs and building

View attachment 185677

above, I am glueing a bunch of the cardboard together before adding the studs and rafters

View attachment 185678

I get as much done as possible, then spray the interior a dull white. The floor/base will be stained

View attachment 185679

Still much to do, but moving right along with this

Dave LASM
That is going to be a very detailed building!

Looks great Dave!


Back
Top