CL&W Subdivision Scenery Blog


Cook 'em, Bend 'em & Hang 'em!

Ok, time for another update. (Sorry, no photos...)

Last weekend I was searching for a minimal-risk method to soften my fresh-from-the-box Super Tree armatures and, lo-and-behold - sitting on a storage shelf in the laundry room was an old Crockpot that SWMBO stopped using when she got a larger one as a gift! Now I could cook the trees in the same work area where I hang them to dry.

Since this Crockpot is a 4-quart vessel, I can fit in ~20 trees at a time. Set the heat on "high" and leave them in for 2-3 hours, then they're easily bendable when I pull them out. Some of them actually straighten out on their own, but most of them I have to bend in the direction opposite of the curve, in several places along the trunk. Then I hang each tree upside-down and clip a few clothespins to the top of the tree to force it to dangle in a straight line, and let them dry for 48 hours. Then voila - I get a batch of [generally] straight trees!

I cooked another batch of trees last night, and they're still drying. Got home too late tonight to have enough time for spray painting the dried ones. Maybe tomorrow....[?]
 
Uh-oh, the topic is dropping off the front page - better post something to keep it visible...

I was up past midnight pulling SuperTrees out of the crockpot and hanging them to dry. [Seems like everything I do with those dang trees always takes a lot longer than planned.] Today, while I wait for them to finish drying, I'm going to focus on putting down some Static Grass in front of the area where I plan to plant the trees. I figure it's better to do that ahead of time to avoid having any stray grass fibers fall and get tangled in the trees.

I'll be putting down some Noch 12mm Beige-colored grass, with a little bit of summer green mixed in. I have the original GrasMaster applicator tool, but everywhere I look, Noch (and their distributors) are trying to tell me I need the GrasMaster v2.0 to plant the long grass...forget that!:rolleyes: My existing applicator works fine as long as I don't use the extender funnel attachment, and hold the tool closer to the target surface.
 
Serious Amounts of Noch

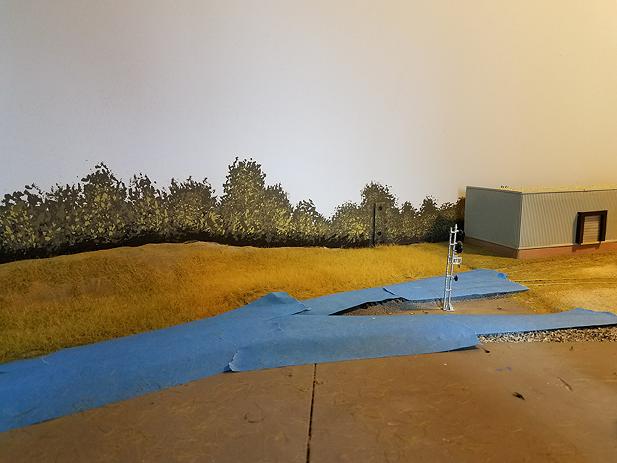
On Saturday I took a break from the Super Trees assembly line and applied Noch Static Gras (sic) to the flatter spots on my ridge. Except for the top - that is where the trees are supposed to go. I wanted to get this field grass in place ahead of time because I didn't want any stray grass fibers getting stuck in the tree foliage.

I used beige colored grass on the sloped areas, and mixed-in some green strands along the bottom flats near the track. I avoided trying to turf any of the really steep slopes, to make them look like the soil had collapsed off the sides.

I started at the South end, adjacent to Brook Park. Since I was still in "experimental" mode, some of the greener grass found its way to the upper edge; I may go back and correct that later:

FreshLaidStaticGras_SouthEnd.jpg


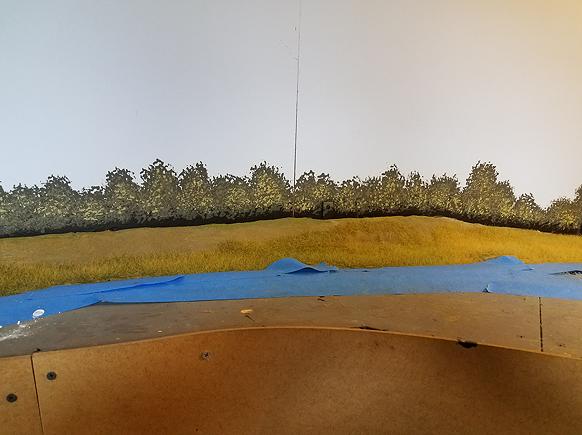
Here is the next stretch of static grass, in the narrow middle section. The slope toward the left was fairly steep, so here I only covered the bottom flat area:

FreshLaidStaticGras_MiddleArea.jpg


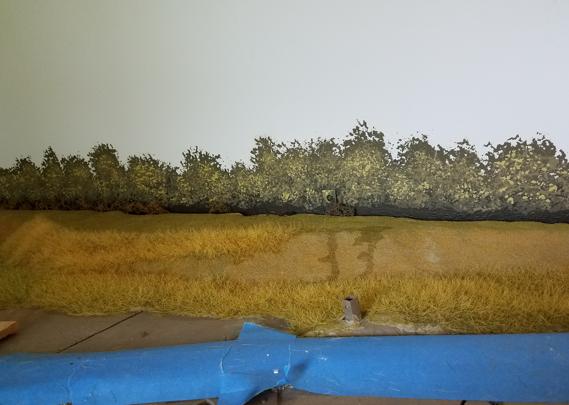
In the next 3-foot segment I had a minor accident with the glue mixture. I dripped an extra length of glue along the top [to the right] so I could place my grounding pin there without having to sprinkle any grass on it; unfortunately I applied just a bit too much, so gravity pulled it over the edge. I'll have to find some way to cover that up...

FreshLaidStaticGras_MiddleNorth.jpg


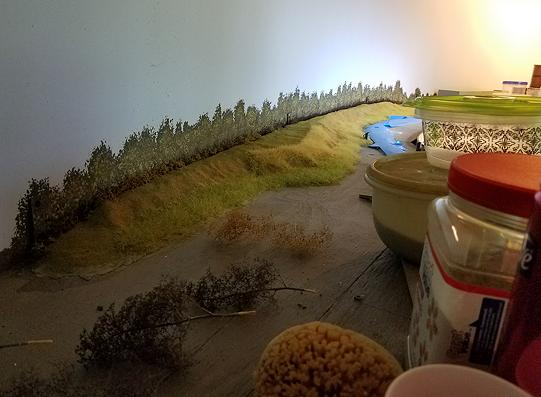
At the North end, you get to see some of the endless clutter that makes it impossible for me to run any trains during this project. There's a couple of my pre-painted Super Tree tree armatures in the left foreground:

FreshLaidStaticGras_NorthEnd.jpg


I wound up having a bit of a gap between the backdrop and the hydrocal ridge, resembling a dark abyss with the flat black paint. So I experimented by stuffing-in small pieces of leftover Super Tree "chaff". Since it will mostly be covered by the trees once I get them planted, I might not even have to paint it - it seems to disguise the abyss fairly well as-is:

FreshLaidStaticGras_CloseUp.jpg


...and that is as far as I was able to get before typical Sunday family commitments drew me away. I now have over 50 Super Tree armatures painted and ready for foliage, that should keep me occupied for another week or two!
 
Last edited by a moderator:
Now, you're getting down to serious scenery. Ken, it looks good. Let the glue dry completely, before you attempt a fix.
 
Now, you're getting down to serious scenery. Ken, it looks good. Let the glue dry completely, before you attempt a fix.

Thanks Joe! I think the glue will be dry enough by this afternoon (72hrs after application) to allow touch-ups.
 
That Dreaded Cracking Sound

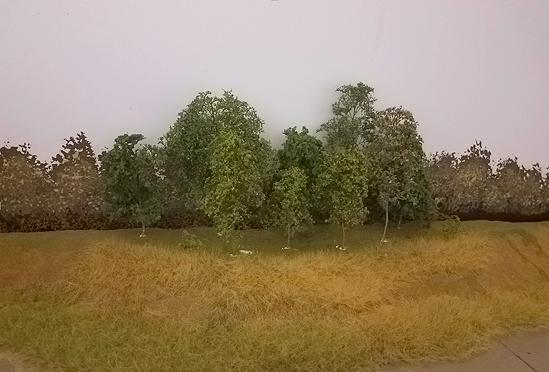
Alright, I’ve planted the first half-dozen of my Super Trees on the widest top surface of the ridge. I’ve been dipping them and sprinkling on the Super Leaf foliage as I go along, since I first want to place the bare armatures in their intended spots to see how they’ll look.

I pre-painted the armatures this past Sunday using Rustoleum Gray primer, followed by Krylon Camouflage Brown on the branches only. Then on Tuesday I started the process of dipping and dressing them. Since the time of year I’m modeling is mid-summer, I’m using three different shades of green for the Super Leaf flocking: Medium Green, Spring Green and Olive Green.

My approach is to put the tallest trees against the backdrop and have rows of progressively shorter trees toward the front, hopefully covering up the imperfections of the taller ones. The main problem I’m facing is the material my ridge is made of: Hydrocal. Making holes to fit the tree trunks into is a hit-or-miss proposition. I start by using a pin vise to drill a pilot hole, then I shove down an awl to widen it.

The tricky part is fitting the tree trunk into the hole; if I can get it all the way down to where the tree is at the perfect height, fantastic! But half the time, I’ll have the tree almost to the point I want it, press a little bit more and…CRRR-ACK! The trunk is broken to a half-inch stub, rendering the tree totally useless!:mad: This was particularly painful after I’d made what looked like a perfect large wide-bodied tree, because I didn’t have any more armatures that were wide enough to create another one that was similarly-shaped. Luckily, since the break was only partial, I was able to save the trunk by drenching it with straight [undiluted] matte-medium and letting it dry overnight. Four other finished trees, however, had to be tossed into the shrubbery bowl.

Anyway, here is a cell phone pic of the first two rows of trees. Pay no attention to the distorted, misshapen tree trunks; I’ll eventually have shrubs in the foreground to hide those. And BTW, the tree on the foreground left does NOT have leaves on the trunk – it’s a low-hanging branch that I didn’t notice until after I uploaded the photo, that will be clipped off.

LinndaleRidgeFirstTrees02.jpg


The photo was shot in a shadowy area [where I plan to hang an overhead light fixture at some point], so it is light-compensated and the colors aren’t as vivid as they look when viewed directly by the human eye.

When this scene is finished, the forest “floor” should be totally covered with underbrush. And the drilled-up white hydrocal power will be painted over.
 
Since my last entry 4 days ago, I scattered some dead leaf 'litter' on the floor of my miniature forest with a little bit of medium green coarse turf in random spots – that made a major improvement in its appearance. However, the grove of trees still lacked something that I was seeing everywhere whenever I drove past real tree clusters: light green trees. I didn’t have any Light Green Super Leaf on hand, so I had to wait until Saturday morning to make the drive North to MB Klein.

Anyway, when I got to MBK and went on their kiosk to get the stock# and official description of what I wanted, the only colors of Super Leaf in their online catalog were ones I already had. But they did, at least, have a Scenic Express flocking material in a color called “Summer Lawn” blend, which looked virtually identical to their light green SuperLEAF and had a fine-enough texture that I could probably use it on my trees...so I figured I might as well try it.

The light green flocking came out looking good enough IMHO for my intended purpose, so I covered three small trees with it. When I went to install them, I ran into another stumbling block: the trunks had to be mounted on areas where I had applied 12mm [tall] Static Grass. Finding the holes once I drilled them was a major PITA – to locate them I had to stand on a stepstool and lean over to look directly down upon the grass-covered surface, trying to find the telltale white speck of drilled-up hydrocal. Eventually though, I did get all the trees mounted.

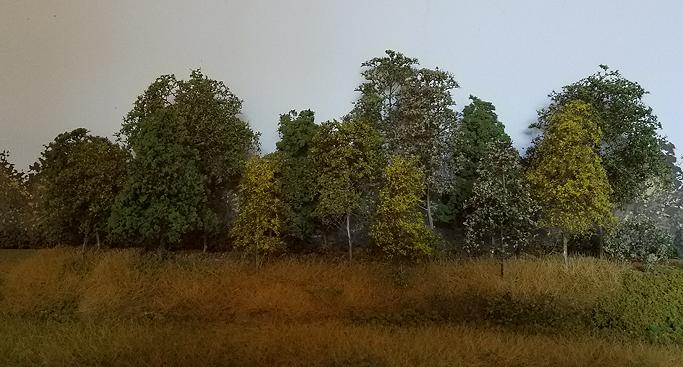
Shortly after sunrise this morning I headed out to the trainroom to grab a photo with my cell phone camera. At this time of day, light comes in thru the window at an angle where shadows of the trees on the backdrop are minimal. One problem I couldn’t do much about was the slight shading from my hand and cell phone as I held it up to capture the image: it made the left side of the grassy area look darker – almost reddish. I tried standing further back beside the window to avoid blocking any light, but at that distance the grass appeared blurry due to the low light level. So I decided the “shadowy” scene was the lesser of two evils.

This view encompasses the whole area of the ridge where I’ve planted my Super Trees thus far. I've also added some coarse green turf and fragments of failed Super Trees to cover the bald spots:

LinndaleRidgeTreesAsOf07-29.jpg


I think I’ve done all I possibly can to make this spot look halfway decent. This whole week has been a repetitive process of trial-and-error, putting different trees in different positions until I got the desired effect. I wanted to get this particular spot as close to “perfect” as possible because it’s the very first thing visitors will see when they come thru the door. Hopefully, covering the remainder of the ridge will be quicker now that I’ve gotten some practice.
 
An Absolutely Marvelous Scene, Ken! That's about as realistic as one can hope for.
You have set the bar high .. Just don't stumble!
 
Appreciate the kind word as always, Sherrell. Actually, it wasn't me who raised the bar, but Pelle Soeborg - and I did stumble over it several times last week until I finally got to where I wanted!
 
Looks great Ken, I'll be using this for a reference!
I was just getting to this stage on the layout and may now be moving to a new house.
 
Nice work Ken......that's what I like about the forums, tips & techniques on all facets of model railroading. Looking forward to more.......
 
Looks great Ken, I'll be using this for a reference!
I was just getting to this stage on the layout and may now be moving to a new house.

Thanks Rick, hopefully you can avoid some of my mistakes!

So you'll be moving, eh? Probably a good thing your current layout didn't have any [or much?] scenery on it. If I ever have to move, I hope that (1) the new house will be a rancher with a decent-sized basement and (2) I'll be physically fit enough to actually build another layout!
 
Nice work Ken......that's what I like about the forums, tips & techniques on all facets of model railroading. Looking forward to more.......

Appreciate it Jerry! For me, the forums have pretty much replaced Model Railroader and the other 'print' magazines as my source of the latest mrr info.
 
Ken.....yeah, for me model railroader is a cover the basics type of mag. I think that is good, those starting in the hobby or just starting a layout needs that type of mag. That's why I subscribed to it. Once I get past that learning curve on what ever I'm trying to achieve I'll move on to another source of info, like model rr forums. ( actually I'll go to what ever source there is that has the info I want). Between this forum, model railreader forum, MRH forum, modelrailroader mag, MRH mag and Youtube, I've got plenty of sources to glean for information.
Regards....
Woops, forgot to mention the nmra mag. I subscribed to that to see what it had, well, after a couple of years, I will not be renewing my subscription to that. The only thing I like in it now is the blurb on the back page about a piece of rr history, but not enough to renew.....
 
Last edited by a moderator:
Not Cody Grivno's Workshop

Another week, another few dozen Super Trees.

I made the most of whatever daylight was available over the weekend, and managed to get at least one full "layer" of trees planted along the ridge. The areas I was working on were narrower than the 1 sqft hilltop I did last week, so it didn't take as long to get them covered. In fact, I thought I was going to finish this entire side of the peninsula today until I realized there was still an area of painted - but otherwise bare - plywood at the far end. So I had to break out the Hydrocal and build up the terrain.

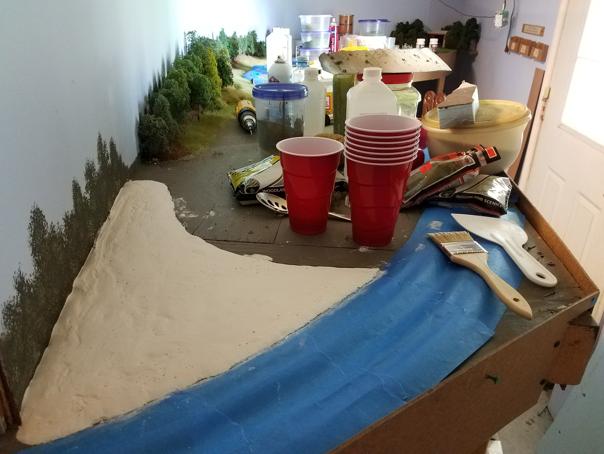
There wasn't anything new that looked markedly different this go-round, so I didn't bother trying to get a realistic photo. After being on my feet for 10 hours working on this project, I just didn't have the energy to stage any "pretty" scenes that look basically the same as what I posted on 7/30. However, I did get a snapshot of the whole work area with the freshly-poured Hydrocal in the foreground.

Most of you are probably familiar with the how-to articles in Model Railroader and other mags. The work scenes are always super-clean and organized, with every tool and material container in exactly the right place. While I'd love to have my own work area looking like that, I simply don't have the space; I keep discovering that I need yet another tool to complete a particular task. And since I'll probably be needing that tool again, it stays within my reach. Because of that, my layout surface unfortunately winds up looking like a disaster area:

LinndaleNorthEndFreshlyPouredTerrain.jpg


...this is part of the "price" I've had to pay to get the kind of scenery I want. It ain't pretty!:rolleyes:
 
[h=2]
icon1.png
Not Cody Grivno's Workshop[/h]

And I thought my layout was cluttered with stuff. What bothers me is when I lose stuff in plain sight. :rolleyes: . Nice progress Ken.
 
Looking good Ken. There's never enough space. I had the same problem being that for the most part, the layout is on a shelf around the walls with little space for scenery goodies or tools.

Joe - I am happy to know that I am not the only one who loses things right in front of them. Can't see the tree through the forest.


Back
Top