Building the Pinnacle Creek Mining & Timber Co. RR


Tunnels, my thoughts.

Tunnels, like getting old, is basically 'can't live with them, can't live without them.' Model railroading tunnels have captured our imagination whether we like it or not. From our earliest exposure to model railroading we've always needed something like this:


If you are, or will be, reading this you've probably grown beyond this photo and I thought I would provide some simple, but often overlooked tunnel issues. If like the Southern Division, now on these pages, in a room with walls, you have two or more logical/good places for tunnels. Namely the corners of your layout. You can't reach that far for operations and these corners give you the perfect reason to put in a tunnel or two. Remember the first PCM&T Co. layout had no tunnels in the corners, but did have one along a wall, and one tunnel built after the original scenery was in place.

So what's with tunnels anyway? Well, real railroads have them, therefore so must we. Not all logical but it is a good reason. Tunnels shorten track routes in real life, if not so much in our modeling. Simply put, I think tunnels are cool. Seeing a train disappear and reappear is generally an important, if not exciting, part of our layouts. Of course, we should all follow a few easy and time-tested steps.

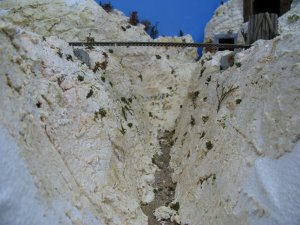
As mentioned tunnels are a natural in our corners for room-sized layouts and even giant "if I had a million" layouts where tunnels will and can appear most anywhere. First thing to do is figure out how long you want your tunnel to be. No magic formulas, but I like corner tunnels long enough to have the train actually disappear then come out the other side. On my layout this is problematic because of room size. Luckly I run short trains and can almost achieve my 'disappearing' goal. Ultimately we have to model the best we can in the space we have.

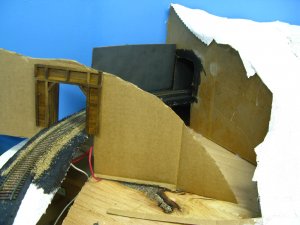
Second is to make sure you can access the tunnel. The inside curve is a natural for leaving open as no one can see the inside. Third, don't forget to lay your track before you enclose the tunnel.

IMG_5867.JPG

Next, most everything in the tunnel should be painted black. There will always be someone trying to peak inside your tunnel don't skip the black paint.

IMG_5870.JPG

Folks are curious about ballasting in the tunnel. I layout cardboard over the tunnel area and see where 'dark' is. You then know how far in to ballast your track. I don't like to ballast where folks can't see because during cleaning and possible retrieving derailed rolling stock ballast can be knocked loose causing problems. End Part One

 
Last edited by a moderator:
Tunnels Part Two

In this picture you can see I had to ballast a ways inside my tunnel. Folks can get a peek inside from only four feet away.

IMG_5871.JPG

Here is a good hint: I never put tape on my tunnel tracks. Residue from the tape will stick to the track and is very difficult to remove even reaching up from your inside curve. Instead I simply use folded paper towels. They soak up everything and have never let me down.

IMG_5872.JPG

Portals: I like to start with a portal at one end of the tunnel not both. By starting I mean all measure up against a piece of cardboard and glued in BEFORE rock, hills, or other scenic devices are use. I've tried the build the land form then carve the tunnel and frankly, while it may have conversation value it is not really worth the time or the effort. Glue the portal and build around it. I leave the portal at the other as the final step because premeasuring anything in our model world seldom works the way we would like.


Tunnel Liners: I say, "NO." Main reason is you can't do maintenance or anything inside your tunnel. If you want or need a liner for the first foot or so then go ahead just so your nosey friends can't see inside. Purchasing premade or making your own tunnel length liners should no happen. You would be surprised how clean your track stays inside a tunnel even without liners.

Lastly, while I've given no earth shattering new ways to build tunnels I think it is good to have a reminder or in some cases a first look at the subject for newer modelers. Ultimately, you need a dark tunnel, a tunnel with hand access, a clean track inside that tunnel and some scenery to cover it all up.

IMG_5873.JPG

Not all layouts need tunnels just because we can build them. Certainly some 'time saver' switching shelf layout would not be a better layout with one. But, don't be afraid of tunnels. They are fun. Jim
 

Attachments

  • IMG_5870.JPG
    IMG_5870.JPG
    220.6 KB · Views: 133
Last edited by a moderator:
Got an email back from the GCclub. Their monthly meeting's this Saturday. Will raise the question about the cars and truck then.
 
Thanks Toot and the rest of you for the car/truck links. Strange that 1930-1941 are the missing years as far as models are concerned. Jim:confused:
 
Last edited by a moderator:
I agree with having room to fit your arm in the trunnel, if you cant squeese your hand in then your in trouble... Jim have you ever made removable tunnels? Im guessing no need to unless you have one long run in the tunnel, But having a access hatch probably wouldnt be a bad thing either.

Keep up the good work, your scenery skills are amazing, im so jealous:p
 
RR, I copy that!

Starting to make a move around the back of the layout. The canyon scene is next. In this photo you see a simple canyon covered in plaster cloth. Sometimes building layouts is tricky and this section is one of those. The stream comes into the canyon from around the rocks on the right by the highway tunnel.

IMG_5973.JPGIMG_5974.JPG

The tricky part is how to do the backdrop on the other side of the river. I could paint it cliff color and let the viewer chuckle or I could actually build the cliff up the back board. This should be fun. While I can reasonably paint a cliff I think I, and you, will learn more if I build one. I've attached some plaster cloth on the backdrop to help the Scuptamold adhere better. I hope this works! Jim :eek:
 
Last edited by a moderator:
I painted the bottom of the canyon floor using Woodland Scenics Earth and Green and then I sealed the painted area with silicon.

IMG_5976.JPG

Using silicon does the work of sealing lake/pond/river/stream bottoms the best. It is clear and your water products blend right it. Also as an added bonus I poured some ground covering onto the silicon and gave it a spray of glue and it looks great. The sides of the canyon will be mostly rock. Jim

IMG_5977.JPG
 
Last edited by a moderator:
Thanks guys. Interesting stuff for sure. Don't be surprised to see some of these vehicles appear on the layout.

Here is a photo of work done on the upper stream part of the canyon. I want the water to 'disappear' around the corner and I'm making the opening quite small to do this. We'll see if it turns out alright. This Sculptamold stuff it still intriguing to me. I mixed this part in a thicker, less water, mix to see if the rocks will change texture??? Jim:)

IMG_5978.JPG
 
Last edited by a moderator:
Thanks guys. Interesting stuff for sure. Don't be surprised to see some of these vehicles appear on the layout.

Here is a photo of work done on the upper stream part of the canyon. I want the water to 'disappear' around the corner and I'm making the opening quite small to do this. We'll see if it turns out alright. This Sculptamold stuff it still intriguing to me. I mixed this part in a thicker, less water, mix to see if the rocks will change texture??? Jim:)

IMG_5978_zps27957a08.jpg

Jim that is gonna look real interesting there!!!

Mike
 
Mike, I agree. Hopefully I can make it work.

Here's a photo just taken that shows some progress. Things to take note of: Always measure your distances across canyons carefully; I like to add my abutments when I add the Scultamold; Again, measure the abutment height with the bridge in place making sure to account for the cork or foam roadbed height. On these abutments I spared nothing! I simply cut two 1"x2" pieces of left over wood on the floor, painted them and stuck them on. Jim

IMG_5979.JPG
 
Last edited by a moderator:
Makes total sense sorry if you stated earlier, but how big is the gap between abutments? How long of a bridge is this going to be?
 
Joed, I did not state the size of the bridge. The gap, and the bridge are 11.5 inches. That is about 83 HO feet, or 64 S feet, or 42 O feet. These are just approximations. The bridge is a wooden through truss. Jim
 
Moving around the back of the layout. This photo shows some work on the left side of the canyon. I'm pretty big on testing and trying ideas out before I build anything. Sort of the measure twice cut once thing. Even that doesn't always work so my modeling has evolved over the years to building rough mock ups before gluing.

IMG_5980.JPG

The portal on the right will be an opening carved into the hillside. The one on the left will be and older wooden style aged like the turntable. I've also decided to raise the right hand track using 1/2" WS Risers. Not sure why, it just doesn't seem right to have the track on the plywood top like the other side of the layout.

ANNOUNCMENT: Next contest will be at 200,000 views. A good prize will be offered. Probably another 'what's different in this photos' type contest. Jim :)
 

Attachments

  • IMG_5981.JPG
    IMG_5981.JPG
    299.3 KB · Views: 151
Last edited by a moderator:
I am new to the forum and this is the first time I have checked out this post so i must say that it has been interesting to see the steps, progress and order of work that has been done. also informative to read some of the reasons why things were done how they were. I will have to spend some time reading all of the pages. looks real good to me.
 
Bpete, Welcome. Call a friend! If you are new to model railroading I would suggest starting on Page 1. That is a lot to ask at this point, I know, but once you get into it it does start to flow and even makes sense! I think the last fellow to start an finish took about 3 days. Info is priced right and it is a fun 'farewell' project for me. Ask questions if you need to. I, or one of the other regulars are sure to answer them. Also, when you get to where the Contests were study the photos. We will be having another Contest at 200,000 views. Probably during February. Jim:)


Back
Top