You are using an out of date browser. It may not display this or other websites correctly.
You should upgrade or use an alternative browser.
You should upgrade or use an alternative browser.
Bridges
- Thread starter rzw0wr
- Start date
otiscnj
Well-Known Member
An alternative for a truss bridge to the Central Valley or Vollmer bridges are the truss bridges offered by Walthers. I build the double track one years ago. They also have a single track one. The double track spans about 15". I think the single track one does about the same. Not as 'gingerbreadish,' as the Central Valley kit, but very prototypical for many standard bridges in the USA.
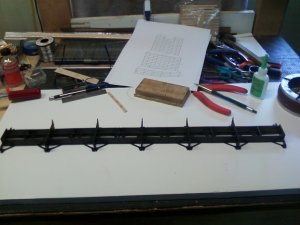
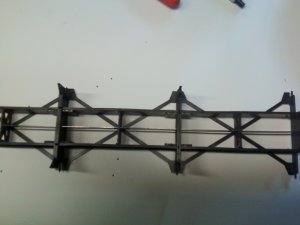
Here are some pictures of the floor assembly.
Also I just found out that you can transfer pictures from your phone to your computer using Bluetooth. Cool


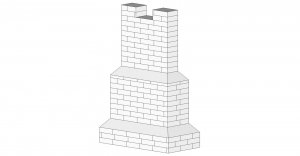
I also need some advice on this pier.
Does anyone have any ideas on how to make it
6 3/4 tall
4 1/2 wide at the base
2 1/2 deep at the base.
I would like to have it look like concrete when finished.

Also I just found out that you can transfer pictures from your phone to your computer using Bluetooth. Cool


I also need some advice on this pier.
Does anyone have any ideas on how to make it
6 3/4 tall
4 1/2 wide at the base
2 1/2 deep at the base.
I would like to have it look like concrete when finished.

logandsawman
Well-Known Member
It is looking good. I think you are getting to the hard part.
AS far as the pier, being a wood guy, I would start with 3 blocks of (soft) wood, I would recommend basswood because the grain won't show through like it may with pine. Etch in the brick lines with a sharp, hard pencil, going over a few times. Use light weight putty to make the bevel edges. Paint to look like concrete.
Someone else might carve it out of firm foam and use the pencil trick for bricks.
I am looking forward to seeing your next progress. lasm
Motley
Active Member
Ya your on the easy part. LOL But looking good though so far.
For peirs, have you looked at Scneic Express, they have some good looking concrete piers. Like this one: http://www.sceneryexpress.com/HO-SCALE-5-GRAY-BLOCK-STONE-PIER/productinfo/PL1427/
For peirs, have you looked at Scneic Express, they have some good looking concrete piers. Like this one: http://www.sceneryexpress.com/HO-SCALE-5-GRAY-BLOCK-STONE-PIER/productinfo/PL1427/
logandsawman
Well-Known Member
You are right, Michael, those are nice looking piers.
Dale, when I see your call sign rzw0wr I think razor owl. I know I am missing something, what is it supposed to be?
lasm
Dale, when I see your call sign rzw0wr I think razor owl. I know I am missing something, what is it supposed to be?
lasm
goscrewyourselves
I'm the one
Agreed - what has been accomplished to date does look very good!
As for your pier question ... like lasm, I too am a wood guy so I like lasm's idea for the pier. If you are after a little more realism though, you could build the structure, as per lasm's suggestion, then coat it (the wooden form) with plaster of paris or any light weight filler.
Once completely dried, give the whole thing a "rough" sand using a course grit sand paper to get a texture - I'm guessing you don't want a "smooth as a babies bum" finish. Then etch in some cracks (if desired), paint with concrete colored paint then put a light black/dark grey wash over the whole structure to give an aged look.
Alternatively, you could build hollow form work out of basswood sheets then pour in a "yogurt" type consistency paris of plaster. If you use that idea, get the 45 minute cure time plaster. Give it 1/2 an hour to start to set then remove the form work. That will give you the concrete look less the color, and, you can build as many piers as needed.
No matter how you choose to do this, looking forward to seeing the results
Thanks guys for the ideas.
I tried Bass wood with POP once and the wood warped.
I am trying to come up with a mold or something. I only need one and the ones I see on line are too short.
LASM, rzw0wr is my old login from work.
I use it a lot because I remember it and it is unique.
I tried Bass wood with POP once and the wood warped.
I am trying to come up with a mold or something. I only need one and the ones I see on line are too short.
LASM, rzw0wr is my old login from work.
I use it a lot because I remember it and it is unique.
goscrewyourselves
I'm the one
Dale,
How about this then ... you know the dimensions that you need so, buy yourself a CHEAP CHEAP CHEAP plastic container that comes close to those dimensions (Family Dollar/Dollar General type).
Cut the container up to match the needed "maximum" dimensions, 4 1/2 X 2 1/2 X 6 3/4 and form a "box" from those sections of plastic. That could be your base mold and, being plastic, it will hold POP. Fill the thing with POP and wait till it starts to cure, open the "mold" and let the actual pier dry. You would then have to "carve" out the rest of the shape for the pier, that would be the only downfall to this I think. On the other hand, you could make 3 molds, one for each tier then finish the shaping by adding POP for the slants.
goscrewyourselves
I'm the one
Another idea might be this ... some time back I bought some HO Scale Molds (brick and cobblestone) that make 1' X 1' X 1/8" tiles. The mold will make 6 - 8 tiles at a time. You could use something like that and attach them to foam. I'll take a couple of photo's of the Molds, and try to find where I bought them, and a couple of pictures of the finished item.
Only down side to this method is waiting for the plaster to harden properly. For my first attempts, I used 20 minute cure PoP and left it for a couple of hours. They still broke when "popping them out" of the Mold, which is rubber by the way. I now leave them for 24 hours before removing the tiles.
From memory, the molds come in a variety of finishes, brick and stone. I know you said you wanted a concrete finish but this could be an alternative and give the piers character.
Found the site I bought the molds from:
http://www.linkaworld.com/catalog.htm
Just a warning though, these are expensive at $12 per mold or $88 for a pack of them. I bought mine to use for roads and footpaths but have found other uses as well, my Lakeview National Park Sign for example.
Last edited by a moderator:
DairyStateDad
Mumbling in the corner
Here's an idea for your bridge support, Dale -- do you live anywhere near where there's a Lego store? They're usually at malls. There aren't a lot so this might be a long shot. But if you do have access to a Lego store, you can individual lego bricks by the bucketload (literally -- they hand you various size containers to fill up, sort of like at a to-go- salad bar), and you can select from bulk containers any kind, size, shape, color of basic Lego bricks. Now, you probably would want to at least paint it or cover it as they would probably be way out of scale, but it would be a quick way to build the pier superstructure.
goscrewyourselves
I'm the one
No problem, that is one of the molds that I have and the one used for my little layout sign base. I don't think you'll be disappointed with them and they do have a multitude of uses.
As I mentioned, and maybe it was just just me but, they do take some getting used to to get the "tile" to come out cleanly. I don't know how many of the "tabs" I have broken during the removal process. Now, depending on what I am using the tile for, I will cut of the tabs and just butt join the tiles.
As I mentioned, and maybe it was just just me but, they do take some getting used to to get the "tile" to come out cleanly. I don't know how many of the "tabs" I have broken during the removal process. Now, depending on what I am using the tile for, I will cut of the tabs and just butt join the tiles.
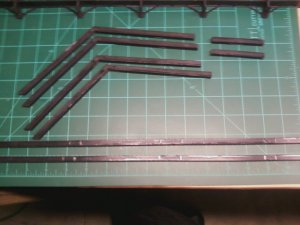
Well, I got the trusses partly assembled.
Not good, the floor assembly and the truss assembly does not line up every well.
I must not have built one or the other close enough to the plan.
I still think the kits are good and would look good when finished, however I think they are above my pay grade right now.
I will set the other kit and the one I was working on back for a little while and gain a little more experience.
I ordered 2 Walthers kits for now.
I need to get this layout moving a little.
FWIW
While waiting for my new bridges to arrive I thought I would try my hand at making a pier that goes between these two bridges.
Tony, aka wombat, told me about a site that sells molds for HO scale blocks or stones.
The mold works great, still trying to get the air bubbles out of the PoP when dry.
I tried to mount the stone sections onto a foam armature with regular dry wall mud.
This turned out to be way to thick and I broke a few sections trying to get them to lay flat.
I tried some Flotrol for latex paint. I was looking for a light, smooth plaster.
One that would allow me to move the sections a little to align, thin enough so that I could seat the sections without a lot of
pressure and one that was thin enough to seep into the small opening between the section like mortar but, not be very wide.
Flotrol worked well for this. Makes a nice smooth mixture.
I am waiting to see if it dry completely. It is drying well right now but, not as hard as the plaster without it.
I am also trying just plain water. The mixture does not look to be as smooth as the Flotrol mixture.
It act like thinned plaster with no body.
I also found that after taking the section from the molds that the backs would need sanding to flatten a little.
The molded sections have staggered stones sticking out the sides to mate up with the next section.
By sanding the section on a flat surface covered with sand paper you can sand away the plaster between these stones.
I did not want to wait several days for the PoP to dry so I put them in the oven, at 210 degrees, for 60 minutes.
Works great, dries the enough to sand the backs.
Last edited by a moderator:


