
You are using an out of date browser. It may not display this or other websites correctly.
You should upgrade or use an alternative browser.
You should upgrade or use an alternative browser.
Back In The Day
- Thread starter 2Tracks
- Start date
Greg@mnrr
Section Hand
Greg, Thanks much! Appreciate it! I have one on its way.
Is there any one hint that you found particularly useful?
Other than the improvements in model railroading electronics and the overall quality of the models, so much of the information in the book is useful today even after the book was first printed in 1965 the last printing in 1977.
Worth the $$$.
Greg
flyboy2610
Loveably weird
I have a book, The Complete Book of Model Railroading by David Sutton. It was published in 1964, but it has a lot of information in it that is still useful.
I was a toddler when it was published.
I was a toddler when it was published.
santafewillie
Same Ol' Buzzard
I never have seen that book before you started posting it, but despite its age, I already use many of those tips.
2Tracks
Ol' School
Happy Thanksgiving Everybody! Have a kind of a long weekend coming up. So I was just going to go ahead and finish up the hints & tips. a couple pages if tips and a couple pages of info from the back.
See ya next week with more.


Concerning tip # 74, telephone poles, on the prototype, they were not just installed randomly. The cross arms face each other were they mount to the pole, front to front as it were. The next pole in line has the "back" of the cross arms, face the "back of the pole next to it, and so on down the line. Not a big detail, but interesting none the less.....


STAY SAFE!
See ya next week with more.
Concerning tip # 74, telephone poles, on the prototype, they were not just installed randomly. The cross arms face each other were they mount to the pole, front to front as it were. The next pole in line has the "back" of the cross arms, face the "back of the pole next to it, and so on down the line. Not a big detail, but interesting none the less.....
STAY SAFE!
2Tracks
Ol' School
Here are the two other pieces of equipment from the drag line pics.
Land Plane..... it look to be in about the same time frame as the drag line. There are quite a few of these in the basin, in the weeds! The big wheel controls the depth of the blade mounted cross wise in the center of the frame work. A lot of farm ground was flood irrigated, so a land plane was used to level out the ground so all the water didn't run to one side. Didn't find any kind of ID tag on it.....
The faded yellowish frame work in front of the drag line.......

End view.... large smooth hollow wheels to help keep from sinking in...

Equipment carrier.....older carriers had a large wheel (like the land plane) to raise and lower the equipment. When I worked for John Deere, their carrier had a Briggs & Stratton for power. I didn't see provisions for either on this one. How it works, the chains are attached to pipes mounted cross wise in the frame. With the drive system, (manual or powered,) you lower the chains and attach them to say, a little three bottom plow. when the plow is hooked up, engage drive and as the pipes turn, the chains wrap around them raising the plow off the ground. Hook up carrier to pick-up, drive to new location. You have to get the carrier away from the plow once the plow is on the ground, to do that, the front wheels, (one missing,) were the frame comes down to a V, are mounted on a fifth wheel. When you pull up to unload, you jack-knife the front wheels so after the plow is on the ground, when you pull out, the carrier will clear the plow, easy peazy...lol

Land Plane..... it look to be in about the same time frame as the drag line. There are quite a few of these in the basin, in the weeds! The big wheel controls the depth of the blade mounted cross wise in the center of the frame work. A lot of farm ground was flood irrigated, so a land plane was used to level out the ground so all the water didn't run to one side. Didn't find any kind of ID tag on it.....
The faded yellowish frame work in front of the drag line.......
End view.... large smooth hollow wheels to help keep from sinking in...
Equipment carrier.....older carriers had a large wheel (like the land plane) to raise and lower the equipment. When I worked for John Deere, their carrier had a Briggs & Stratton for power. I didn't see provisions for either on this one. How it works, the chains are attached to pipes mounted cross wise in the frame. With the drive system, (manual or powered,) you lower the chains and attach them to say, a little three bottom plow. when the plow is hooked up, engage drive and as the pipes turn, the chains wrap around them raising the plow off the ground. Hook up carrier to pick-up, drive to new location. You have to get the carrier away from the plow once the plow is on the ground, to do that, the front wheels, (one missing,) were the frame comes down to a V, are mounted on a fifth wheel. When you pull up to unload, you jack-knife the front wheels so after the plow is on the ground, when you pull out, the carrier will clear the plow, easy peazy...lol
2Tracks
Ol' School
For those that don't make it to the coffee shop.......
Some trivia, I've got this 76 union antenna ball. Who remembers these? (20-30 year olds won't)
Can you guess what year they appeared, WITHOUT using an electronic device?
Hint=they came out in one of the years I lived in Grants Pass Oregon...hope that helps...

Some trivia, I've got this 76 union antenna ball. Who remembers these? (20-30 year olds won't)
Can you guess what year they appeared, WITHOUT using an electronic device?
Hint=they came out in one of the years I lived in Grants Pass Oregon...hope that helps...
2Tracks
Ol' School
Ok, today we're going to go back in the day in modeling mode. I don't have a lot of time right now for model railroading but I have to do something towards that line. Here is a Kadee kit ( 3 actually) I picked up off of you know were......about 15 years ago, all metal kits. I have not put together an all metal kit yet, so I figured I'd start with this one. I don't know the timeline of the Kadee company but these are from their Grape St. downtown Medford location, that was, back in the day!

Lots of parts! All packages still sealed.

The plastic bags are loaded with tiny pieces. So I whipped up a parts tray for this build.

First order of business, ok second, would be to clean all the parts of flash. The first was to read the instruction sheets over. There are three sheets. A set of miniature files and those small sanding sticks work well. After de-flashing, they got a vinegar bath and warm water wash.
First items to build are the log bunks.
Install bushing in upright, install uprights in bunks.

Install rings in end of chain, install chains in uprights.
I'm installing the chain in the upright here, seeing were I need to cut the wire to form the pin. You need to make pins to put bunks together.

These chains are there to keep the upright from flopping over backwards on a log load. They run down thru the channel of the bunk, and are hooked between pegs for adjustment. The access is hung on another peg with the ring.

Next assembly is the brake gear. This was a fairly straight forward assembly, remember to pre-drill and clean out all mounting holes.
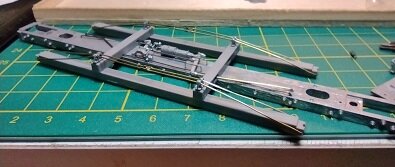
At this stage, the instr. sheet says stop, and get the truss structure built.

So that's where I'm at now, got the queen post and support rods in, what a process!

Lots of parts! All packages still sealed.
The plastic bags are loaded with tiny pieces. So I whipped up a parts tray for this build.
First order of business, ok second, would be to clean all the parts of flash. The first was to read the instruction sheets over. There are three sheets. A set of miniature files and those small sanding sticks work well. After de-flashing, they got a vinegar bath and warm water wash.
First items to build are the log bunks.
Install bushing in upright, install uprights in bunks.
Install rings in end of chain, install chains in uprights.
I'm installing the chain in the upright here, seeing were I need to cut the wire to form the pin. You need to make pins to put bunks together.
These chains are there to keep the upright from flopping over backwards on a log load. They run down thru the channel of the bunk, and are hooked between pegs for adjustment. The access is hung on another peg with the ring.
Next assembly is the brake gear. This was a fairly straight forward assembly, remember to pre-drill and clean out all mounting holes.
At this stage, the instr. sheet says stop, and get the truss structure built.
So that's where I'm at now, got the queen post and support rods in, what a process!

2Tracks
Ol' School
Thank goodness! Honestly though, the guys at Kadee did a pretty good job on the instruction sheets. I've assembled other craftsman kits and some of those guys forgot to proofread their stuff.No mention of DCC
2Tracks
Ol' School
Need to finish the truss rod assembly, get the rods secured in the notches in the end of the truss frame.

Once I got the rod ends shaped to fit the notches, I gave them a dab of CA. To keep the rods in place while I did the other end, I installed the bunk and tied it to the frame. I am going to glue the bunks on, but that will be later.

Same thing here, glue rods in notches, install bunk, tie them together.

This will let me straighten the truss rods between the queen posts and ends. They are very soft. From queen post to queen post, the rods seem to have some kind of temper to them, certainly not from the queen post to the end! Anyway, I just wanted to get them reasonably straight before paint.

Next is mount the truss frame to the body and finish installing brake rigging.

Get the coupler pockets installed and taped for primer.

I put the chains in the bunks and covered them with tape. The holes in the side of the bunk I blocked off with pieces of the strip paper I used to keep the truss rods aligned earlier. The pockets were the truss frame goes I made little tiny paper towel spit wads to install.

I used Rust-Oleum 2X ultra cover flat gray primer. Didn't care much on how it went on, kind of splotchy, took a couple of days to get good & dry, probably won't use it again.

Handle installed in coupler pocket for painting body color.

Once I got the rod ends shaped to fit the notches, I gave them a dab of CA. To keep the rods in place while I did the other end, I installed the bunk and tied it to the frame. I am going to glue the bunks on, but that will be later.
Same thing here, glue rods in notches, install bunk, tie them together.
This will let me straighten the truss rods between the queen posts and ends. They are very soft. From queen post to queen post, the rods seem to have some kind of temper to them, certainly not from the queen post to the end! Anyway, I just wanted to get them reasonably straight before paint.
Next is mount the truss frame to the body and finish installing brake rigging.
Get the coupler pockets installed and taped for primer.
I put the chains in the bunks and covered them with tape. The holes in the side of the bunk I blocked off with pieces of the strip paper I used to keep the truss rods aligned earlier. The pockets were the truss frame goes I made little tiny paper towel spit wads to install.
I used Rust-Oleum 2X ultra cover flat gray primer. Didn't care much on how it went on, kind of splotchy, took a couple of days to get good & dry, probably won't use it again.
Handle installed in coupler pocket for painting body color.
Attachments
2Tracks
Ol' School
When the bunks had dried, I hand painted them tru-color flat black. After that had dried, I removed the tape and took the chains out so I could paint the inside of the bunk.


The truck on the left is the one that came with the kit. Arch Bar with code 110 smooth back wheels, fully sprung.
The center truck has had the wheels replaced with Kadee code 88 ribbed back wheels.
The right truck is the new Kadee Arch Bar, HGC with code 88 ribbed back wheels.

Three logs come with the kit. You have to match the number codes for the end pieces with the logs.

The truck on the left is the one that came with the kit. Arch Bar with code 110 smooth back wheels, fully sprung.
The center truck has had the wheels replaced with Kadee code 88 ribbed back wheels.
The right truck is the new Kadee Arch Bar, HGC with code 88 ribbed back wheels.
Three logs come with the kit. You have to match the number codes for the end pieces with the logs.
2Tracks
Ol' School
Greetings, I thought I'd follow up with a little bit on the bunks.
I got the inside of the bunks painted, great job for the micro-brush, they come in three sizes, I just ordered some more. Anyway, insides are painted. This paint has some shine to it for being called "flat". It has acetone in it. I'll work on the shiny part later..........
With this type of metal, I had to keep the paint relatively thick, if I thinned it down, it wouldn't cover very well.

There is still a little bit of touch up to do around the uprights, but that's best done after this round of paint has dried.
In the meantime, it's more work on the logs.
The nmra standards for weight gives 1oz, + 1/2 oz per inch. This car is 6 inches long = 4 oz weight.
Only place for weight on this car is the logs. The car weighs 2 oz, so I'll put an ounce in two logs. The fishing weight lead that I'm using is 7 inches per ounce. I cut each piece in half & a little silicone to secure them inside the logs.

With the weight in there, the end pieces are installed.

I've already filed down the log end on the left, it looked like the one on the right, where the mold casting is a bit off, giving it a raised ring affect.
The center one is not too bad, it really shows how Kadee modeled the chain saw marks, but I filed all three down to give a consistent look.
Here is the three of them filed down, I scraped across the ends with the teeth of a razor saw to at least try and give the appearance of saw marks.

From a little further away.

There's some weathering tips on the instruction sheet for the logs, but I was going to wait until I have all the kits put together to do that, whenever that might be.
I got the inside of the bunks painted, great job for the micro-brush, they come in three sizes, I just ordered some more. Anyway, insides are painted. This paint has some shine to it for being called "flat". It has acetone in it. I'll work on the shiny part later..........
With this type of metal, I had to keep the paint relatively thick, if I thinned it down, it wouldn't cover very well.
There is still a little bit of touch up to do around the uprights, but that's best done after this round of paint has dried.
In the meantime, it's more work on the logs.
The nmra standards for weight gives 1oz, + 1/2 oz per inch. This car is 6 inches long = 4 oz weight.
Only place for weight on this car is the logs. The car weighs 2 oz, so I'll put an ounce in two logs. The fishing weight lead that I'm using is 7 inches per ounce. I cut each piece in half & a little silicone to secure them inside the logs.
With the weight in there, the end pieces are installed.
I've already filed down the log end on the left, it looked like the one on the right, where the mold casting is a bit off, giving it a raised ring affect.
The center one is not too bad, it really shows how Kadee modeled the chain saw marks, but I filed all three down to give a consistent look.
Here is the three of them filed down, I scraped across the ends with the teeth of a razor saw to at least try and give the appearance of saw marks.
From a little further away.
There's some weathering tips on the instruction sheet for the logs, but I was going to wait until I have all the kits put together to do that, whenever that might be.
