Athearn BB SW7 frame and shell.


Blues909

Active Member
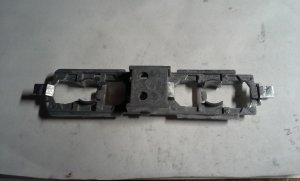
I noticed all three of the frames I have are bowed up toward the shell. If I set the shell in place using the fuel tank tabs one end is higher than the other. From memory I don't recall what the SW7 and S12 were like. I think I would have noticed this yet who knows.

I don't feel trying the bend the frame is the answer. I think I might remove the two frame tabs and file the coupler mounts flat where the metal horn hook snap on cover fits then drill through then glue a plastic block behind the pilots so each end is level then secure the frame through the coupler and frame into a tapped plastic pad behind each pilot , glued to the back of the pilot and the area above the frame ends. If I need to I can shim it just enough to the shell sits level with the frame. I'm not real concerned with the open area under the coupler yet I could cut the frame pads back just enough the clear the filler under the open pilot bottom.

Has anyone noticed how the old blue box SW7 frames don't sit level with the shell? I know before I used undec shells and always glued the cab in place. It's been a long time since I had an SW7 or S-12 yet I noticed Athearn didn't trim away the flash on the frames and on these I have now the frame tab on one SW7 and one S-12 pushed out the shell cast fuel tank slot on one side because of the extra flash on one side. I glued that back yet don't feel that's the answer.

I did the coupler pad file and glue in shell pad on a SD40-2 and Railpower GP-35 and Model power E7 and all worked out fine and are level. The SW7 should work out the same way.
 
OMG,
Where ignorance is bliss, 'Tis folly to be wise. Thomas Gray

I was was fat dumb and happy until I saw this post by Blues909.
I checked my mini fleet of SW7's, three cows and a calf and found my frames were bent!

Now I did straighten a MDC steam loco frame which was arched much worse, so I will attempt a repair on a spare frame.
I used a fixture which applied limited pressure to the frame and heated with a propane torch from a distance of 6-8 inches.
My frame was designed to stop pressure after a few fractions of inch movement.
You do not want to try bending zinc by hand, lest it snaps in two like a cookie!
Flash of course has to be removed.
Athearn SW7 frame.JPG
 
OMG,
Where ignorance is bliss, 'Tis folly to be wise. Thomas Gray

I was was fat dumb and happy until I saw this post by Blues909.
I checked my mini fleet of SW7's, three cows and a calf and found my frames were bent!

Now I did straighten a MDC steam loco frame which was arched much worse, so I will attempt a repair on a spare frame.
I used a fixture which applied limited pressure to the frame and heated with a propane torch from a distance of 6-8 inches.
My frame was designed to stop pressure after a few fractions of inch movement.
You do not want to try bending zinc by hand, lest it snaps in two like a cookie!
Flash of course has to be removed.
View attachment 46738

That's the same amount I found the three frames I have judging by your photo. I also did a MDC stream . I used straight steel 1/4" x 1/4" bar and a few small C -clamps and slowly tightened till straight yet it sprung right back it was a 2-8-0 . I did the same then placed it in an old toaster over and it then came out straight . The MDC was a thicker frame , these frames and much thinner and different. I think if one placed a steel bar across the top of the truck openings which are flat and used small C-clamps under the coupler pads and a little controlled heat they might straighten out , or maybe closer to the fuel tank since there is not much distance between the truck mount and coupler pads so maybe the area top of frame at the ends of the tank . Maybe a heat gun , I noticed one side of these SW7 frames at least on one has more bow on one side so it also has a slight twist. I removed all the flash hoping that was the issue It was not yet still needs to be removed.

You notice the frame at the cab end is thinner or rather less metal overall and from the front opposite the cab a straight edge is level to the very end of the tank from the front of the frame where the lamp holder would be , What needs to be moved up is the area from front of tank to the cab end coupler pad . If one placed something under just where the bottom of the frame cab end clears the taper up of the pad to the frame then fit a flat metal piece inside the tank allowing for the difference between them about 3/8" meaning the bottom of the tank is 3/8" lower and added a bit over what the warp down is the difference measured of the gap with the straight edge plus a bit clamp heat and maybe I will work.

Short of trying to straighten the frame I felt for me it might be better to file the coupler pads and fit plastic styrene blocks behind the pilots then remove the lips that face down on the pads to secure the metal factory clips , drill a clearance hole for 2-56 through the pad then tap the plastic block , I also realized the top part of the frames pads touch the shell at each end so the pads need to be thinned enough to allow enough plastic block to drill and tap. Then just remove the tabs that secure the shell at the tank. This is if the frame will not yield to straightening.

I've had SW7 and S-12's years ago yet I would have noticed the difference or gap between the shell and frame . Mine were from the mid to late 80's they have the same frame number. It may have been pulling frames out of the mold before they cooled . The ones I have all are the late motor and brass flywheels one had cast flywheels and the late motor. It's possible I didn't notice the warp years ago yet I tend to notice things that are not sitting correct .
 
I filed off all the flash and there was a lot of it. I also filed the bottom of the coupler pads flat where the stock metal clip is used for horn hook couplers. There was a bit of a bump on each side top of the frame just ahead of the cab side so I filed that away. Then made a jig out of aluminum 1/4" aluminum bar then placed a aluminum U channel just ahead of the rear cab end round bolster that was just above 3/8" tall then clamped the frame at the center inside of the fuel tank so the frame has a slight up bow than used a weller 120 watt soldering iron set the tip right on the area on top or the frames fuel tank and let it get real hot so I could not come close to touching the frame anywhere. I did this twice the soldering iron reaches 900 degrees F didn't melt the frame as I tested it on a fuel tank I cut of decades ago. It's cooling now so once it's cool I'll see if the frame stays straight , hopefully it will. I'm still going to remove the fuel tank tabs and secure styrene blocks by the pilots and drill through the frame and tap the blocks and secure it to the shell that way . I don't like the fuel tank mounting deal at all. I made certain the up bow it the frame was more than the down bow it had in an attempt to get the frame straight.
 
Below is the setup forcing the frame at the cab end into a bow up, clamped the frame down inside the tank , placed an aluminum U channel just over 3/8" , after clamping to see a slight up bow I added the 120 watt iron to heat the frame the iron reaches 900 degrees and let it heat so the entire frame from the sides of the tank to the right was real hot and let it cool by unplugging the iron. Before I did anything I removed all the flash and filed off the coupler pad pin and lips for the old metal push one horn hook deals shown in the next photo.

20200418_175537.jpg
20200418_204122.jpg

20200418_204224.jpg

The straight frame


20200418_204245.jpg

Since the area facing the bottom of this photo at the coupler touches the bottom of the shell and I'm filing off the two fuel tank frame tabs I need to remove above half of the coupler pad up to where you see the factory notch at the cab end the notch is not at the front end yet I need to cut that notch a bit deeper and add the same on the other end file flat which then gives me room to glue a thick enough styrene block under each pilot and tap it 2-56 then coupler mount. If I just use the area that is already thinned down the couplers will stick out to far because that end is even with the outside of the pilots . I'll need to see if #5 kadee fits and goes in enough or perhaps a shorter kadee I have different ones that might fit without removing more. It's a test fit once I remove the frame tabs on the fuel tank. Once I do there is no going back ,well I can add tabs yet I feel they are a royal pain to remove the shell , I prefer screw mount keeping the metal pads just like one would do on an early SD40-2 and many other Athearn BB diesels.
 

Attachments

  • 20200418_204108.jpg
    20200418_204108.jpg
    158.7 KB · Views: 142
It's finished other than a bit of painting fine details.
20200421_151741 (1).jpg

Here's the bottom with the coupler mounting #5 kadee. I didn't take photo's of the actual mounting of the body coupler plastic pads of the filing I needed to do to have room for the pads. I used .080" thick styrene X 7/32" wide x 3/16" long and removed an .080" deep x 3/16" long are from the top of the coupler frame pads to allow for the pads and tapped the holes for 2-56 screws tapped them before gluing them in under the pilots since tapping after doesn't work well IMHO unless the pads are much thicker. I have a 2-56 bottom tap yet it's still easier to tap before as long as you make certain the pads are centered. Now it's level and the couplers are secure as is the shell without those fuel tank tabs on the frame. 2 screws and the shell comes off. I used the frame from a bb Athearn SW7 that I got from a member Dennis461 that I ruined the day by bringing up the bent frames and the shell as well . Once the dummy frame was finished I transferred the drive over from another frame a drive that is 1 of two I made from motors I had and power trucks with the later inside axle bearings , It's all fine tuned and lubed , both are. One will be for a Athearn blue box S-12 shell that I'm going to make the proper hood width someday. Both are the late Athearn bb gold motors one has brass flywheels the one I used in the SW7 has the cast flywheels.

20200421_151719 (1).jpg


A closer look.

20200421_151644 (1).jpg


Roof view

20200421_153939.jpg

Side view , got the handrails on and the horn and bell , Painted the handrails and made sure they are straight . Used super glue to secure them . If I can find the white of even yellow I'll paint the lower handrails and the step edges.
 
Last edited:
Nice kit bashing of a locomotive. Please post some photos when you are finished painting the details.

Greg
I will once I get some white paint.

Decades ago when I had 5 of these SW7's I started with an undec shell because they were plenty of them. I used to trim off the nubs on the shell for the handrails and stanctions . Most real SW7's had three stanctions on the pilot ends and one across the bottom just above the walkway . I'd plug the two holes and add a third in the center and use thinner brass wire. I still used Athearn stanctions . I never noted the frames had a bow and never used the metal coupler clips. The frame I removed was didn't have a bow yet the dummy frame I used did yet the fuel tank tab on one side of that frame had flash and in so when the shell was snapped on the one notch in the air tank on that side was punched out. I tried to repair it with liquid cement cleaned off the flash and it still didn't fit right . I never ran across this before on any SW7's or S-12's . I guess some Athearn employee's were more attentive. Just like some of the first runs of the SD40-2 and GP38-2 and ever later runs had real heavy black coatings on the frames, some didn't . There is no way of telling what year each one was built. Yet for the money they were pretty good once they had the correct hood widths . I found the SW7 does have the proper 7' wide hood the S-12 is a different story. The frames were never painted on these. That frame is made for the SW7 because it has the taper at the rear , the S-12 must have come along later yet shared the same frame. I've even found the 4 pins on their old trainmaster some were really heavy painted frames and the pins had flash which spread the shell holes and split some . I have one like this the other 5 have a thin coating and the pins don't have flash. The GP38-2 are real easy to convert to coupler mount in a different way . You remove the frame pads drill the frame in 4 corners , glue a styrene bar across the inside of the shell drill and tap these then add thick styrene pads behind the pilots so they rest on the two cross bars and once done it's just as strong and frame mounting and remove the 4 shell push into frame clips which make it a pain to remove the shell . I did this with the tunnel port athearns as well to secure the frame to shell just didn't remove the frame coupler pads , they were a mix of pin mount like the old SD40-2 yet without the long porches it was easy to add the cross bar's and secure the frame with 4 counter sunk brass screws like the gP38-2.


Back
Top