Narrow Gauge rolling stock 3D printing.


I have the idea it's possible to "spoof" an inkjet printer (the ink tank type, or one which uses refillable cartridges), into printing solid white ink while the printer-and-software combination actually thinks it's printing solid black ink in grey-scale printing mode. I was contemplating this a while back, and did some research, but I can't remember what I came up with because in larger volumes, ink-pad printing seemed like the better alternative for big fleets of cars. Or for printing "runs" of cars as might a manufacturer.

The big issue with white ink is keeping the ink head clean, but it's certainly possible with special white-inkjet printers and their inks. I WOULDN'T want to try it using that expensive Epson, but if you have an old small printer lying around you might try it. Maybe using something as simple as the classic "white out" typing ink (thinned way down, of course). Or maybe ink pad printer inks.

Or just stick with the dry-transfers.
 
I'll give the yellow and black printing a try. The Army boxcars were stenciled black on the OD. Geeze those were ugly! Apparently they were originally made for export to South America but got diverted to Alaska. As to the large collection of vehicles, Microscale does make suitable decals and I'll look at some of the decals for other narrow gauge roads which except for the heralds would be useable.
 
The passenger cars are currently Hunter Green with yellow lettering so have some "Valley-Joe" acrylic en route. Of course really hard to say what the exact color was in the 1940's. I did find the note on the color of the ARMY boxcars, a fortunate find. All a moot point for the moment till i get more resin for printing. WP&YR had some interesting combines and baggage cars with cupolas on top! Being where there were, they built and re built much of their own rolling stock.
 
I found this on another website you might be interested in.

"If you're talking about military rolling stock that was used in the US, here it is for July 1945:

US Navy had
about 80 helium tank cars, 8 regular tank cars, 78 depressed center flats, 107 hoppers, 1400 boxcars

War Department had
4000 tank cars, 16 calcium carbide cars

The above were freight cars. There were also 100 hospital cars, 800 troop kitchens, 40 hospital kitchen and 2400 troop sleepers owned by the War Department but operated by Pullman.

If you're thinking of doing military trains in the US, all the Army equipment was transported on railroad-owned cars. Personnel were transported in the above cars plus other cars leased from Pullman"
 
Thanks for the info. I am of course doing Narrow Gauge as applied in Alaska and Yukon. The Army in this case had several locomotives built by Baldwin and obtained rolling stock from Colorado and Hawaii (and maybe EBT). This in addition to the equipment on premises which the Army leased for the duration.
 
There are various drawings of WP&Y rolling stock available, though often the dimensions are usually illegible. One factor seems to be that the WP shops were continual modifiers and builders so getting anything pinned down to a particular date is quite unlikely!

Though not era appropriate, I did see that someone has made a conversion of a 6 axel Diesel to HON3 and printed an appropriate upper body, would love to do this, but quite a project for some future time.

I have designed a couple of combine-baggage cars and a passenger car so may print a total of four of five but still need to get the trucks. MRGS has some, anybody know how well the work? I do have detailed dimensioned drawings of the WP pax tucks, so I could make my own, though I'd probably go with commercial wheels and axels.
 
Caboose and Gondola. The "White Pass" on the caboose is done via a stencil I made.

Caboose Gondola.jpg
 
Impressive, sir, and particularly that you used a stencil. Not easy. and it turned out very well. As a Rio Grande fan, I do appreciate the use of the speed lettering too, and at the moment I can't say which road actually pioneered it. If I could find my copy of the softcover book about the WPY I might know for sure. But either way, I'ma likin' it.

I also like the splintered glass on the right cupola window too. Two on the same caboose?

I do suggest you tighten up the tension rods underneath to remove the sag, and sharpen the changes to the angled ends more sharply as with your gondola on the right side of this pic. Two pairs of needle nose pliers, or even two tweezers held in both hands, working against one another should do it.

The other thing would be adjust the coupler height and droop at the right end of the caboose. "She be running a bit low in the water," and that low hose might snag up on a turnout. Other'n that, she looks just great. Your rear-end crew should be pleased...as long as the stove is heating up some beans. And maybe a steak or two.

Re the trucks on the gondola: Did you buy them or did you print them yourself? They are pretty much the same color as the carbody is why I ask.
 
At the moment I am making rolling stock, I do not have an operable layout to run stuff on, none of the cars are complete, tuned, weathered etc. It's a learning process. Assembling the Kadee 714 couplers is a bit of a task for my fat fingers and the insertion of the wires sometimes problematical, I've broken a couple!

Somewhere I found railroad fonts on the net and there is one called "Whitespeed" which is what WP&Y used mostly, though there is a version which I hand designed that uses a wider W at the start. This was often found on loco tenders. I can type this font right into my stencil design program and then cut them on my "Cameo" machine. There are several ways to do this: use the stencil as a mask and paint through it; apply the base color and apply the letters over it, adding the final color coat and removing the letters; or use them as press applies. WP&Y at various times used a version of "Railroad Roman" numbering, which one can see on the loaded flatcars in Skagway. These are more problematic in very small sizes as they have very thin sections.

I have not as yet weathered any of the trucks, the gondola trucks are a Microscale Bettendorf.
 
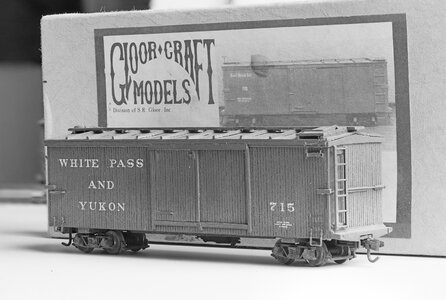
I originally built this mythical railroad boxcar (East Bottom Top) and was able to get WP&Y decals back in the dat, some 35 years ago. It's a Gloorcraft wooden kit and a delightful little project. Wood is fun to work with. A little damage, later needs to be replaced and the sill at the far end has disappeared. No worries, easy enough to make replacements. I used this one as a guide to create print files for a couple of my own.
 

Attachments

  • Boxcar Gloorcraft.jpg
    Boxcar Gloorcraft.jpg
    925.1 KB · Views: 53
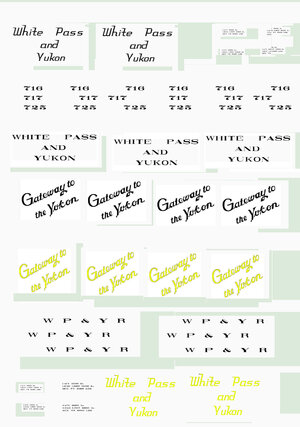
WP&Y used a lot of Colorado and Southern Boxcars, which I have also recreated. I made a file to attempt to print some boxcar lettering. I did find a number of photos showing these in yellow lettering, which is doable as opposed to white in home printed decals. I also found some photos of the C&S style boxcars which appear to be (maybe) in OD. An individual boxcar often has gone through several paint jobs and markings. The color in old photos is so bad as to not be able to determine the exact color.

Decal experiments depending on obtaining some new printer cartridges. The timing was impeccable! This was one of the early sheets I was working up.
 

Attachments

  • WP DECAL SHEET small.jpg
    WP DECAL SHEET small.jpg
    560.5 KB · Views: 39
boxcar yellow lettering.jpg
The local Office Max had the appropriate cartridge for my small PIXMA printer and I printed off two decal sheets. ZO... We shall see how well they work. No way of telling whether or not WP&Y always used yellow lettering (or black) or mostly white. The available color photos tend to show a lot of yellow lettering. Certainly black and yellow does have prototypical evidence. Yellow lettering in typical panchromatic photography with a yellow (typical) filter would look quite white. Photoshop has proven quite useful for creating or re creating such graphics. That "Whitespeed" and RR Roman are available as fonts, though the WP tank car numbering seems to be more like USN Stencil.

I saw some 3D printed narrow gauge pax cars on shapeways, body and floor sold separately. The asking price less shipping was right up there with a Blackstone RTR version after you add trucks, couplers and decals.

The above is apparently one of the C&S Boxcars.
 
I originally built this mythical railroad boxcar (East Bottom Top) and was able to get WP&Y decals back in the dat, some 35 years ago. It's a Gloorcraft wooden kit and a delightful little project. Wood is fun to work with. A little damage, later needs to be replaced and the sill at the far end has disappeared. No worries, easy enough to make replacements. I used this one as a guide to create print files for a couple of my own.
Geez...I built at least one of those Gloor Craft kits myself (standard gauge tho). Used Android cement to put it together. It had what was basically a piece of scribed wood for doors...and I almost want to say "Z" angle wood for top slides? Ala "Campbell Scale Models," as used with so many of their structure kits.

You might find one of those C&S boxcars on the "Georgetown Loop Railroad" Georgetown to Silver Plume line even today. I know they run at least one Shay, and since part of the original C&S narrow gauge was RIGHT THERE, I'd be somewhat surprised if they didn't have one.
 
Last edited:
I haven’t seen Ambroid cement in decades. In the early 60 s I built a Battleship kit 1:192 from wood. The Ambroid has held up perfectly over all those decades.

Decals not adhering as well as I would like. I’m sure I’ll get it worked out, eventually ….
 
"Android cement...". LOL! Yeah, I WAS tired when I typed that last night.

White tube, orange, blue and/or maybe black lettering...and I'd be surprised if there isn't a rolled up/dried up tube of AMBroid cement in one of these old boxes of hobby stuff and other stuff I'm slowly digging through.
It's something of an archeology dig. I can chart my changing interests and (hopefully) improving skills just by examining the layers....

I will not be taking core samples though. Just in case there's something interesting down there.
 
The spel Chequer is notorious for changing words. Last night I had thoughts of printing new pockets for the Kadee 714. Possibly a small piece of foam might replace the springs? I saw an example of this but mine would be to back up whatever printed style my car had included.
 
An unusual day. I am today able to visit a real hobby shop. So we shall see what is available. Certainly some decal solutions and paint, perhaps some styrene and CA.
 
Back home after being gone for a week visiting. Did make it to the hobby shop and picked up some paints, thinner, styrene and decal solutions. In the meantime back at the ranch, my PO box filled with some items I ordered. Perhaps I am a little disappointed in the MRGC HON3 passenger trucks for having plastic wheels. We shall see how these work.... Back in the day I had some brass ones, which have long since disappeared. This was from the era of lost wax castings for low volume items.

Cheers: Tom
 
3D printing is witches art, still. I have moved to a new resin, an aqua gray 8K, which has potential, but I have to work with the settings for optimal results. A major issue is placing of supports such that sufficient support is provided in printing, removal can be made without damage and there are no adhesions of support stalks to the model. Either a new resin or new printer has an adjustment period. As experiment printing a revised gondola and several Dodge Command Cars as seen on flatcars in Skagway. So... working out kinks! Currently not having good luck with the decals.

Cheers: Tom


Back
Top